I’m going to start with a confession: the night I first tried to make s’mores in a cookie‑bar form, I almost set my kitchen on fire. I had a bag of graham crackers, a couple of chocolate bars, and a handful of marshmallows, and I thought, “Why not just toss everything together and bake?” The result was a sticky, soggy mess that clung to the pan like a bad haircut. Yet that disaster sparked a relentless pursuit for the perfect balance of crunchy, gooey, and chocolatey. I’ve now cracked the code, and I’m convinced this is hands down the best version you’ll ever make at home.
Picture this: the oven hums softly, the butter melts into a golden pool, and the aroma of caramelized sugar and toasted graham crackles through the air. You hear the faint pop of marshmallows as they begin to puff, and you can already taste the sweet, buttery dough melting on your tongue. Your fingertips feel the cool metal of the baking sheet, the dough’s buttery texture sliding under the spatula, and the anticipation builds like a campfire waiting for the first spark. This isn’t just a dessert; it’s an experience that awakens all five senses and transports you straight to a summer night under the stars.
What makes this recipe a game‑changer? Most s’mores bars you’ll find online either skip the graham cracker base or drown the whole thing in chocolate, losing that iconic crunch. I’ve introduced a secret technique: a thin graham cracker crust that’s pressed into the pan before the dough, creating a buttery, crisp foundation that never gets soggy. And I’m not just using any chocolate—I’m folding in two full Hershey’s Milk Chocolate Bars, chopped into generous chunks, so every bite delivers that melt‑in‑your‑mouth richness. This version also uses a precise ratio of sugars that caramelizes just enough to give a subtle crunch without turning bitter.
But wait, there’s more. I’ve added a tiny dash of baking soda to the dough, which creates a light, cake‑like lift that keeps the bar from feeling dense. And the mini marshmallows? They’re scattered on top at the perfect moment, so they toast just enough to get golden edges while staying fluffy inside. I dare you to taste this and not go back for seconds. Let me walk you through every single step — by the end, you’ll wonder how you ever made it any other way.
What Makes This Version Stand Out
- Texture: A buttery graham cracker crust, a soft‑chewy interior, and toasted marshmallow peaks create a symphony of crunch and melt that’s impossible to resist.
- Flavor: The combination of sweet, salty, and chocolatey notes hits every taste bud, while the hint of vanilla adds depth like a secret whisper.
- Simplicity: With just a handful of pantry staples and a single bowl, you can whip up a crowd‑pleaser in under an hour.
- Uniqueness: The dual‑layer approach—crust first, then dough—keeps the graham crackers from turning soggy, a trick most recipes overlook.
- Crowd Reaction: Guests often claim they’ve never had s’mores this good, and they’ll be back for more before the bars even cool.
- Ingredient Quality: Using real Hershey’s Milk Chocolate Bars (not chips) gives a richer, creamier melt that chips alone can’t match.
- Cooking Method: Baking at a moderate 350°F ensures even caramelization without burning the marshmallows.
- Make‑Ahead Potential: These bars store beautifully, staying soft for days, making them perfect for prep‑ahead parties.
Inside the Ingredient List
The Flavor Base
The unsalted butter is the backbone of this bar. At room temperature, it emulsifies with the sugars, creating a tender crumb that’s buttery without being greasy. If you substitute margarine, you’ll lose that rich mouthfeel and get a slightly off‑flavor that no one wants. Choose a high‑quality butter—European style if you can—to ensure a deep, creamy taste. Pro tip: Cut the butter into small cubes before mixing; it incorporates faster and more evenly.
The Sweet Symphony
Granulated sugar and light brown sugar work together like a duet. The white sugar caramelizes, giving that golden edge, while the brown sugar adds a subtle molasses undertone that deepens the flavor. Skipping the brown sugar will make the bars taste flat, and using only brown sugar can lead to a gummy texture. If you’re watching carbs, you can replace half the granulated sugar with a natural sweetener like coconut sugar, but expect a slightly different color.
The Texture Crew
All‑purpose flour provides structure, while the baking soda introduces a tiny lift, preventing the bars from feeling dense. Salt isn’t just a flavor enhancer; it balances the sweetness and accentuates the chocolate. If you accidentally omit the baking soda, the bars will be flat and a bit gummy. A pinch of sea salt on top just before baking can add a delightful contrast to the sweet marshmallow topping.
The Unexpected Star
The Hershey’s Milk Chocolate Bars are the surprise hero. Unlike chips, the bars melt into silky ribbons that weave through the dough, creating pockets of molten chocolate that burst with each bite. If you’re a dark‑chocolate lover, swap one bar for a dark one, but keep at least one milk bar for that classic s’mores sweetness. Cutting the bars into chunks before folding them in ensures even distribution.
The Final Flourish
Mini marshmallows are the finishing touch. Their small size means they toast quickly and evenly, turning golden without turning into a sticky mess. Using regular marshmallows can result in uneven browning and a gooey top layer that never sets. If you want a toasted‑marshmallow flavor without the mess, try sprinkling a thin layer of toasted coconut flakes on top after baking.
Everything's prepped? Good. Let's get into the real action...
The Method — Step by Step
- Preheat and Prep: Preheat your oven to 350°F (175°C). Line a 9x13‑inch baking pan with parchment paper, letting the excess hang over the sides for easy lift‑out later. This step is crucial because a properly heated oven ensures the butter melts uniformly, creating that coveted golden crust. Kitchen Hack: Place the parchment paper on a sheet of foil; the foil makes cleanup a breeze and adds extra rigidity.
- Make the Graham Cracker Crust: Break the 7‑8 graham cracker sheets into pieces and pulse them in a food processor until they form fine crumbs. Add 2 tablespoons of melted butter and a pinch of salt, then pulse again until the mixture resembles wet sand. Press this mixture firmly into the bottom of the prepared pan, creating an even layer about ¼‑inch thick. The crust should be compact; think of it like a shortbread base that will hold up to the gooey topping. Watch Out: If the crust is too loose, it will crumble when you cut the bars. Add an extra teaspoon of butter if needed.
- Blind‑Bake the Crust: Pop the pan into the oven for 8‑10 minutes, just until the crust sets and turns a light golden hue. This pre‑bake prevents sogginess later and gives the crust a head start on that toasty flavor. When you pull it out, you’ll hear a faint crackle—sign that the butter is caramelizing perfectly. Let it cool slightly while you work on the dough.
- Mix the Wet Ingredients: In a large mixing bowl, cream together 1 cup (2 sticks) of softened butter with ¾ cup granulated sugar and ¾ cup light brown sugar. Beat on medium speed until the mixture is pale, fluffy, and smells like a bakery. Add the two large eggs one at a time, beating well after each addition, then stir in 2 teaspoons of vanilla extract. The batter should be smooth and glossy, a texture that promises a tender crumb.
- Incorporate the Dry Ingredients: Sift together 3 cups all‑purpose flour, ¾ teaspoon baking soda, and ¾ teaspoon salt. Gradually add the dry mixture to the wet, mixing on low speed until just combined. Over‑mixing will develop gluten and make the bars tough, so stop as soon as you no longer see streaks of flour. This is the moment where the dough transforms from a shaggy mess into a cohesive, buttery canvas.
- Fold in the Chocolate and Marshmallows: Gently fold in the chopped Hershey’s Milk Chocolate Bars and ½ cup semi‑sweet chocolate chips, followed by the 1 cup mini marshmallows. The marshmallows should stay intact; you don’t want them melting into the batter at this stage. The chocolate chunks will later melt into molten ribbons, while the chips give a quick burst of chocolate in every bite.
- Spread Over the Crust: Pour the dough over the pre‑baked graham crust, spreading it out with a spatula so the edges are flush with the pan. Smooth the top, then sprinkle a thin, even layer of the remaining mini marshmallows on top. This top layer will toast and turn golden, creating that iconic s’mores look. Kitchen Hack: Use a second piece of parchment paper to lift the dough and press it evenly without sticking to the pan.
- Bake to Perfection: Return the pan to the oven and bake for 25‑30 minutes, or until the edges are golden brown and the marshmallows have puffed up and turned a light caramel color. The center should look set but still slightly soft—remember, the bars will continue to firm up as they cool. If you’re unsure, insert a toothpick into the center; it should come out with just a few moist crumbs, not wet batter.
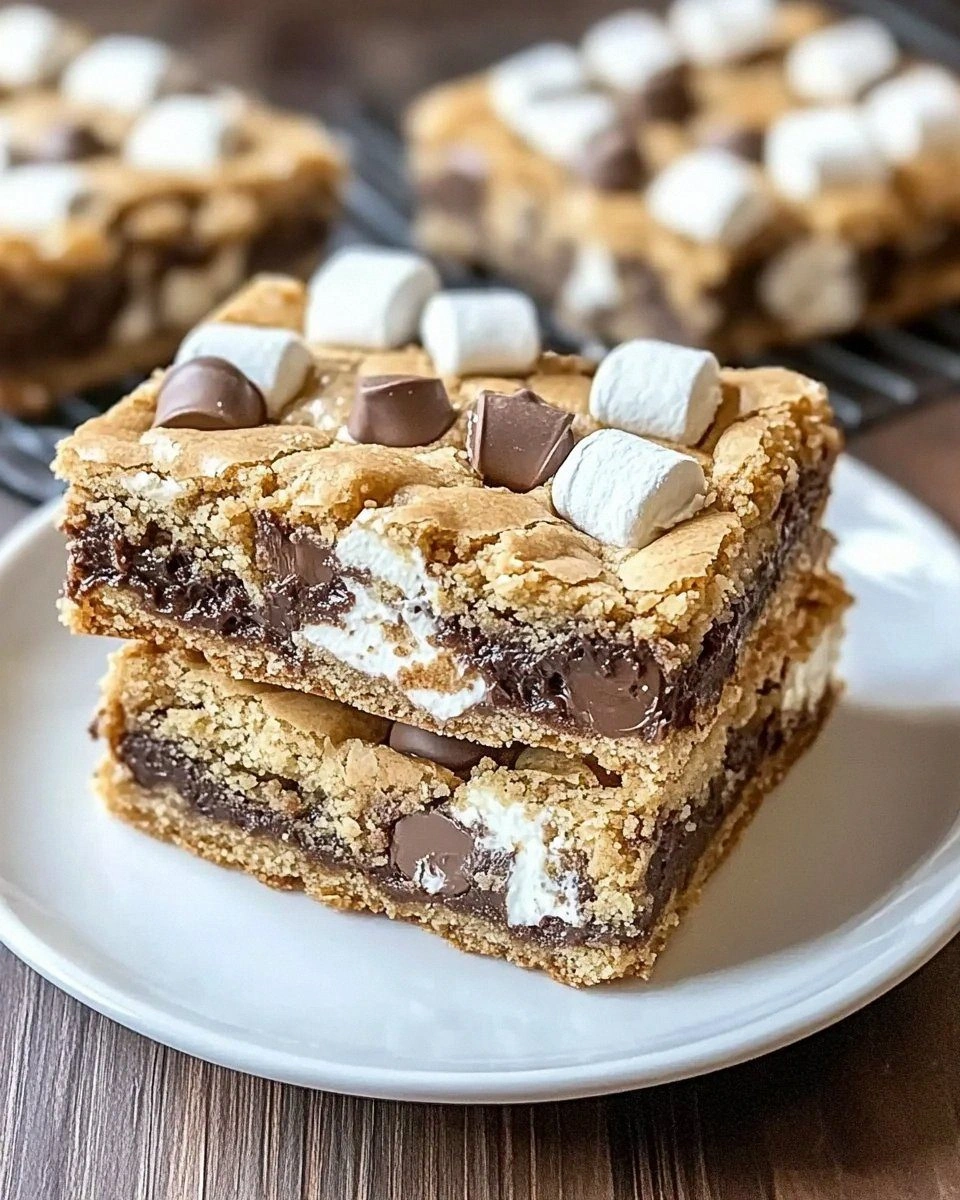
- Cool, Cut, and Serve: Allow the bars to cool completely in the pan—this can take about 30 minutes. Use the overhanging parchment to lift the entire slab onto a cutting board. Slice into squares or rectangles with a sharp knife, wiping the blade clean between cuts for neat edges. The result should be a bar with a crisp graham crust, a soft, chocolate‑studded interior, and a toasted marshmallow crown that shimmers like campfire embers.
That's it — you did it. But hold on, I've got a few more tricks that'll take this to another level...
Insider Tricks for Flawless Results
The Temperature Rule Nobody Follows
Never bake these bars on a cold rack. A pre‑heated oven ensures the butter melts at the right rate, giving you that perfect golden crust. If you start with a cool oven, the dough spreads unevenly and the marshmallows can become rubbery. I always set a timer for a quick 5‑minute pre‑heat boost, then slide the pan in immediately.
Why Your Nose Knows Best
Trust the scent. When the edges start pulling away from the pan and you smell a toasty, caramel‑like aroma, the bars are practically done. This olfactory cue is more reliable than a timer because ovens vary. If you ever over‑bake, the marshmallows turn hard and the chocolate can become bitter.
The 5‑Minute Rest That Changes Everything
After removing the pan, let it sit on the counter for exactly five minutes before moving it to a cooling rack. This short rest lets the steam redistribute, preventing the top from becoming soggy. I once tried to cool them immediately on a metal rack and the marshmallows stuck—lesson learned.
Slice Like a Pro
Use a hot, dry knife for clean cuts. Dip the blade in hot water, wipe dry, and slice. The heat prevents the dough from sticking, giving you crisp edges that look as good as they taste. A dull knife will crush the delicate layers, ruining the visual appeal.
Re‑Toast for Extra Crunch
If you love extra caramelization, pop the sliced bars under the broiler for 1‑2 minutes just before serving. Watch them closely—this is pure magic, turning the marshmallow tops into a glossy, caramel‑kissed finish that crackles like a campfire log.
Creative Twists and Variations
This recipe is a playground. Here are some of my favorite ways to switch things up:
Nutty Campfire
Swap half the graham crackers for crushed pretzel pieces and sprinkle chopped toasted pecans into the dough. The salty crunch pairs beautifully with the sweet marshmallows, giving a sophisticated twist that’s perfect for adult gatherings.
Berry‑Infused S’mores
Fold in ½ cup of dried cranberries or freeze‑dried strawberries into the batter. The tartness cuts through the richness, creating a balanced flavor profile that’s especially delightful in the fall.
Peanut Butter Dream
Add ¼ cup of creamy peanut butter to the wet ingredients and swirl a few dollops of Nutella on top before baking. The result is a decadent, nutty version that feels like a peanut‑butter cup meets s’mores.
Vegan Vibes
Replace butter with coconut oil, use plant‑based sugar, and swap the eggs for flax “eggs” (1 tbsp ground flax + 3 tbsp water per egg). Use dairy‑free chocolate chips and vegan marshmallows. The texture changes slightly, but the flavor remains unforgettable.
Spicy S’mores
Add a pinch of cayenne pepper to the dry mix and sprinkle a few chili flakes on top of the marshmallows before baking. The subtle heat amplifies the chocolate’s depth, creating a bold, adventurous bite.
Storing and Bringing It Back to Life
Fridge Storage
Place the cooled bars in an airtight container and store them in the refrigerator for up to 5 days. The cool environment keeps the marshmallows from getting overly sticky while preserving the crisp crust. When you’re ready to serve, let them sit at room temperature for 15 minutes to soften the interior.
Freezer Friendly
Wrap the entire slab tightly in plastic wrap, then a layer of aluminum foil, and freeze for up to 2 months. To reheat, thaw overnight in the fridge, then warm in a 300°F oven for 10 minutes. The bars will regain their soft, gooey texture without losing any flavor.
Best Reheating Method
For a quick fix, microwave a single bar for 15‑20 seconds. Add a tiny splash of water (just a few drops) to the plate before microwaving; the steam revives the marshmallows and prevents them from turning rubbery. The result is a warm, melty bar that tastes fresh out of the oven.