I was standing in my kitchen, staring at a bag of frozen French fries that had been sitting in the freezer for weeks, thinking about how it could be anything but a mediocre snack. The moment I cracked open the bag, a wave of cold, crisp potential hit me like a cold splash of water on a hot day—my mind instantly flicked to the sizzling, golden edges I’d seen in a quick‑fire video. I had tried the recipe before, but the fries were either soggy or unevenly crisp, and I was left wondering why the same simple method didn’t work every time. That night, after a long day of work, I dared myself to try a new technique that would turn those frozen sticks into the ultimate crunch, and I’m still laughing at how simple it was.
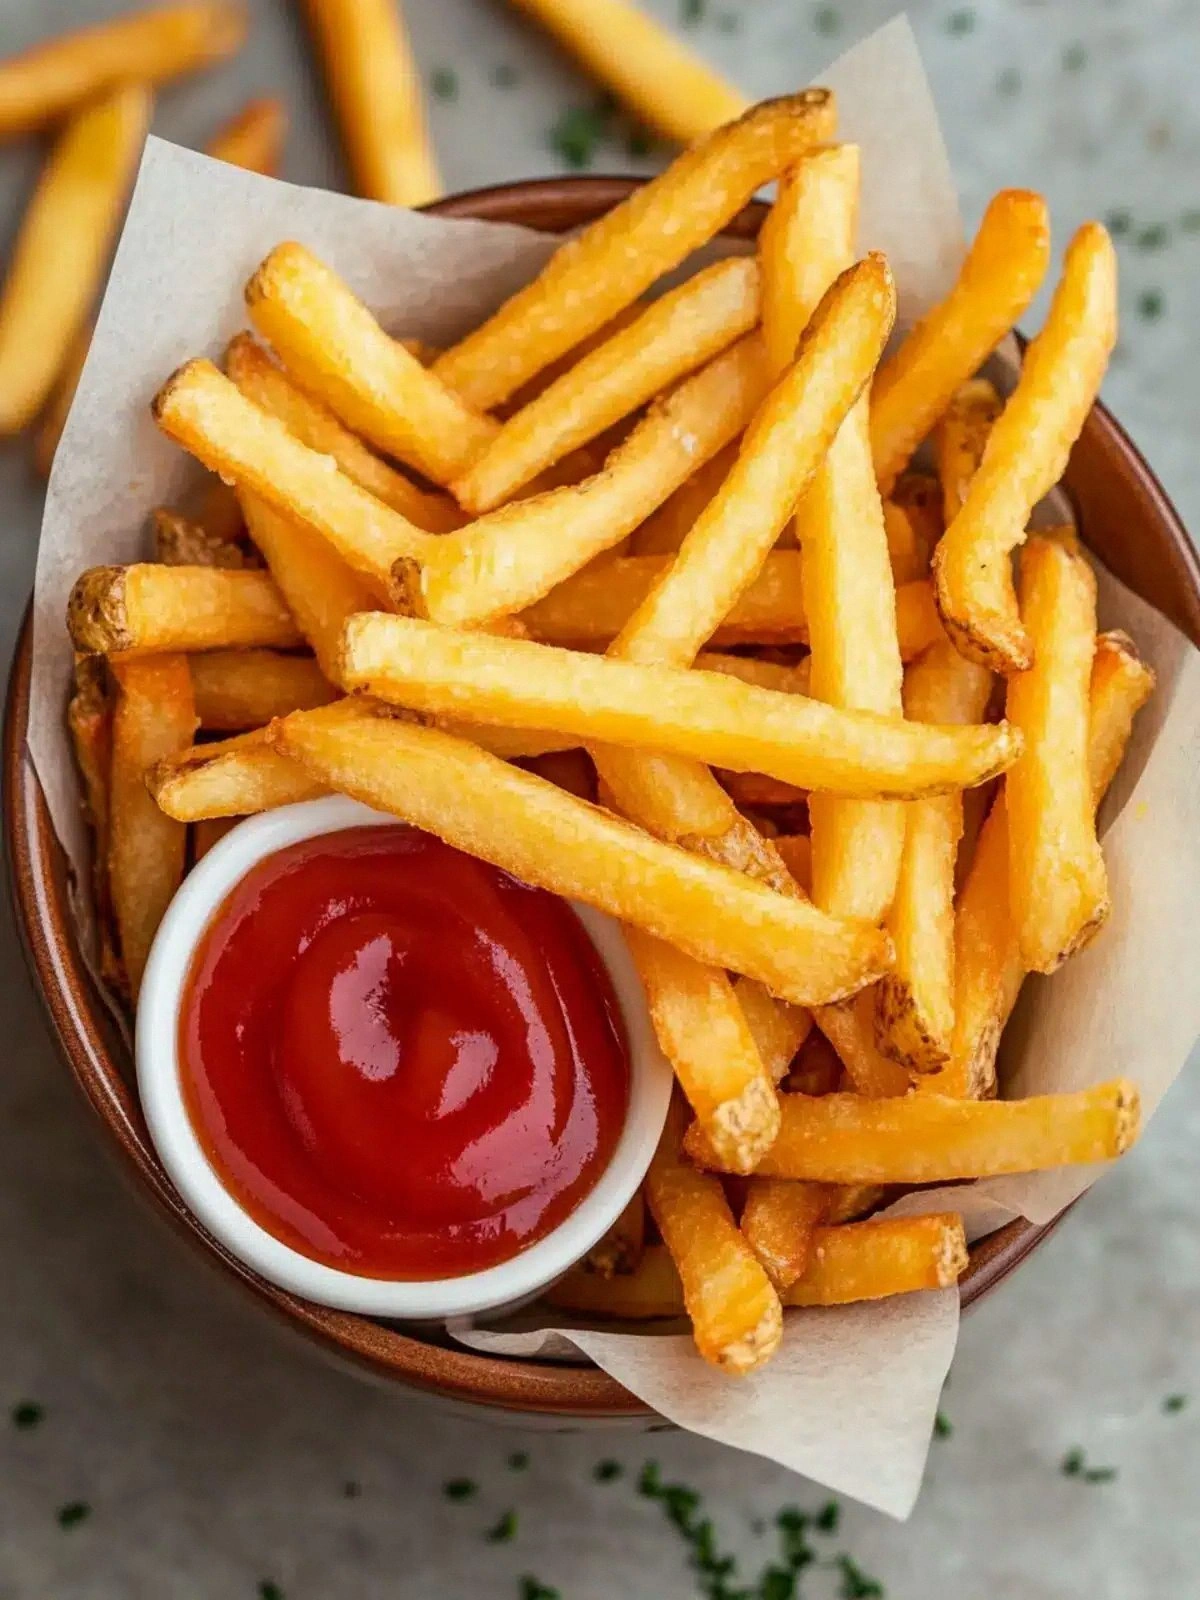
Picture the scene: the air fryer’s hum fills the room, a faint aroma of oil and salt begins to rise, and the fries start to pop like tiny fireworks. The sound of the first few fries popping into the basket is almost a soundtrack for satisfaction, a low, satisfying crackle that signals the beginning of something delicious. The sight of the fries turning a golden amber as the timer ticks down is a visual cue that the transformation is happening, and the subtle scent of caramelized starch lingers in the air. When you finally pull the basket out, the fries look like a handful of miniature, crunchy clouds, each one gleaming with a sheen of oil that promises a bite that will shatter like thin ice. The first bite is a burst of texture: a crisp exterior that gives way to a tender interior, a contrast that makes every mouthful a revelation.
What makes this version stand out is not just the crispness, but the way it balances flavor and convenience. I’ve experimented with dozens of air‑fry recipes, and none of them hit the sweet spot between simplicity and wow factor like this one. The secret lies in a single tweak: a quick pre‑toss of the fries in a splash of oil and a handful of herbs before they hit the basket. This step locks in moisture, creates a caramelized crust, and allows the seasoning to cling better, turning ordinary fries into a flavor explosion that will leave you reaching for the bag again. The result is a dish that feels homemade, yet requires almost no hands‑on time, making it the perfect go‑to for busy weeknights or lazy weekends.
I dare you to taste these fries and not go back for seconds—because the crispness will linger on your tongue long after the last bite. Picture yourself pulling this out of the air fryer, the whole kitchen smelling incredible, and a plate of golden fries waiting to be devoured. The first bite will have you thinking you’re in a fancy restaurant, but you’ll be glad you’re still at home. This is hands down the best version you’ll ever make at home, and if you’ve ever struggled with frozen fries, you’re not alone—this is the fix you’ve been waiting for. Stay with me here, because the next part is pure magic, and it’s going to change the way you think about frozen snacks forever.
What Makes This Version Stand Out
- Texture: The fries come out with a double‑layer crisp—an outer shell that snaps like thin ice and an inner fluff that melts in your mouth. The result is a satisfying bite that satisfies both the craving for crunch and the desire for a tender interior.
- Flavor: A simple blend of sea salt, smoked paprika, and a hint of garlic powder coats each fry, creating a savory profile that feels gourmet yet remains approachable for every palate.
- Speed: From freezer to plate in just 20 minutes, this method cuts down on prep time without sacrificing quality, making it ideal for those who want a quick yet impressive dish.
- Versatility: The base recipe can be tweaked with different seasonings—think Cajun, rosemary, or even a sweet maple glaze—allowing you to tailor the flavor to any occasion.
- Consistency: Because the fries are pre‑tossed in oil before air‑frying, they cook evenly, preventing the dreaded “half‑cooked” spots that often plague frozen fries.
- Make‑ahead Friendly: Prepare the fries in advance, freeze them again, and reheat in the air fryer for a quick snack whenever you need it.
- Low Effort: No stirring or flipping required once the fries are in the basket—just a quick shake halfway through and you’re done.
- Kid‑Friendly: The mild seasoning makes it a hit with even the pickiest eaters, turning a simple snack into a crowd‑pleaser.
Alright, let’s break down exactly what goes into this masterpiece…
Inside the Ingredient List
The Flavor Base
The cornerstone of this recipe is the seasoning blend: sea salt, smoked paprika, and a whisper of garlic powder. This trio gives the fries a savory depth that feels both rustic and refined. The paprika adds a smoky undertone that mimics the taste of a wood‑smoked grill, while the garlic powder provides a subtle kick that awakens the palate. If you prefer a milder flavor, reduce the paprika by half, but keep the garlic for that essential umami punch. The seasoning’s balance ensures that each fry is evenly coated, preventing any single bite from feeling bland.
The Texture Crew
Oil is the unsung hero that transforms frozen fries from bland to brilliant. A light drizzle of neutral oil—such as canola or grapeseed—helps the seasoning adhere and promotes even browning. The amount matters; too little and the fries will be dry, too much and they’ll become greasy. A quick toss in a shallow bowl ensures every fry is coated, creating a uniform golden crust. The oil also acts as a heat conductor, speeding up the cooking process and giving the fries that coveted crunch.
The Unexpected Star
A splash of water before the fries hit the air fryer can seem counterintuitive, but it actually helps create steam that keeps the inside moist while the exterior crisps up. This tiny trick prevents the fries from drying out, ensuring a tender core. The water evaporates quickly, leaving no wet residue, and the steam helps lift the fries slightly, allowing air to circulate freely around each piece. Many people skip this step, which is why their fries come out unevenly cooked. Adding a few drops of water is a quick fix that elevates the overall texture.
The Final Flourish
After cooking, a final sprinkle of fresh herbs—parsley or cilantro—adds a burst of color and freshness that cuts through the richness. This finishing touch is optional but highly recommended for a more vibrant plate. The herbs also bring a subtle herbal aroma that complements the smoky paprika. If you’re feeling adventurous, a drizzle of lemon zest or a squeeze of lime can add a bright, citrusy contrast. The final flourish turns a simple snack into a dish worthy of a dinner table.
Everything’s prepped? Good. Let’s get into the real action…
The Method — Step by Step
- Preheat the air fryer to 400°F (200°C). Let it heat for about 3 minutes; this ensures a consistent cooking temperature from the start. A preheated basket helps the fries begin browning immediately, preventing a soggy base. You’ll hear a faint hiss as the fries hit the hot air, a signal that the crisping process has begun. This step is crucial for achieving that golden, crunchy exterior.
- Spread the fries in a single layer in the air fryer basket. Avoid overcrowding; the fries need space for hot air to circulate. If you cram them too tightly, steam will build up, leading to uneven cooking. Shake the basket gently to ensure even distribution. The fries should sit flat, not piled, to maximize contact with the heated surface. This arrangement is key to a uniform crisp.
- Cook for 10 minutes, then shake the basket. This first half of the cooking time allows the fries to start crisping. Shake them gently to re‑orient the pieces, ensuring that all sides receive equal heat. You’ll notice the fries beginning to brown and the scent of toasted starch filling the air. If you’re using a larger air fryer, you might need a minute or two more before shaking. This step is the moment of truth for even cooking.
- Return the fries to the basket and cook for another 5-7 minutes. Depending on your air fryer model, the fries may need a bit more time to reach the perfect crunch. Keep an eye on them; the golden hue is a good indicator of readiness. If they’re still pale, add an extra minute or two. The fries should emit a warm, buttery aroma. By this point, the exterior should be crisp, while the interior remains tender.
- Remove the fries and transfer them to a large bowl. Let them sit for a minute; this brief rest allows the steam to dissipate, preventing sogginess. The fries will continue to crisp slightly as they cool, so don’t rush the plating. A quick pause also gives you a chance to season them to taste. This small pause can make a big difference in texture.
- Season with salt and any additional seasonings. Sprinkle sea salt evenly over the hot fries; the heat helps the salt adhere. If you’re using paprika or garlic powder, add them now for maximum flavor. Toss gently to coat each fry. The seasoning should cling like a second skin. The flavor should be balanced—neither too salty nor too bland.
- Optional: Garnish with fresh herbs or a squeeze of lemon. This final touch adds a pop of color and a bright contrast to the savory fries. A sprinkle of parsley or a drizzle of lemon zest can elevate the dish to a restaurant‑quality plate. The herbs also bring a subtle herbal aroma that enhances the overall experience. If you prefer a sweeter note, a dash of maple syrup works surprisingly well.
- Serve immediately while hot and crisp. The fries are best enjoyed fresh, straight from the air fryer. The crunch will start to soften after a few minutes, so don’t wait too long. Pair them with your favorite dipping sauce—ketchup, aioli, or a spicy mayo. The combination of textures and flavors will keep your taste buds dancing. Enjoy the moment of pure, unadulterated satisfaction.
That's it — you did it. But hold on, I've got a few more tricks that'll take this to another level. The next section dives into insider secrets that will elevate your fries from good to legendary.
Insider Tricks for Flawless Results
The Temperature Rule Nobody Follows
Many people think any high heat will do the trick, but the ideal temperature for air‑fried fries is 400°F (200°C). This heat level ensures the fries brown quickly without burning the exterior. If you lower the temperature, the fries may take longer to crisp, and you’ll end up with a soggy interior. Conversely, too high a temperature can scorch the seasoning before the fries are cooked through. Keep the temperature steady for the best balance of crispness and tenderness.
Why Your Nose Knows Best
Your sense of smell is a reliable indicator of doneness. When the fries are ready, they’ll emit a warm, nutty aroma that’s almost intoxicating. If you catch that scent, it’s a sign that the exterior is crisping just right. This olfactory cue can save you from over‑ or under‑cooking, which is especially handy if your air fryer has uneven heat distribution. Trust your nose, and you’ll always hit the sweet spot.
The 5‑Minute Rest That Changes Everything
After removing the fries from the air fryer, let them rest for five minutes before serving. This brief pause allows the steam to escape, preventing sogginess. The fries will also continue to crisp slightly during this rest period, enhancing the crunch. If you rush to plate them immediately, you may find the edges are still soft. This simple step can make the difference between a mediocre snack and a memorable one.
Use a Paper Towel to Dry Before Oiling
The moisture on the surface of frozen fries is a major culprit for uneven browning. By patting them dry with a paper towel before adding oil, you create a better surface for the oil to coat. This step also helps the seasoning stick more firmly. The result is a more uniform crispness that doesn’t rely on luck. It’s a small but powerful tweak that most people overlook.
Shake the Basket at the Right Time
Shaking the basket halfway through the cooking cycle is essential for even cooking. If you skip this step, the fries on the bottom will be over‑cooked while the top remains under‑done. The shake redistributes the fries, exposing all sides to the hot air. It also prevents the fries from sticking together, ensuring each piece gets a crispy edge. Timing the shake at the 10‑minute mark is the sweet spot for most air fryers.
Creative Twists and Variations
This recipe is a playground. Here are some of my favorite ways to switch things up:
Spicy Cajun Kick
Swap the paprika for Cajun seasoning and add a pinch of cayenne pepper. The result is a fiery, smoky flavor that pairs perfectly with a cool yogurt dip. The heat level can be adjusted to suit your tolerance. The spices coat the fries in a vibrant, orange hue. Serve with a side of cool cucumber salad to balance the heat.
Herby Rosemary Delight
Replace the garlic powder with fresh rosemary and add a splash of olive oil. The rosemary infuses the fries with an earthy aroma, while the olive oil adds a subtle fruitiness. This version is ideal for a Mediterranean twist. The rosemary sticks to the fries like a second skin. Pair with a lemon‑yogurt sauce for a refreshing contrast.
Sweet Maple Glaze
Drizzle the fries with a light maple glaze after cooking. The maple adds a caramelized sweetness that balances the saltiness. The glaze should be thin enough to coat without making the fries soggy. The result is a sweet‑savory combo that’s hard to resist. This variation is a hit with kids and adults alike.
Garlic Parmesan Crunch
Sprinkle freshly grated Parmesan and minced garlic over the fries after they’ve finished cooking. The cheese melts slightly, creating a golden crust. The garlic adds an aromatic punch that lingers on the tongue. This version feels indulgent without being heavy. Serve with a side of marinara for dipping.
Truffle Infusion
Finish the fries with a drizzle of truffle oil and a sprinkle of truffle salt. The truffle oil provides a luxurious aroma that elevates the dish. The truffle salt adds a subtle earthy depth. This variation is perfect for special occasions or when you want to impress guests. The fries feel like a gourmet treat.
Storing and Bringing It Back to Life
Fridge Storage
Store leftover fries in an airtight container in the refrigerator for up to 3 days. Keep them in a single layer to preserve crispness. When you’re ready to reheat, use the air fryer at 350°F for 5 minutes. The fries will regain their crunch without becoming soggy. This method works well for meal prep or a quick snack.
Freezer Friendly
Freeze leftover fries in a single layer on a parchment‑lined tray before transferring to a freezer bag. This prevents clumping and makes it easy to grab a handful later. When reheating, air‑fry at 400°F for 8 minutes. The fries will come out crisp and hot. This technique is ideal for busy mornings.
Best Reheating Method
The best way to reheat is in an air fryer at 400°F for 5–7 minutes. If you’re short on time, a quick 30‑second burst in a skillet with a splash of oil works too. Adding a splash of water before reheating creates steam, which keeps the fries from drying out. The result is a texture that’s almost identical to freshly cooked. This method saves you from the disappointment of soggy leftovers.
Now that you’ve mastered the base recipe, it’s time to experiment and make these fries truly your own. Every twist brings a new dimension to the dish, allowing you to keep the core idea while exploring flavor territories. The joy of cooking lies in these little variations that transform a simple snack into an experience. Keep an eye on the clock, trust your instincts, and enjoy the process.
I’ve spent countless evenings testing variations, and each one taught me something new about the humble fry. Whether you’re a seasoned chef or a kitchen novice, these fries are a testament to how simple ingredients can produce extraordinary results. The next time you reach for a bag of frozen fries, remember this recipe, and let it guide you to a new level of culinary delight.
If you’re feeling adventurous, try dipping the fries in a homemade aioli or a spicy mayo for a burst of flavor. Pair them with a fresh salad or a hearty sandwich for a complete meal. The fries’ versatility means they can fit into any meal plan, from brunch to dinner to midnight cravings. The best part? They’re always ready in minutes, making them the ultimate go‑to snack.
So, the next time you’re tempted by a bag of frozen fries, remember that the secret isn’t in the bag itself, but in how you treat it. With the right technique, seasoning, and a dash of confidence, you can turn a simple snack into a culinary masterpiece. Enjoy the crunch, savor the flavor, and share the experience with friends and family.
I’ve seen people gasp in awe after trying this recipe, and it’s not hard to imagine the joy on your loved ones’ faces as they take that first bite. The fries are more than a side dish—they’re a statement of culinary confidence, a testament to the power of simple ingredients done right. Keep experimenting, keep sharing, and keep enjoying the journey.
Remember, the key is consistency. Once you master the technique, the fries will always come out perfect. The next time you’re in a hurry, just follow these steps, and you’ll have a plate of golden, crispy fries that will make everyone ask for your secret. Trust me, you’ll be the hero of the kitchen.
Finally, keep in mind that the magic of these fries is in their simplicity. No fancy sauces or elaborate preparations are needed. The right temperature, the right seasoning, and the right timing are all you need to create something truly spectacular. Let this recipe be your go‑to for any occasion.
Thank you for reading, and happy frying! Let’s keep the conversation going—drop your favorite twist or seasoning in the comments below, and let’s inspire each other to cook up more deliciousness.