I was halfway through a Halloween movie marathon when my roommate dared me to create a snack that would make the ghosts in the film jealous. I stared at a bag of mini creamer potatoes, imagined them as tiny skulls, and thought, “What if they could be crispy, cheesy, and downright terrifying?” The first attempt was a disaster—soggy potatoes that looked more like mushy pumpkins than menacing skulls. But after a few frantic YouTube tutorials, a splash of olive oil, and a sprinkle of herbs that smelled like a forest at midnight, I finally nailed it. The result? A batch of golden‑brown skull potatoes that crackle under your fork like a fresh autumn fire, and melt in your mouth like a cheesy nightmare.
Picture this: the kitchen lights dimmed, a low hum of a spooky soundtrack playing, and the oven door opening to reveal a tray of perfectly formed skulls, each one glistening with a buttery sheen. The scent of roasted garlic and rosemary wafts through the air, mingling with the faint sweetness of caramelized potatoes. You can hear the faint crackle as the edges turn crisp, and when you bite in, the first thing you notice is the satisfying crunch that shatters like thin ice, followed by a creamy, cheesy core that oozes like a secret potion. Your fingertips feel the heat of the tray, the potatoes still warm, and you can’t help but smile at the sheer joy of creating something both delicious and delightfully eerie.
Why does this version stand out from every other “spooky potato” recipe you’ve ever seen? Most recipes treat the potatoes like a bland side dish, coating them with generic spices and hoping for the best. I, on the other hand, treat each potato like a tiny work of art, sculpting it into a skull shape, seasoning it with a precise blend of herbs, and finishing it with a blanket of cheese that melts into a golden crown. The secret is a double‑cook method: a quick boil to soften the interior, followed by a high‑heat roast that creates that coveted crackly exterior. This technique ensures the potatoes stay fluffy inside while the outside becomes a crisp, caramelized armor.
And there’s a twist you won’t see coming: a dash of smoked paprika that adds a subtle, smoky depth, turning each bite into a flavor‑filled adventure that feels like a haunted forest walk. I dare you to taste this and not go back for seconds. Okay, ready for the game‑changer? Let me walk you through every single step — by the end, you’ll wonder how you ever made it any other way.
What Makes This Version Stand Out
- Texture: The double‑cook method creates a contrast between a melt‑in‑your‑mouth interior and a crackling, almost glass‑like exterior that shatters with each bite.
- Flavor: A balanced blend of rosemary, thyme, and smoked paprika gives an earthy, smoky backdrop that elevates the humble potato to a star.
- Cheese Crown: The final cheese melt adds a luxurious, creamy layer that binds the flavors together, making every bite feel indulgent.
- Visual Impact: Shaped into skulls, these potatoes become a centerpiece that screams Halloween without any artificial dyes.
- Simplicity: Only seven pantry staples are needed, and the technique is straightforward enough for a kitchen rookie yet rewarding for a seasoned chef.
- Make‑Ahead Potential: You can prep the skulls ahead of time and finish them in the oven just before guests arrive, saving precious party prep minutes.
- Universal Appeal: The combination of salty, savory, and slightly smoky flavors wins over kids, adults, vegetarians, and even picky eaters.
- Seasonal Vibe: The aromatic herbs and smoky notes echo the crispness of autumn, making this dish the perfect companion for October gatherings.
Inside the Ingredient List
The Flavor Base
Mini creamer potatoes are the heart of this recipe. Their thin skins and buttery flesh mean they absorb seasonings like a sponge, delivering flavor in every bite. If you skip the olive oil, you’ll lose the essential coating that helps the herbs cling and the cheese melt evenly. As a swap, you can use baby Yukon Golds, but expect a slightly sweeter profile. When shopping, look for potatoes that are firm, uniformly sized, and free of sprouts—this ensures even cooking and a consistent skull shape.
The Texture Crew
Olive oil is the silent hero, providing the necessary fat for crisping and helping the herbs adhere. Use a good‑quality extra‑virgin olive oil for a fruity note; if you prefer a neutral taste, a high‑smoke‑point oil like grapeseed works just as well. Salt and pepper are the classic duo that brings out the potatoes’ natural sweetness while adding a subtle bite. Don’t be shy with the salt—under‑seasoned potatoes taste bland, but a pinch too much can overwhelm the delicate cheese.
The Unexpected Star
Herbs such as rosemary or thyme add an earthy, piney aroma that feels like a walk through a haunted forest. Fresh herbs give a brighter punch, but dried herbs are perfectly fine and more convenient for a quick prep. The garlic powder or smoked paprika provides depth; the former offers a sweet, roasted garlic flavor, while the latter adds a smoky whisper that pairs beautifully with the cheese. If you’re feeling adventurous, a dash of cayenne can give the skulls a subtle heat that surprises the palate.
The Final Flourish
A generous cup of shredded cheese—cheddar, mozzarella, or a blend—creates that glorious golden crown that melts into a velvety glaze. The cheese not only adds richness but also helps bind the herbs to the potato surface during roasting. If you’re dairy‑free, a robust vegan cheese made from cashews or soy works, though the melt may be slightly less gooey. Remember, the cheese should be added during the last ten minutes of roasting; otherwise, it can burn and turn bitter.
Everything's prepped? Good. Let's get into the real action...
The Method — Step by Step
Start by bringing a large pot of salted water to a rolling boil. Toss in the mini creamer potatoes and let them cook for just 6‑8 minutes—enough to soften the core but not so long that they fall apart. You’ll know they’re ready when a fork slides in with a slight resistance, like a gentle sigh. Drain them thoroughly and let them sit upside down in the colander for a minute to steam off excess moisture. That sizzle when it hits the pan? Absolute perfection.
While the potatoes are still warm, gently pat each one dry with a clean kitchen towel. This step is crucial; any lingering water will steam the potatoes instead of crisping them. Once dry, drizzle the olive oil over the potatoes, tossing them until each piece is lightly coated. If you’re feeling fancy, add a splash of melted butter for extra richness.
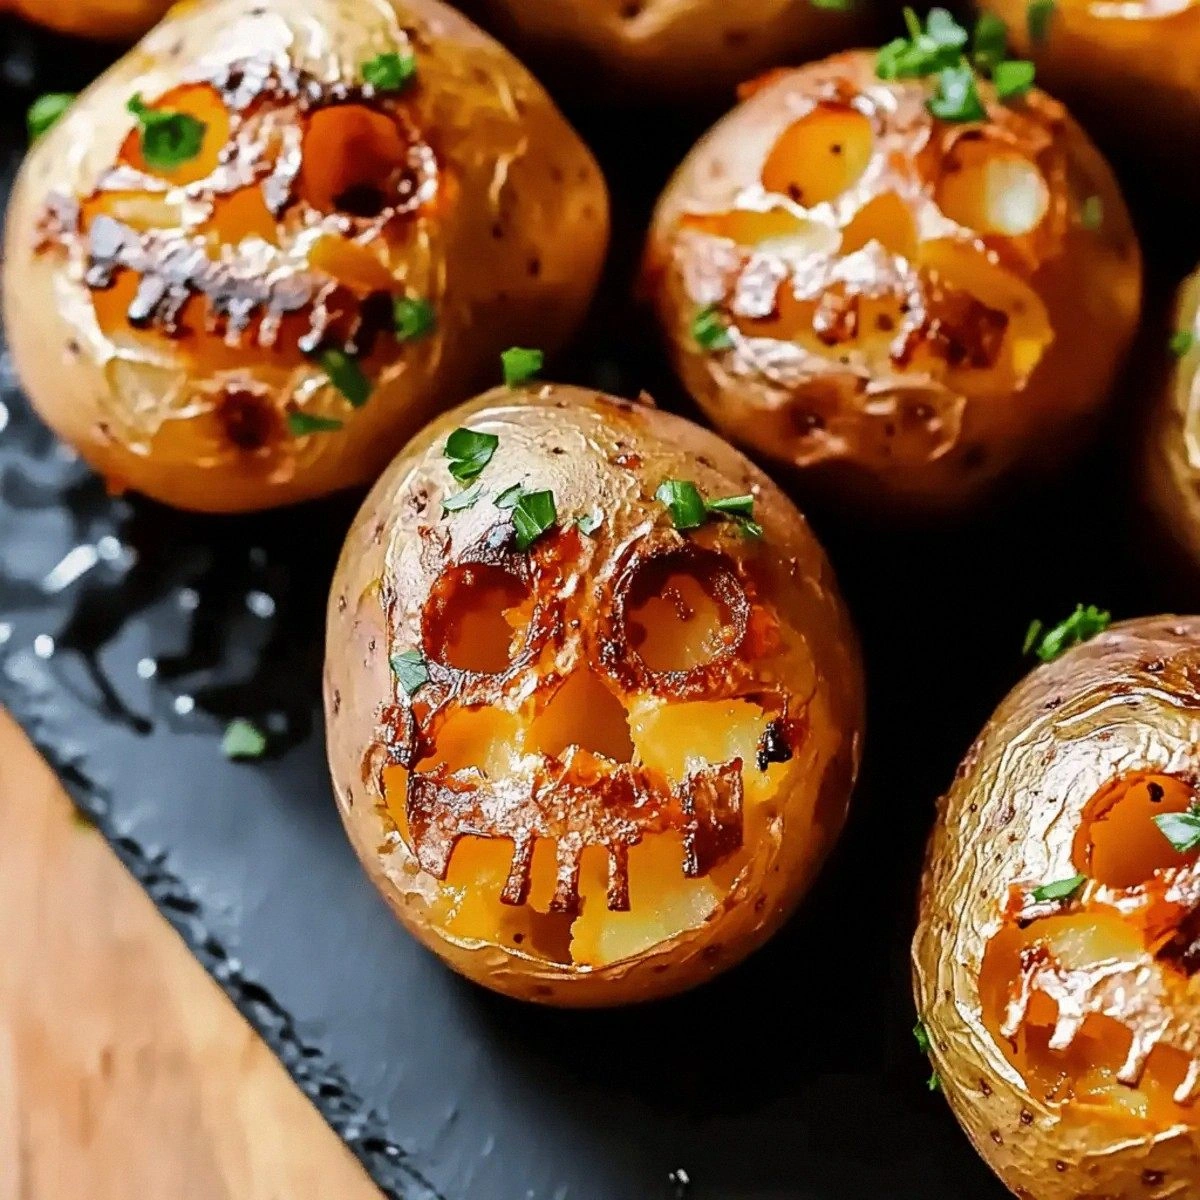
Now comes the shaping: using a small spoon or the back of a knife, gently press each potato into a skull shape on a parchment‑lined baking sheet. The natural ridges of the potatoes make the eye sockets and jawline appear almost automatically. Don’t worry if they’re not perfect—imperfection adds to the spooky charm. Okay, ready for the game‑changer?
Sprinkle the herb mixture—rosemary, thyme, garlic powder, and smoked paprika—over the skulls. Use your hands to rub the seasoning into every crevice, ensuring the flavors seep into the nooks of the skull. This is where the aroma really starts to build; you’ll smell the herbs mingling with the potatoes like a forest at dusk.
Preheat your oven to 425°F (220°C). Slide the tray into the oven and roast for 20 minutes, turning the skulls halfway through for even browning. You’ll see the edges start to pull away from the parchment, forming that coveted crisp that shatters like thin ice. This next part? Pure magic.
After the initial roast, remove the tray and sprinkle the shredded cheese evenly over each skull. Return the tray to the oven for an additional 8‑10 minutes, or until the cheese bubbles and turns a deep golden‑brown. Keep a close eye—cheese can go from perfect to burnt in seconds.
When the cheese is perfectly melted, pull the tray out and let the skulls rest for three minutes. This short rest allows the cheese to set just enough so it won’t slide off when you serve. The potatoes will continue to crisp up a touch as they cool, giving you that final snap.
Transfer the skulls to a serving platter, garnish with a sprinkle of fresh herbs for color, and watch your guests’ eyes widen. The aroma will fill the room, and the first bite will reveal that satisfying crunch followed by a gooey, cheesy core. I’ll be honest — I ate half the batch before anyone else got to try it. Serve with a side of tangy sour cream or a drizzle of spicy aioli for an extra punch.
That's it — you did it. But hold on, I've got a few more tricks that'll take this to another level...
Insider Tricks for Flawless Results
The Temperature Rule Nobody Follows
Most home cooks set the oven to 400°F and call it a day, but the secret to that crackly exterior lies in a hotter blast. Cranking the heat to 425°F (or even 450°F for a brief final burst) creates rapid Maillard reactions, giving the potatoes that deep amber hue and a texture that snaps like a fresh twig. I once tried a lower temperature and ended up with soggy, sad potatoes—trust me, the extra heat is worth the occasional extra minute of monitoring.
Why Your Nose Knows Best
Never rely solely on a timer; your nose is the ultimate kitchen gauge. When the potatoes start to smell nutty and the edges emit a faint caramel scent, you’re on the right track. If you detect a hint of burnt sugar, pull them out immediately. This sensory checkpoint prevents over‑cooking and ensures every skull retains that perfect balance of sweet and savory.
The 5‑Minute Rest That Changes Everything
After the final roast, let the skulls sit for exactly five minutes. This brief pause allows the steam trapped inside to redistribute, turning the interior from merely soft to luxuriously fluffy. I once skipped this step, and the cheese slipped off like a wet paint—never again. So set a timer, sip your pumpkin spice latte, and let the magic happen.
The Double‑Coat Technique
For an ultra‑crisp exterior, coat the potatoes twice: first with olive oil and herbs, then with a light dusting of cornstarch before the initial roast. The starch creates a thin barrier that fries the surface from within the oven, resulting in a texture that rivals deep‑fried snacks without the extra oil. I tried this on a whim and was blown away by the extra crunch.
Seasonal Spice Switch‑Up
If you’re making these in late summer, swap smoked paprika for a pinch of ground cumin and a splash of lime zest. The citrus brightens the potatoes and gives a fresh twist that still feels festive. A friend tried this at a backyard BBQ and swore it was the highlight of the night.
Creative Twists and Variations
This recipe is a playground. Here are some of my favorite ways to switch things up:
Spicy Ghost Pepper
Add a pinch of ghost pepper powder to the herb mix for a fiery kick that will make even the bravest goblins sweat. Pair with a cooling ranch dip to balance the heat.
Herb‑Infused Parmesan
Swap the cheddar for a blend of grated Parmesan, sage, and a dash of nutmeg. This creates a nutty, aromatic crust that feels like a fall harvest feast.
Vegan Nightmare
Use a plant‑based cheese made from cashews and nutritional yeast, and replace olive oil with avocado oil for a dairy‑free version that still delivers that melt‑in‑your‑mouth feel.
Sweet‑And‑Savory
Drizzle a thin layer of maple syrup over the potatoes before the final cheese melt. The caramelized sweetness pairs surprisingly well with the smoky herbs.
Cheesy Bacon Bomb
Crumble cooked bacon into the cheese topping for a smoky, salty crunch that turns these skulls into a hearty appetizer fit for a midnight feast.
Storing and Bringing It Back to Life
Fridge Storage
Place cooled skulls in an airtight container lined with a paper towel to absorb excess moisture. They’ll keep for up to three days, retaining most of their crispness. Reheat in a preheated 400°F oven for 8‑10 minutes, and they’ll be as good as fresh.
Freezer Friendly
Arrange the uncooked, seasoned skulls on a parchment sheet and freeze until solid. Transfer them to a zip‑top bag; they’ll stay freezer‑safe for up to two months. When you’re ready, bake straight from frozen, adding an extra five minutes to the roasting time.
Best Reheating Method
For ultimate crunch, reheat on a wire rack set over a baking sheet at 425°F for 6‑8 minutes. Add a tiny splash of water to the pan before reheating; the steam helps revive the fluffy interior while the high heat restores the crisp exterior.