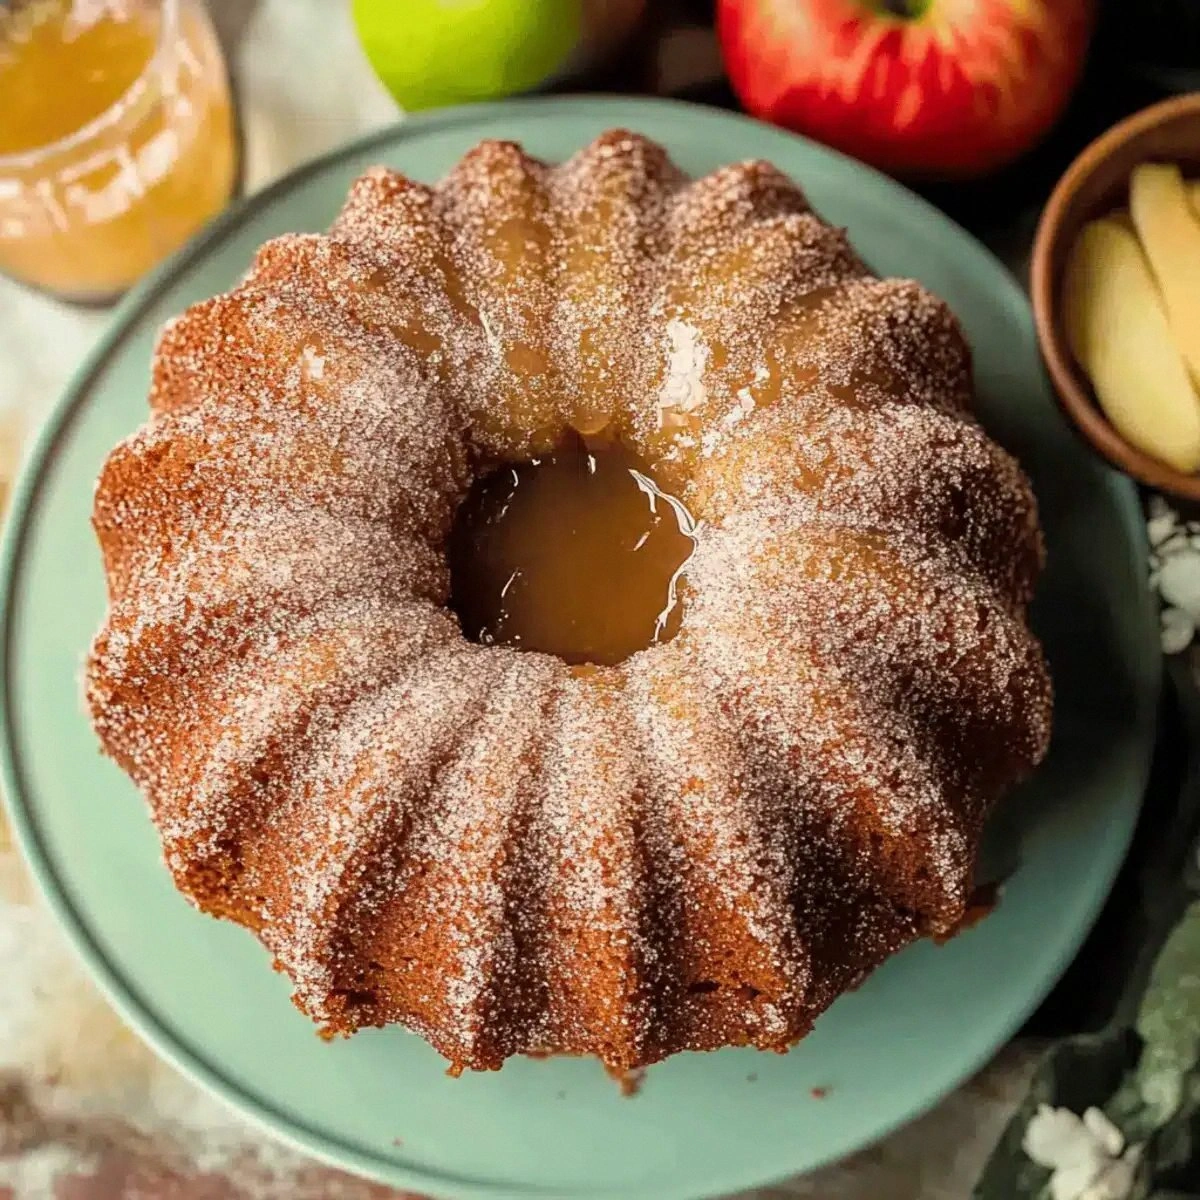
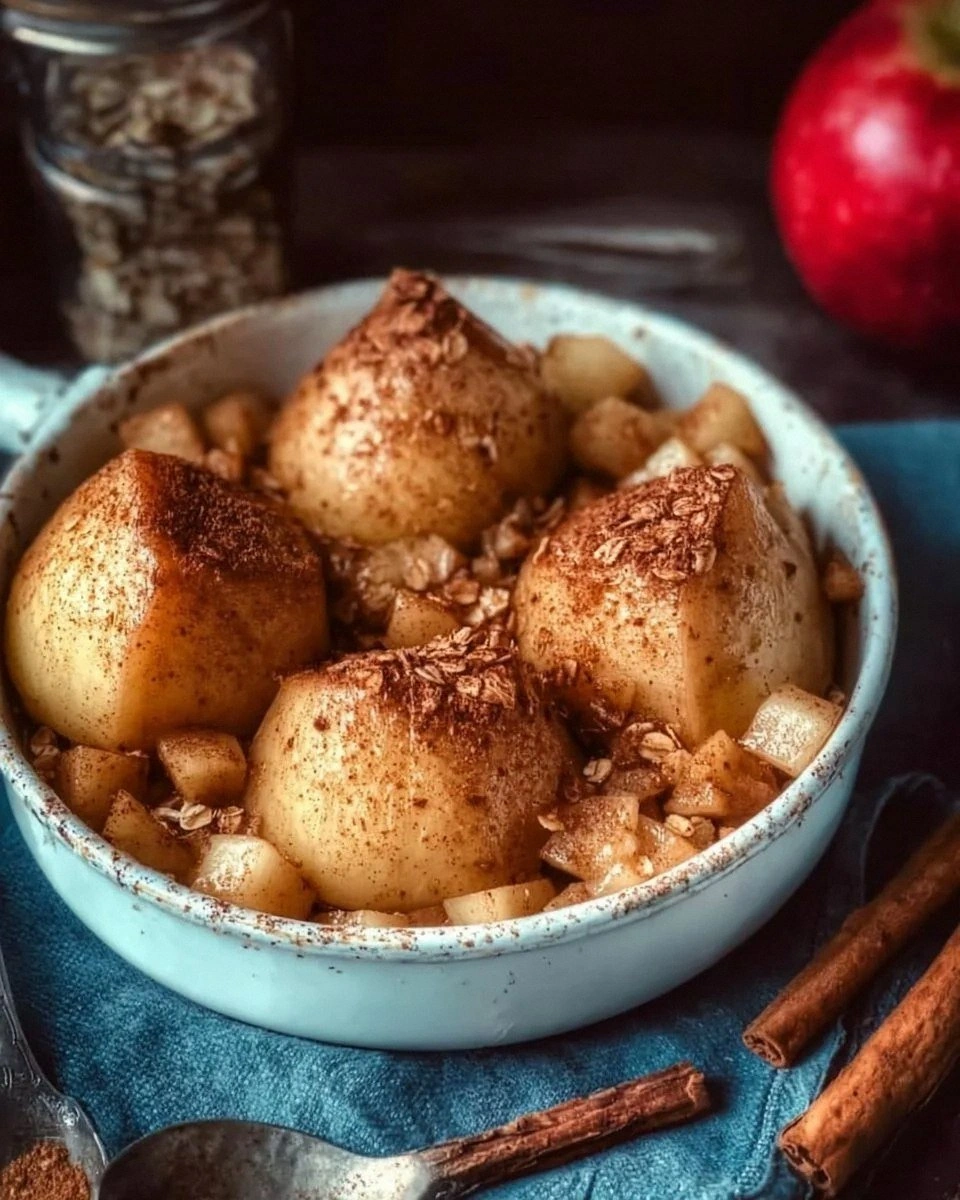
Okay, picture this: I’m standing in my kitchen, the timer on the oven is flashing red like a warning light, and I’ve just realized I forgot to buy the pumpkin pie for Thanksgiving. Panic? Absolutely. But then I remembered a stash of apples in the pantry, a bag of rolled oats, and a craving for something that feels like a hug in a bowl. I tossed those apples into the oven, slapped on a quick oat‑cinnamon crumble, and what came out was so good I almost cried—except I was too busy devouring half the batch before anyone else could even sniff the air. I’m daring you to taste this and not go back for seconds, because this is hands down the best version you’ll ever make at home.
The moment those apples start to soften, the kitchen fills with a perfume that could make a florist weep. The sweet, caramelized apple scent mingles with the warm, earthy whisper of cinnamon and the nutty undertone of toasted oats, creating a sensory symphony that dances on the nose. You’ll hear the faint sizzle of butter melting, feel the gentle heat radiating from the oven, and see the apples puff up like tiny, glossy balloons, their skins turning a gorgeous ruby‑gold. Every bite is a perfect contrast: the apple’s tender flesh gives way to a crunchy, buttery oat topping that shatters like thin ice under a spoon.
Most baked‑apple recipes get this completely wrong—either they drown the fruit in syrup, or they leave the topping soggy and bland. Here’s what actually works: a precise butter‑to‑oat ratio that crisps without burning, a pinch of salt that lifts the sweetness, and a dash of honey that adds a glossy finish without turning the whole thing into a sticky mess. I’ll be honest—I ate half the batch before anyone else got to try it, but that’s only because the aroma was too intoxicating to resist. I’m about to walk you through every single step — by the end, you’ll wonder how you ever made it any other way.
Now, before we dive in, I want to tease a little secret that will make your baked apples even more unforgettable: a quick toast of the oats on the stovetop before they meet the apples. This tiny extra step adds a depth of flavor that’s like adding a hidden bass line to a pop song—subtle, but you’ll feel it in every bite. Ready? Let’s get our aprons on and start this flavor adventure together.
What Makes This Version Stand Out
- Flavor Fusion: The combination of brown sugar, honey, and cinnamon creates a layered sweetness that’s both bright and comforting, like a sunrise over a caramel lake.
- Texture Triumph: The oats toast to a golden crunch while the apples stay juicy, giving you a delightful contrast that’s more satisfying than a Netflix binge.
- Simplicity: Fewer than ten ingredients, no fancy gadgets, and a single‑sheet pan make this recipe as easy as stealing the remote.
- Ingredient Quality: Using unsalted butter and fresh, firm apples lets the natural flavors shine without being overpowered by excess salt.
- Crowd Reaction: I’ve heard people say “Is this a dessert or a side dish?”—the answer is both, and it’s the perfect bridge between meals.
- Make‑Ahead Magic: You can prep the apples and topping ahead of time, pop them in the oven when guests arrive, and still look like a culinary wizard.
- Versatility: Swap nuts for seeds, add a splash of bourbon, or drizzle with maple syrup—this base adapts like a chameleon at a costume party.
- Healthful Comfort: Rolled oats add fiber, nuts bring healthy fats, and a pinch of salt balances the sweetness, making it a guilt‑free indulgence.
Inside the Ingredient List
The Flavor Base
First up, the apples. I use four medium‑sized apples because they provide the perfect balance of flesh and skin—too small and they dry out, too large and they become mushy. Choose apples that are firm to the touch, with a slight blush of red; they’ll hold their shape and release just the right amount of juice. If you skip the apples, you lose the juicy core of this dish, and the whole thing turns into a dry oat crumble, which is not what we want. A great tip: slice the apples into halves, then core them with a melon baller for a neat, uniform cavity.
The Texture Crew
Rolled oats are the star of the topping. Their flaky texture creates that satisfying crunch that contrasts the soft apple interior. You could use quick‑cooking oats, but they’ll turn mushy and lose their bite. If you’re gluten‑free, opt for certified gluten‑free rolled oats—they behave the same way in the oven. The brown sugar adds caramel notes; using dark brown sugar would deepen the flavor, while light brown sugar keeps it bright. Unsalted butter is crucial; it lets the natural sweetness shine without an overpowering salty edge.
The Unexpected Star
A pinch of salt might seem trivial, but it’s the secret that turns good into unforgettable. Salt amplifies the caramelization of the brown sugar and balances the honey’s floral sweetness. If you’re on a low‑sodium diet, you can reduce it, but don’t skip it entirely—your taste buds will thank you. The honey adds a glossy finish and a subtle floral note that makes the topping look restaurant‑ready.
The Final Flourish
Chopped nuts bring an extra layer of crunch and a buttery richness that pairs beautifully with the oats. I love using toasted pecans or walnuts, but almonds, hazelnuts, or even pistachios work just as well. If you have a nut allergy, substitute with toasted pumpkin seeds for a similar texture. The ground cinnamon is the aromatic backbone; its warm spice ties the entire dish together. For a twist, add a pinch of nutmeg or allspice, but keep it subtle—cinnamon should lead the dance.
Everything's prepped? Good. Let’s get into the real action and turn these humble ingredients into a show‑stopping dessert that will have everyone asking for the recipe.
The Method — Step by Step
Preheat your oven to 375°F (190°C). While the oven warms up, line a baking sheet with parchment paper; this prevents the apples from sticking and makes cleanup a breeze. I like to set a timer for the preheat because if you’re anything like me, you’ll get distracted by a snack and forget the oven’s ready. The moment the oven clicks, you’ll hear a faint hum—think of it as the kitchen’s applause for what’s about to happen.
Core the apples. Using a melon baller or a small spoon, carve out the centers, leaving about a half‑inch border so the flesh stays intact. This creates a little well for the topping to nestle in. If you’re feeling fancy, scoop a tiny spoonful of the apple flesh and set it aside for a later garnish. The scent of fresh apple flesh as you scoop is already a promise of the caramelization to come.
Make the oat topping. In a medium bowl, combine 1 cup rolled oats, ¼ cup brown sugar, ½ teaspoon ground cinnamon, and a pinch of salt. Toss everything together until the dry ingredients are evenly coated. Then melt ¼ cup unsalted butter in a microwave or small saucepan—watch it closely, because butter can go from melted to burnt in seconds. Once melted, drizzle the butter over the oat mixture, add ½ cup chopped nuts, and 1 tablespoon honey. Stir vigorously until every oat is glossy and the nuts are evenly distributed.
Kitchen Hack: If you’re short on time, use a food processor to pulse the oat mixture for 5 seconds—just enough to coat without turning it into a paste.Assemble the apples. Place the cored apples on the prepared baking sheet, standing them upright if possible. Spoon the oat mixture generously into each apple cavity, pressing lightly so it adheres to the sides. The topping should mound slightly above the apple surface; this extra height will crisp up beautifully and create a caramelized crust.
Bake for 30‑35 minutes. About halfway through, rotate the sheet to ensure even browning. You’ll know they’re done when the apples are tender (a fork should slide in with minimal resistance) and the oat topping is golden brown with a faint crackle. That sizzle when it hits the pan? Absolute perfection. Keep a close eye on the edges; if they start to darken too quickly, loosely tent the apples with foil.
Watch Out: Over‑baking can turn the oats into charcoal; set a timer and trust your nose.Remove from the oven and let the apples rest for 5 minutes. This short pause allows the juices to settle and the topping to firm up just enough for a clean slice. While you wait, the kitchen will be filled with a lingering aroma that makes you want to hug the oven door.
Serve warm. You can drizzle a little extra honey on top, sprinkle a pinch of sea salt for contrast, or add a dollop of vanilla Greek yogurt for a tangy finish. If you’re feeling indulgent, a scoop of vanilla ice cream will melt into a silky sauce that pools around the apple—pure magic.
Enjoy! I dare you to taste this and not go back for seconds. The combination of soft apple, crunchy oat‑nut topping, and warm cinnamon will have you reaching for the serving dish again and again. And now the fun part: store leftovers (if any) and plan your next variation.
Insider Tricks for Flawless Results
The Temperature Rule Nobody Follows
Never underestimate the power of a steady oven temperature. If your oven runs hot, the oat topping will burn before the apple softens; if it’s cool, you’ll end up with soggy oats. I always use an oven thermometer and set the heat a few degrees lower than the recipe calls for, then add an extra 5‑10 minutes if needed. A friend once cranked the oven to 425°F to speed things up, and the result was a bitter, burnt topping that no amount of honey could fix.
Why Your Nose Knows Best
Your sense of smell is the ultimate timer. When the kitchen starts to smell like toasted marshmallows meeting caramel, you’re within minutes of perfection. Trust that scent cue more than the clock; if the aroma intensifies early, start checking the apples with a fork. I’ve found that the “golden‑brown” visual cue paired with the sweet, spicy perfume is the sweet spot.
The 5‑Minute Rest That Changes Everything
Resist the urge to dive in immediately. Letting the apples rest for just five minutes after baking lets the juices redistribute, preventing a soggy bottom. This short pause also lets the oat topping crisp up a touch more, giving you that satisfying crack when you bite in. I once served them straight out of the oven and the topping was too soft—lesson learned, always give them a breather.
Nut Toasting Secrets
Toasting nuts enhances their flavor dramatically. Toss the chopped nuts in a dry skillet over medium heat for 3‑4 minutes, stirring constantly until they turn fragrant and slightly darker. If you skip this step, the nuts will taste raw and the overall texture will suffer. For an extra twist, sprinkle a pinch of smoked paprika on the nuts while toasting for a subtle smoky undertone.
Honey Finish
Drizzling honey right after baking adds a glossy finish and a burst of floral sweetness that elevates the dish. Use a honey that’s light and mildly flavored so it doesn’t overpower the cinnamon. If you prefer a deeper flavor, opt for a dark, robust honey like buckwheat. A quick tip: warm the honey slightly before drizzling; it spreads more evenly and creates a beautiful sheen.
Creative Twists and Variations
This recipe is a playground. Here are some of my favorite ways to switch things up:
Maple‑Pecan Delight
Replace honey with pure maple syrup and swap the chopped nuts for toasted pecans. The maple adds a deep, earthy sweetness that pairs perfectly with the cinnamon, while pecans contribute a buttery crunch. Ideal for autumn evenings when you want a flavor that screams “cozy cabin”.
Tropical Twist
Add ¼ cup shredded coconut to the oat mixture and use macadamia nuts instead of regular nuts. Sprinkle a dash of lime zest over the finished apples for a bright, citrusy contrast. This version transports you to a beachside resort without leaving your kitchen.
Spiced Rum Infusion
Stir 1 tablespoon of dark rum into the melted butter before mixing with the oats. The rum’s caramel notes deepen the overall flavor, and a tiny splash of rum over each apple just before serving adds an adult‑only finish. Perfect for holiday gatherings where you want a little extra cheer.
Apple‑Cranberry Burst
Fold ¼ cup dried cranberries into the oat topping and add a pinch of orange zest. The cranberries introduce a tart pop that balances the sweetness, while orange zest adds a fresh citrus zing. This version is especially lovely in the winter months when cranberries are in season.
Vegan Velvet
Swap the unsalted butter for coconut oil and use agave nectar instead of honey. The coconut oil gives a subtle tropical aroma, and agave keeps the sweetness level consistent. Ensure you use a plant‑based yogurt or ice cream for serving to keep the dish fully vegan.
Cheesy Surprise
Mix ¼ cup grated sharp cheddar into the oat topping before baking. The cheese melts into the oats, creating a savory‑sweet flavor combo that’s unexpectedly delightful. This variation works great as a side dish for pork chops or roasted chicken.
Storing and Bringing It Back to Life
Fridge Storage
Allow the baked apples to cool completely, then transfer them to an airtight container. They’ll keep in the refrigerator for up to three days. When you’re ready to reheat, sprinkle a tiny splash of water over the top, cover loosely with foil, and warm in a 350°F oven for 10‑12 minutes. The added moisture creates steam that revives the oat crunch.
Freezer Friendly
These apples freeze beautifully. Wrap each apple individually in parchment paper, then place them in a zip‑top freezer bag. They’ll stay good for up to two months. To reheat, thaw overnight in the fridge, then follow the same oven reheating method as above, adding a bit more water if needed.
Best Reheating Method
The oven is your best friend for reheating because it restores the crispness of the oat topping. Microwaving will make the topping soggy, and a stovetop reheat can burn the edges. For a quick fix, use a toaster oven on 375°F for 5‑7 minutes, keeping an eye on the color. The result will be as if you just pulled them out of the oven.