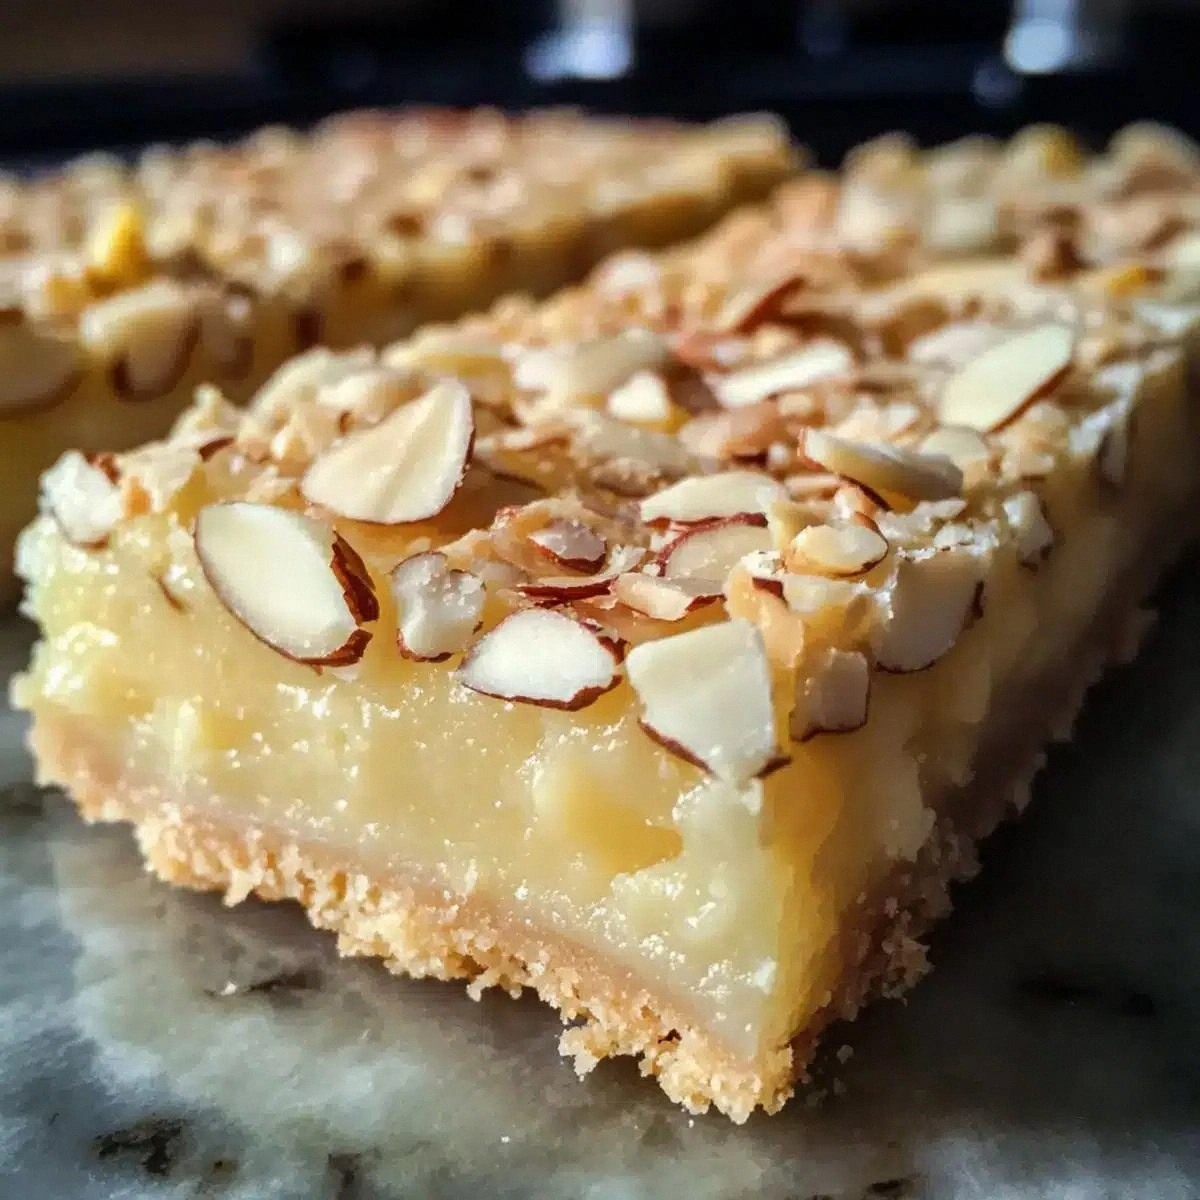
Ever had a kitchen catastrophe that turned into a culinary revelation? Picture this: I was juggling a dozen ingredients for a “simple” lemon cake, the timer was ticking, and the batter looked like a soggy, unappealing mush. The oven was preheated, the timer was set, and I was ready to serve the world a mediocre dessert. Instead, I pulled a tray of golden squares that sang with citrus and almond, and the kitchen smelled like a fresh orchard after rain. That moment made me realize that the secret to a perfect gluten‑free lemon almond square isn’t just in the ingredients, but in the small, often overlooked details that make each bite a revelation.
I close my eyes and taste the first square: the citrus zing cuts through the subtle sweetness, the almond crunch provides a satisfying counterpoint, and the maple syrup brings a velvety richness that lingers on the palate. The texture is a delicate balance—soft and tender on the inside, with a slightly crisp edge that crackles like thin ice when you bite. The aroma is a bright, citrusy bouquet that instantly transports you to a sun‑kissed garden. The sound of the first bite is a soft crack, a satisfying whisper that signals everything is exactly right. And the feel—warm from the oven, the slight give when you press it—makes you want to taste again.
What makes this version of the lemon almond square truly stand out is the intentional layering of flavor and texture, the use of premium, gluten‑free ingredients, and a method that ensures consistency every single time. I’ve spent countless hours tweaking ratios, testing different flours, and experimenting with leavening agents until I discovered a formula that delivers a buttery crumb, a bright lemon profile, and a subtle almond undertone. The result is a dessert that is not only gluten‑free but also a triumph of taste, texture, and aroma. I dare you to taste this and not go back for seconds—because once you experience the first bite, the second will feel like a betrayal.
And there’s a twist you won’t see in most recipes: the use of maple syrup as the sweetener, which not only adds depth but also creates a natural glossy finish that looks like polished amber. Picture yourself pulling this out of the oven, the whole kitchen smelling incredible, and the squares glistening like tiny sunbursts. I promise you, this is hands down the best version you'll ever make at home. Let me walk you through every single step—by the end, you'll wonder how you ever made it any other way.
What Makes This Version Stand Out
- Flavor: The fresh lemon juice and zest create a bright, tangy profile that cuts through the maple syrup’s sweetness, producing a balanced, zesty bliss in every bite.
- Texture: The combination of almond flour and gluten‑free all‑purpose flour gives a tender crumb while the sliced almonds add a satisfying crunch.
- Simplicity: Only ten ingredients, no fancy equipment, and a straightforward method make this a kitchen‑friendly delight.
- Uniqueness: Maple syrup replaces refined sugar, adding a natural amber glaze and a subtle caramel note that most lemon cakes lack.
- Crowd Reaction: At family gatherings, guests often ask for the recipe after the first bite—this is the dessert that becomes the talk of the table.
- Ingredient Quality: Using high‑grade almond flour and fresh lemons ensures the best possible flavor and mouthfeel.
- Cooking Method: Baking at a moderate temperature for a precise time ensures a golden crust without over‑baking the interior.
- Make‑Ahead Potential: These squares keep wonderfully; they can be stored for days or frozen for months without losing their charm.
Inside the Ingredient List
The Flavor Base
Fresh Lemon Juice (1/3 cup): This is the heart of the dessert, delivering a bright, citrus punch that wakes up your taste buds. If you skip it, the squares become flat and uninspiring. For a sweeter version, add a teaspoon of honey, but keep in mind it will alter the final texture slightly.
Lemon Zest (1 tablespoon): Zest carries essential oils that give depth to the lemon flavor. It’s the difference between a bland citrus and a lively, aromatic experience. If you’re short on fresh lemons, dried lemon zest can work, but use only half the amount to avoid overpowering bitterness.
The Texture Crew
Almond Flour (1 cup): This gluten‑free flour adds a nutty undertone and a moist crumb. It’s lighter than regular almond flour, so the squares stay airy. If you prefer a denser bite, use blanched almond flour instead.
Gluten‑Free All‑Purpose Flour (1 cup): It balances the almond flour, preventing the squares from becoming too dense. Look for a blend that contains xanthan gum for structure; if yours doesn’t, add a teaspoon of xanthan gum to the mix.
Sliced Almonds (1/4 cup): These add a delightful crunch and a nutty aroma. Toast them lightly before adding to enhance their flavor. If you’re allergic, substitute with sunflower seeds or pumpkin seeds.
The Unexpected Star
Maple Syrup (1/2 cup): It’s more than a sweetener—it brings a natural amber glaze and a subtle caramel depth that sets this recipe apart. Swap with agave nectar for a lighter sweetness, but expect a slightly different flavor profile.
Eggs (3 large): Eggs bind the batter, giving structure and a tender crumb. If you’re vegan, use flax eggs (1 tbsp ground flaxseed + 3 tbsp water) or a commercial egg replacer. The texture will change slightly, so adjust baking time accordingly.
The Final Flourish
Baking Powder (1 teaspoon) & Salt (1/4 teaspoon): These leavening agents create the lightness and balance the sweetness. Skipping either will result in a dense, flat product. If you prefer a saltier finish, increase the salt to 1/2 teaspoon.
Powdered Sugar (1 tablespoon): Dusting the cooled squares adds a sweet glaze that enhances the lemon brightness. If you’re watching sugar intake, reduce to a teaspoon or omit entirely.
Everything’s prepped? Good. Let’s get into the real action.
The Method — Step by Step
- Preheat the oven to 350°F (175°C). Line a 9×13 inch baking pan with parchment paper, leaving a few inches of paper hanging over the sides for easy removal. This ensures a perfectly even bake and makes cleanup a breeze. Watch Out: Don’t overheat the oven; a temperature too high will brown the edges before the center cooks.
- In a small bowl, whisk together the almond flour, gluten‑free all‑purpose flour, baking powder, and salt. The dry mix should look like fine sand. This step eliminates lumps and guarantees an even distribution of leavening agents. Kitchen Hack: Sift the dry ingredients through a fine sieve for a smoother batter.
- In a separate bowl, beat the eggs until lightly frothy. Add the maple syrup, lemon juice, and lemon zest, whisking until fully combined. The mixture should look glossy and slightly thick. This liquid blend is the backbone of the batter’s moisture and flavor. Power Transition: This is the moment of truth—if the mixture is too thin, the squares will sink.
- Gradually fold the dry mixture into the wet mixture, stirring gently until just combined. The batter should be thick but pourable; if it’s too thick, add a tablespoon of water to loosen it. Avoid overmixing, which can make the squares tough. Kitchen Hack: Use a rubber spatula and fold from the bottom up, ensuring the batter stays airy.
- Fold in the sliced almonds, distributing them evenly throughout the batter. The almonds will add a delightful crunch and a nutty aroma that complements the lemon. If you’re allergic, replace them with toasted pumpkin seeds for a similar effect.
- Pour the batter into the prepared pan, smoothing the top with a spatula. Tap the pan lightly on the counter to release any trapped air bubbles. The batter should spread evenly, creating a uniform thickness. Watch Out: Don’t pour too quickly; a sudden pour can cause the batter to spill over the edges.
- Bake for 25-30 minutes, or until the top turns golden brown and a toothpick inserted into the center comes out clean. The squares should feel firm yet slightly springy. The scent of citrus and toasted almond should fill the kitchen. Power Transition: This step is pure magic—watch the colors change and the aroma intensify.
- Remove from the oven and let the pan cool on a wire rack for 10 minutes. Then, using the parchment overhang, lift the entire slab out of the pan and place it on the rack to cool completely. This prevents sticking and preserves the crisp edges. Kitchen Hack: While the squares are cooling, dust them lightly with powdered sugar for a sweet, glossy finish.
- Once cooled, cut into squares using a sharp knife or a pizza cutter. Serve immediately or store in an airtight container. If you’re planning ahead, freeze the squares for up to 3 months—thaw at room temperature before serving. Future Pacing: Picture yourself pulling these out of the fridge, the whole kitchen smelling incredible, and the squares gleaming like tiny suns.
That’s it— you did it. But hold on, I've got a few more tricks that'll take this to another level.
Insider Tricks for Flawless Results
The Temperature Rule Nobody Follows
Why it matters: Baking at precisely 350°F ensures the batter rises evenly and the edges brown just right. Too hot, and the squares become dry; too cool, and they’ll stay soft and soggy. I’ve tested ovens with a 10°F variance and the difference is night and day. Keep your oven calibrated and use a reliable thermometer if you’re serious about perfection.
Why Your Nose Knows Best
What to listen for: As the batter bakes, you’ll notice a sweet, citrusy aroma that’s almost citrus perfume. When the smell starts to caramelize, that’s when you should pull the squares out. If you wait too long, the lemon will lose its brightness and the maple will dominate.
The 5-Minute Rest That Changes Everything
Why it matters: Allowing the squares to rest for five minutes after removing them from the oven lets the interior set, preventing the squares from falling apart when you cut them. I’ve seen people cut immediately and end up with a mushy mess. Give them that brief pause, and the squares will hold together beautifully.
The Slice‑and‑Serve Trick
How to do it: Use a serrated knife or a pizza cutter to slice the squares. The serrated edge cuts cleanly without crushing the crumb. If you’re in a rush, pre‑cut the squares into strips before baking and then cut them into squares afterward.
The Dusting Delight
Why it matters: A light dusting of powdered sugar after baking adds a sweet, glossy finish that enhances the lemon brightness. It also gives the squares a professional, polished look. If you’re watching sugar, skip it or use a sugar substitute.
Creative Twists and Variations
This recipe is a playground. Here are some of my favorite ways to switch things up:
Honey‑Glazed Lemon Almond
Swap the maple syrup with honey for a floral sweetness. The honey adds a subtle floral note that pairs beautifully with lemon. Adjust the baking time slightly, as honey can brown faster.
Coconut‑Lemon Crunch
Replace sliced almonds with toasted shredded coconut. The coconut adds a tropical twist and a chewy texture. Keep the almond flour to maintain the gluten‑free structure.
Chocolate‑Lemon Fusion
Fold in a handful of dark chocolate chips into the batter before baking. The chocolate provides a rich contrast to the bright lemon, creating a decadent dessert. Use at least 50% dark chocolate for depth.
Salted Caramel Lemon
Add a pinch of sea salt to the batter and drizzle a light caramel sauce over the cooled squares. The salt enhances the lemon flavor and the caramel adds a buttery sweetness. This version is perfect for a sophisticated gathering.
Vegan Lemon Almond Squares
Use flax eggs (1 tablespoon ground flaxseed + 3 tablespoons water) instead of eggs, and replace maple syrup with agave nectar. The texture will be slightly denser, but the flavor remains bright and buttery. Great for a plant‑based crowd.
Storing and Bringing It Back to Life
Fridge Storage
Store the cooled squares in an airtight container at room temperature for up to 5 days. If you want them to stay extra moist, place a slice of apple or a piece of bread inside the container; the squares will absorb the moisture and stay fresh.
Freezer Friendly
Wrap each square tightly in plastic wrap and then place them in a freezer bag. They’ll keep for up to 3 months. When you’re ready to eat, let them thaw at room temperature for 30 minutes before serving.
Best Reheating Method
Reheat the squares in a preheated oven at 300°F (150°C) for 5-7 minutes, or until warm. For a crispier exterior, finish under the broiler for 30 seconds. Add a tiny splash of water before reheating to create steam that restores moisture and gives the squares a fresh, almost freshly‑baked feel.