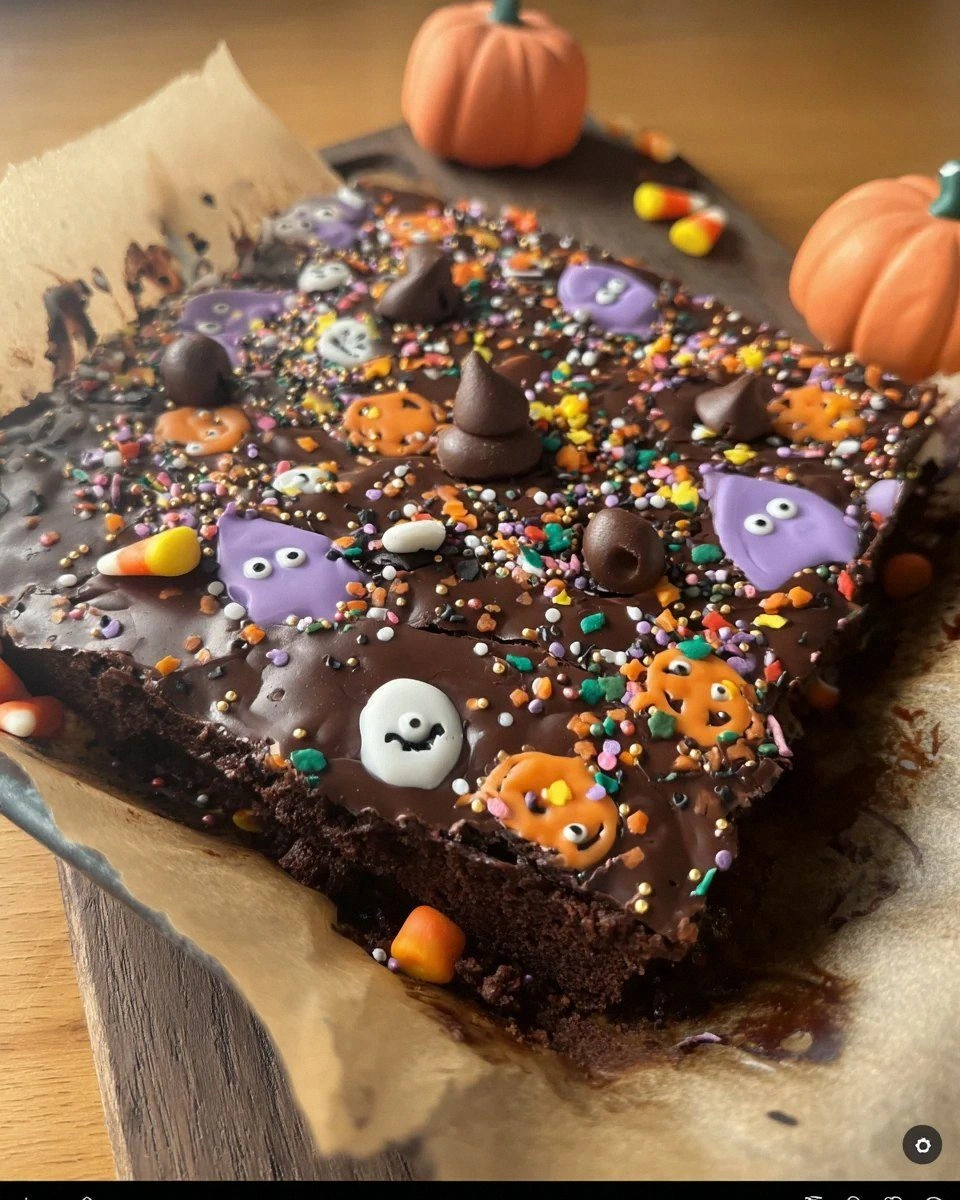
Picture this: It's 11:47 p.m. on October 28th, you're still in your work clothes, and you've just promised your kid's entire third-grade class that you'll bring "something awesome" to the Halloween party tomorrow. The grocery store is closed, your pantry looks like a crime scene, and the only thing staring back at you is a half-eaten bag of fun-size candy bars and a dusty box of cocoa powder. Most people would panic. I did—until I remembered the formula my grandmother whispered to me while we carved pumpkins: butter, chocolate, sugar, and just enough spooky swagger to make the neighbors jealous. What happened next was kitchen alchemy at its finest: a glossy, fudgy Halloween brownie so dark it could hide a vampire, studded with orange-and-black M&M's that melt into technicolor puddles, and topped with a crackly layer that shatters like thin ice under your fork. I dare you to taste this and not go back for seconds.
Now, before you roll your eyes and mutter, "Great, another cutesy holiday dessert that sacrifices flavor for Instagram points," let me confess something: I ate half the batch before anyone else got to try it. Straight from the pan. Standing over the sink. Using my bare hands like a sugar-frenzied raccoon. These aren't those dry, cakey squares that haunt office potlucks; these are the moist, chewy, borderline-dangerous kind that make you question your life choices at 1 a.m. The secret? A double-hit of chocolate—melting quality bittersweet into the batter, then folding in chips for molten pockets—and swapping some of the white sugar for brown, which gives you that glossy, crinkle-top finish that looks like a spider web in the moonlight.
Most recipes get this completely wrong. They over-cream the butter, over-mix the eggs, and under-bake the center until you're left with a soggy, oily mess that tastes like regret. Here's what actually works: melt the butter first—yes, melt it—then whisk in the cocoa while it's still warm so the fat blooms the chocolate like a midnight flower. The eggs go in one at a time, but only until the yolks disappear; think of it as introducing them to the party, not interrogating them under fluorescent lights. Future pacing? Picture yourself pulling this out of the oven, the whole kitchen smelling like Willy Wonka's basement, and your roommate drifting in wearing pajamas asking, "Are those for me?" Spoiler alert: they are, because generosity tastes better when you're the hero.
Stay with me here—this is worth it. By the time you preheat your oven, we'll have conjured a brownie that walks the line between cake and truffle, with edges that caramelize into candy-like shards and a center so silky it could double as chocolate mousse. We're talking about a dessert that pairs equally well with cold milk for the kids and a shot of espresso for the adults who refuse to admit Halloween is primarily for grown-ups in clever costumes. Let me walk you through every single step—by the end, you'll wonder how you ever made it any other way.
What Makes This Version Stand Out
Midnight-Rich Flavor: Thanks to a 1:1 ratio of cocoa powder and melted dark chocolate, you get both deep, earthy notes and bright, fruity top notes—think espresso meeting black cherry at a masquerade ball. Most recipes lean too heavily on one form of chocolate and end up flat, like a ghost with no backstory.
Spooky-Crackly Top: That glossy, tissue-thin crust isn't just for looks; it provides a textural snap that gives way to a gooey interior. The trick is beating the sugar into the warm butter long enough to dissolve partially, creating a meringue-like surface that shatters under your fork like a vampire's coffin at sunrise.
One-Bowl Simplicity: Forget the stand mixer; we're using the same saucepan we melted butter in, which means fewer dishes and more time to debate whether Hocus Pocus is a cinematic masterpiece or campy nostalgia. Cleanup is so minimal you can do it while the brownies bake.
Candy-Studded Surprise: Fold in seasonal M&M's or chopped peanut butter cups after the batter cools slightly so the colors stay vibrant and the candy keeps its shape instead of bleeding into muddy streaks. Every bite is a jackpot of chocolate on chocolate, with the occasional orange candy shell winking at you like a jack-o'-lantern.
Crowd-Control Magic: These cut into 24 petite squares—perfect for classroom parties—or 9 generous slabs for the grown-ups who need a sugar shield against endless trick-or-treater doorbell rings. Either way, they disappear faster than a full-size candy bar in a toddler's pillowcase.
Make-Ahead Friendly: Bake tonight, frost tomorrow, serve three days later; the flavor actually improves as the brown sugar hydrates and the chocolate notes meld into a harmonious choir of indulgence. If they last that long, which, honestly, they won't.
Alright, let's break down exactly what goes into this masterpiece, starting with the pantry MVPs and ending with the Halloween bling that makes kids squeal and adults pretend they're only eating "a sliver."
Inside the Ingredient List
The Flavor Base
Butter is the soul here—use the good European-style stuff with 82% fat. Lower-water butter means denser, fudgier texture and a toasted, nutty aroma that blooms when you melt it almost to the point of browning. If you only have standard supermarket sticks, no worries; just add an extra pinch of salt to compensate for the higher water content. Cocoa powder should be Dutch-processed for smoother, less acidic chocolate flavor that plays nicely with the brown sugar's molasses notes. Natural cocoa works, but you'll get a lighter color and tangier edge—more trick than treat.
Dark chocolate is where the drama lives. Reach for something in the 60–70% cacao range; anything higher can taste bitter once baked, anything lower melts into sugary anonymity. Chop it coarse so you get both molten puddles and tiny flecks that add speckled intrigue. Skip chocolate chips here—they contain stabilizers that resist melting, leaving you with waxy pebbles instead of velvet rivers.
The Texture Crew
Brown sugar is the undercover operative. Its natural molasses adds chew, caramel complexity, and that coveted glossy surface. Light brown works fine, but dark brown amps up the toffee notes and gives the batter a color reminiscent of rich potting soil—the perfect canvas for neon candy. White sugar provides crisp edges, so don't swap it out entirely unless you want a uniformly dense brick. Eggs should be large and at room temperature; cold eggs can seize the melted butter, creating grainy pockets that no amount of whisking will fix. If you forget to pull them ahead, submerge the whole eggs in warm tap water for five minutes while you prep the pan.
All-purpose flour keeps the crumb tender; cake flour is too delicate and bread flour too chewy. Measure by spooning the flour into the cup and leveling with a knife—scooping compacts it, leading to cakey brownies that taste like they were hugged too hard by a linebacker. A modest teaspoon of baking powder just barely lifts the batter so the center doesn't sink like a graveyard fog, but not so much that you lose that fudgy density.
The Unexpected Star
Espresso powder is the invisible wingman. You won't taste coffee; you'll just taste more chocolate, deeper and louder, like someone turned up the volume on a vintage stereo. A mere half-teaspoon does the trick. If you don't have it, substitute with a shot of cooled espresso and reduce the butter by a tablespoon to keep the fat ratio balanced. Vanilla extract might seem basic, but splurge on the real stuff—artificial vanillin flattens faster than a cheap Halloween costume after one wear.
The Final Flourish
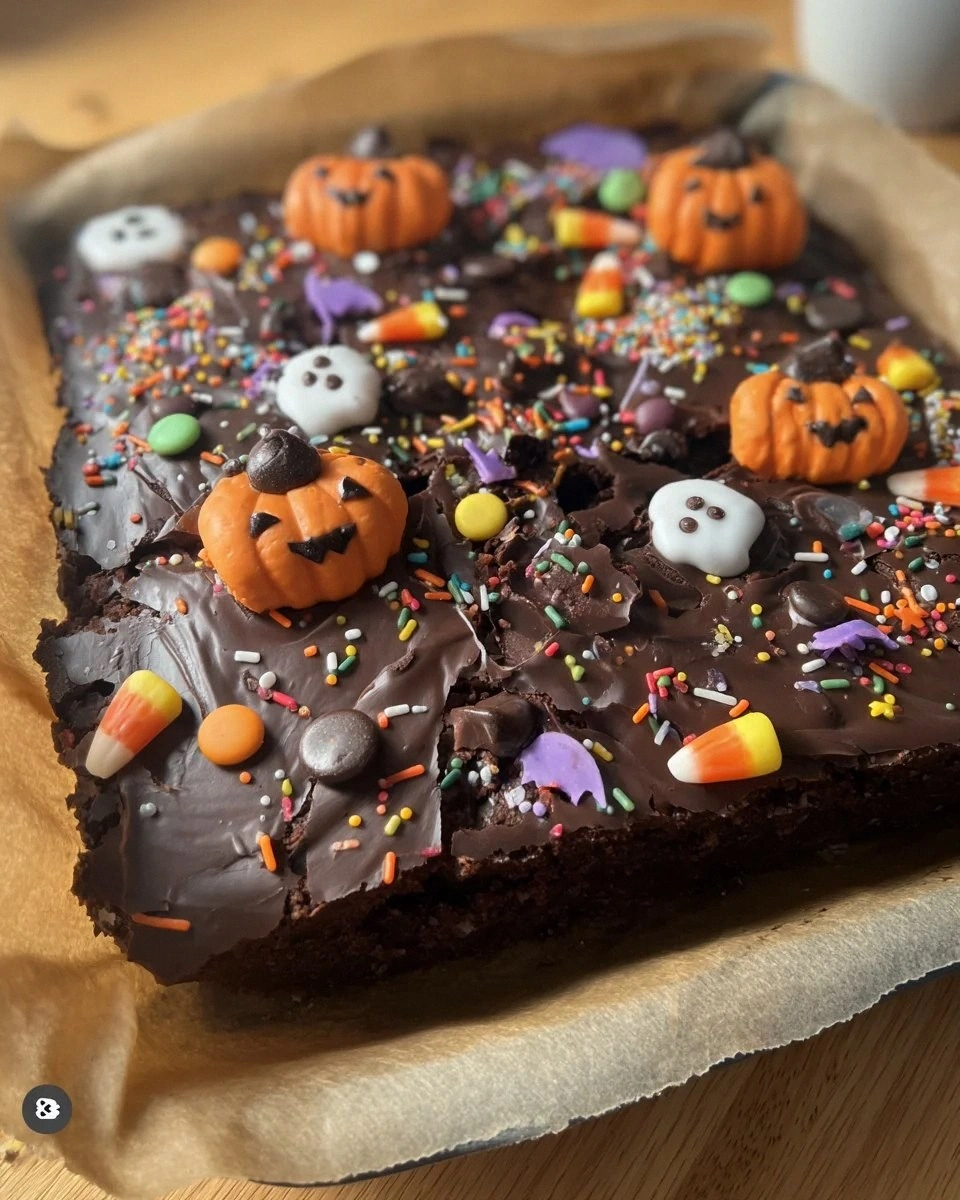
Orange and black M&M's are classic, but chopped mini peanut butter cups add a gooey core that mimics molten caramel when warm. Candy corn is divisive—some say it tastes like sugary plastic, others swear it's autumnal manna—so deploy at your own risk. A light dusting of flaky sea salt on top heightens sweetness and adds crunch that crackles like dry leaves underfoot. If you're feeling fancy, whisk a quick orange glaze (powdered sugar plus a few drops of food coloring and milk) and drizzle in zigzags across the cooled slab for a minimalist spider-web effect.
Everything's prepped? Good. Let's get into the real action, starting with melting butter so fragrant your neighbors will think you're running an underground chocolate speakeasy.
The Method — Step by Step
- Set your oven to 325°F (not the usual 350°F) and position a rack in the lower third—this slower, gentler heat prevents the top from burning before the center sets. Line a 9×13-inch metal pan with foil, letting the excess hang over the long sides like sad bunting; you'll use these handles later to lift the entire brownie slab out in one triumphant piece. Butter the foil generously with the wrapper from your butter stick, because waste is the real horror here. Metal pans conduct heat more efficiently than glass, giving you those coveted chewy edges; glass insulates and can leave you with a soggy bottom, which sounds like a Victorian ailment but tastes worse.
- Cube 12 tablespoons of unsalted butter and drop them into a medium saucepan set over medium-low heat. Swirl occasionally as the butter melts; you want it just to the point where the milk solids start to toast and smell like hazelnuts—about three to four minutes. Don't walk away from the stove here; butter goes from nutty to burnt faster than a vampire dissolves in daylight. Once melted, remove from heat and immediately whisk in ¾ cup Dutch-processed cocoa powder until the mixture looks like glossy river mud. The warmth blooms the cocoa's essential oils, amplifying depth the way a good backstory makes a villain more interesting.
- While the chocolate mixture cools slightly, whisk 1½ cups packed light brown sugar, ½ cup granulated sugar, and 1 teaspoon kosher salt in a large bowl until no lumps remain. This is the moment of truth: pour the warm chocolate-butter over the sugars and whisk until it resembles midnight velvet ribbon. The residual heat partially dissolves the sugar, which is your insurance policy for that shiny, crackly top later. Let it rest for two minutes so you don't scramble the eggs in the next step—patience, young padawan.
- Crack in 4 large room-temperature eggs, one at a time, whisking each until the yolk disappears before adding the next. Think of it like introducing guests at a dinner party—nobody likes a crowd surge. Add 2 teaspoons pure vanilla extract and ½ teaspoon espresso powder; whisk just until combined. Over-beating incorporates air, which gives you cakey brownies, and we want fudgy enough to bend like a flexible zombie limb.
- Measure 1 cup all-purpose flour and 1 teaspoon baking powder into a small bowl; whisk to distribute the leavener evenly so you don't hit a bitter pocket. Sprinkle the dry mix over the chocolate batter like you're dusting for fingerprints. Use a rubber spatula to fold—don't stir—until only a few streaky freckles of flour remain. Over-mixing develops gluten, turning your brownies tough enough to resole boots.
- Now for the fun part: fold in 1 cup Halloween-colored M&M's plus ½ cup chopped mini peanut butter cups. The batter should be cool enough that the candy doesn't melt into tie-dye swirls, but still fluid enough to swallow the mix-ins whole. If the batter feels warm to the touch, wait another minute; candy that bleeds looks like a crime scene, and while that's on-brand for Halloween, it's not appetizing.
- Scrape the batter into your prepared pan and coax it into the corners with an offset spatula. The top will look bumpy and lunar; that's perfect. Bang the pan on the counter twice to settle any air pockets—this prevents weird craters and satisfies your inner percussionist. Sprinkle a handful of extra M&M's on top for billboard-level advertising that these are not ordinary brownies.
- Bake for 28–32 minutes, rotating the pan halfway through. You'll know they're done when the edges have puffed slightly and pulled away from the foil, the center jiggles like a lazy wave when you shimmy the pan, and a toothpick inserted two inches from the edge comes out with a few moist crumbs—no wet batter. They'll continue cooking from residual heat, so err on the side of under-baking; you can always pop them back in, but you can't un-bake a dry brownie.
- Cool the pan on a wire rack for 10 minutes—this sets the crumb so your first cut doesn't ooze like a lava cake. Use the foil sling to lift the entire slab onto the rack and let it cool completely, about an hour. If you're impatient (and I am), park the rack in the fridge for 20 minutes; cold brownies slice cleaner, and you can always warm individual squares later for that molten-core experience.
That's it—you did it. But hold on, I've got a few more tricks that'll take this to another level, starting with why your nose is actually the best kitchen timer you own.
Insider Tricks for Flawless Results
The Temperature Rule Nobody Follows
Room-temperature ingredients aren't just culinary snobbery; they're chemistry. Cold eggs tighten the butter, creating grainy pockets that ruin the satin texture you're chasing. Pull eggs, butter, and even the bag of brown sugar 30 minutes before mixing. If you're the forgetful type (hi, same), submerge whole eggs in warm tap water for five minutes and microwave the brown sugar for 15 seconds to soften it. Your batter will emulsify into a glossy mirror that bakes evenly from edge to center.
Why Your Nose Knows Best
Forget timers—when the cocoa-butter mixture smells like a liquid version of a chocolate croissant, it's ready. Overheating drives off volatile aromatics, leaving you with flat, cardboard chocolate. Once you catch that nutty, toasted scent, pull the pan off heat immediately; residual warmth will finish the job. A friend tried pushing it to a full brown butter and ended up with brownies that tasted like burnt popcorn. Learn from her trauma.
The 5-Minute Rest That Changes Everything
After baking, let the pan rest on a cold burner for exactly five minutes—no more, no less. This brief pause allows the starches to retrograde, setting the gooey middle so it doesn't gush like a broken dam when you slice. Skip this and you'll scoop out brownie pudding; wait longer and cold edges will tug against the warm center like a bad duet. Set a timer; TikTok will still be there when you're done.
Creative Twists and Variations
This recipe is a playground. Here are some of my favorite ways to switch things up:
The Monster Mash-Up
Swap half the M&M's for chopped Oreos and Reese's Pieces. The cream filling melts into soft pockets, while the peanut butter candies give you that salty-sweet pop that keeps grown-ups hovering around the dessert table pretending they need "just one more bite for quality control."
Caramel-Cauldron Brownies
Pour a 14-ounce can of dulce de leche over the cooled slab, then drag a toothpick through in spirals. Chill until set, then sprinkle with flaky salt. The caramel acts like edible glue, adhering extra candy eyes so every square stares back at you like a possessed dessert.
Spicy Aztec Edition
Whisk ½ teaspoon cayenne and 1 teaspoon cinnamon into the cocoa powder. The heat sneaks up like a ghost—first you taste chocolate, then a warm tingle blooms in the back of your throat. Serve with cold milk for maximum dramatic contrast.
Gluten-Free Graveyard
Sub in a 1:1 gluten-free baking blend, but add an extra egg yolk for richness since GF flours tend to absorb more fat. Crushed chocolate-covered pretzels on top mimic crunchy grave dirt, and candy bones from the cake-decorating aisle make adorable (if slightly morbid) decorations.
Vegan Vampire
Replace butter with coconut oil, eggs with flax eggs (1 tablespoon ground flax + 3 tablespoons water per egg), and use vegan chocolate. The coconut oil adds a faint tropical note that pairs surprisingly well with orange zest, making the whole thing taste like a chocolate orange you can sink your fangs into.
White Chocolate Phantom
Stir ½ cup white chocolate chips into the batter along with the M&M's. The ivory chips create ghostly pockets that contrast against the dark crumb, and they caramelize slightly on top, giving you toasted marshmallow flavor without the campfire smoke.
Storing and Bringing It Back to Life
Fridge Storage
Once fully cool, slide the slab—still on the foil—into a gallon zip-top bag, press out excess air, and refrigerate up to five days. The chill turns them into dense, truffle-like bricks that pair beautifully with coffee. Let a square sit on the counter for 15 minutes before eating; the flavors open up as the butter softens.
Freezer Friendly
Cut into squares, layer between parchment in an airtight container, and freeze up to three months. Thaw overnight in the fridge, then warm individual pieces in the microwave for 12 seconds. Pro tip: add a tiny splash of water before microwaving; it steams the brownie back to gooey perfection without drying the edges.
Best Reheating Method
For that fresh-from-the-oven experience, place a square on a piece of foil in a 300°F oven for 6 minutes. The gentle heat revives the glossy top and softens the candy without turning it into sticky lava. Serve immediately with a scoop of orange-vanilla ice cream for maximum Halloween vibes.