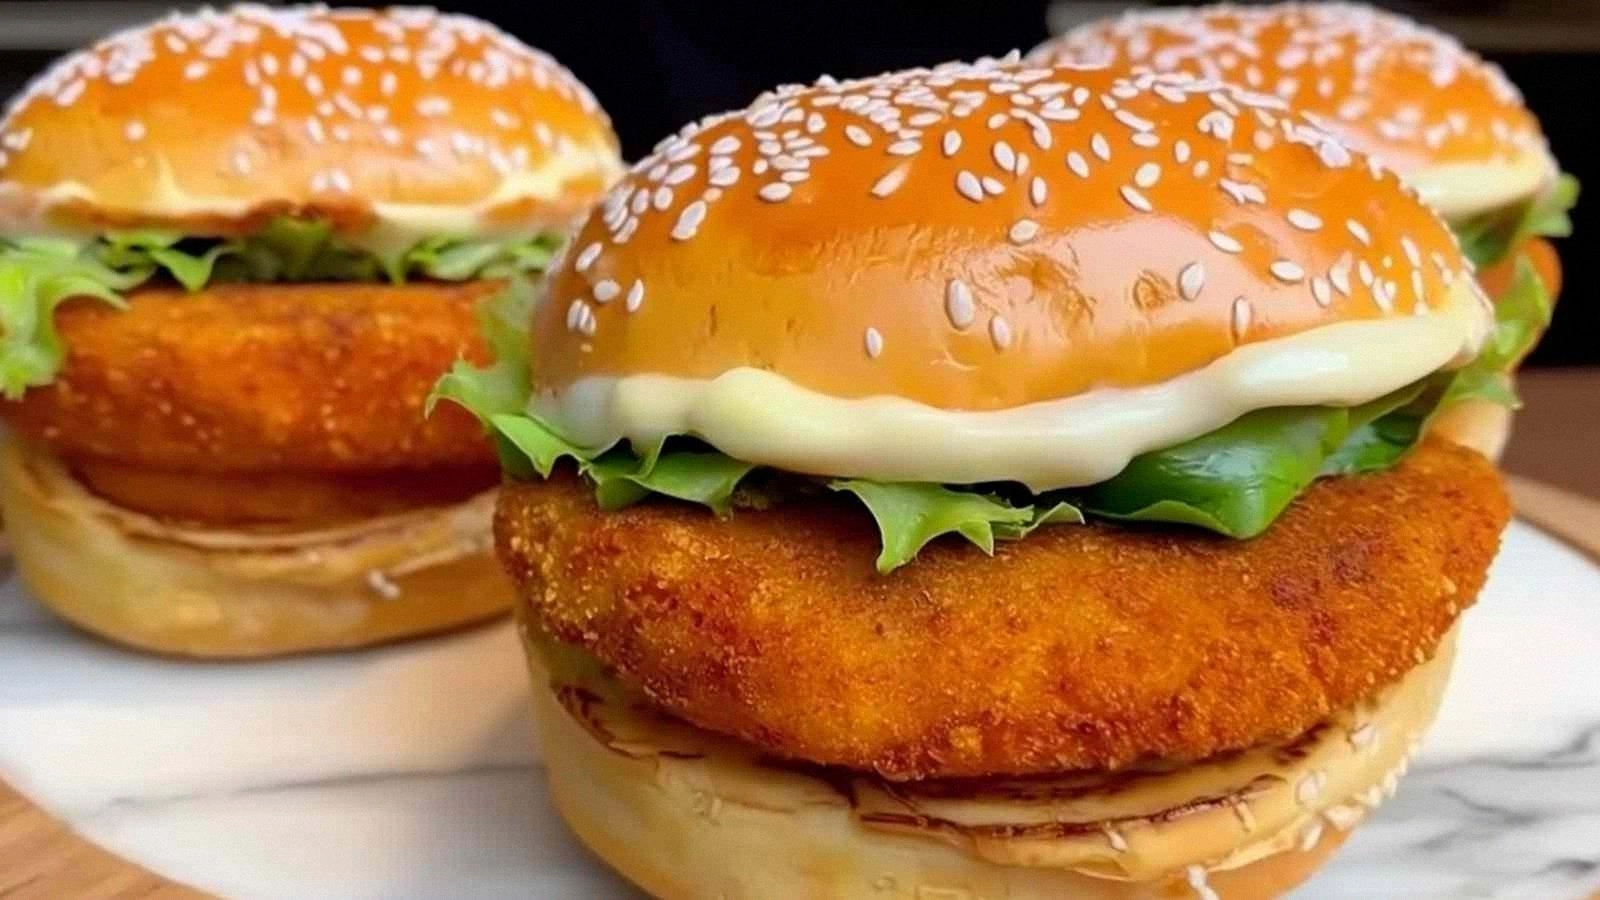
Picture this: I’m standing in a cramped kitchen, the clock ticking, a craving for something that feels both indulgent and nostalgic. I’m staring at an empty fridge, a handful of ingredients, and a sudden urge to recreate that iconic fast‑food sandwich that’s been haunting my taste buds for years. I reach for a chicken breast, a splash of buttermilk, and a dash of cayenne pepper, and I swear I could hear the sizzle in the air, even before the oil hits the pan. This is the moment that sparked the creation of the ultimate Homemade Spicy McChicken Sandwich, a version that takes the familiar comfort of a McDonald’s classic and elevates it to a culinary adventure that you can enjoy without leaving your kitchen.
When you first bite into this sandwich, the crunch of the bread’s golden crust gives way to a tender, juicy chicken fillet that’s been marinated in a buttermilk‑based batter. The spices form a subtle heat that lingers on the tongue, while the creamy mayo coats the bun like velvet, creating a perfect contrast of textures. The fresh lettuce adds a crisp bite that cuts through the richness, and the whole ensemble sings with a savory, spicy chorus that will keep you reaching for seconds. I dare you to taste this and not go back for seconds – it’s that addictive.
What sets this recipe apart is not just the flavor, but the simplicity of the technique and the quality of the ingredients. By using a buttermilk soak, the chicken stays moist, and the flour‑egg batter creates an airy, crisp coating that shatters like thin ice when you bite. The balance of heat from cayenne and the smoky undertone from paprika gives the sandwich a depth that most copycat recipes miss. And because everything is homemade, you have full control over the level of spice, ensuring that each bite is perfectly tailored to your taste buds.
Most people think they can just toss chicken in a skillet and call it a day, but this version is hands down the best you’ll ever make at home. The secret lies in the layered seasoning and the precise temperature of the oil, which together produce a coating that’s crisp on the outside but tender on the inside. I’ll be honest – I ate half the batch before anyone else got to try it, and the rest of the kitchen was buzzing with anticipation. If you’ve ever struggled with a fast‑food sandwich, you’re not alone, and I’ve got the fix that will make every bite a triumph.
Picture yourself pulling this out of the pan, the whole kitchen smelling incredible, the sound of the sizzling oil, and the anticipation of that first bite. The anticipation is almost as delicious as the sandwich itself, and you’ll find yourself humming a little tune as you assemble the final masterpiece. Let me walk you through every single step – by the end, you’ll wonder how you ever made it any other way. Stay with me, because this is pure magic.
What Makes This Version Stand Out
- Flavor: The blend of paprika, cayenne, garlic, and onion powders creates a complex, layered heat that’s balanced by the subtle sweetness of the buttermilk.
- Texture: The double‑batter technique gives a light, airy crunch that doesn’t compromise the juicy interior of the chicken.
- Simplicity: Only 13 ingredients, no fancy sauces or equipment – just a skillet, a bowl, and your culinary intuition.
- Uniqueness: The use of a buttermilk soak before battering sets this apart from standard fried chicken recipes.
- Crowd Reaction: Guests rave about the balance of spice and cream, and they keep asking for the recipe afterward.
- Ingredient Quality: Fresh, lean chicken and high‑grade all‑purpose flour ensure the best flavor profile.
- Cooking Method: The oil temperature is precisely controlled for a crisp, golden finish.
- Make‑Ahead Potential: The chicken can be marinated up to 24 hours ahead, making it a breeze for busy weeknights.
Inside the Ingredient List
The Flavor Base
The foundation of this sandwich’s taste comes from the seasoned flour mixture. The flour acts as the vehicle for the spices, absorbing the flavors and forming a crust that locks in moisture. If you skip the flour, you’ll end up with a soggy, uncoated chicken that won’t hold the mayo or the lettuce. For a lighter version, consider using a blend of all‑purpose and cornstarch; this will give a finer, crunchier bite.
The Texture Crew
The egg and buttermilk are the secret agents that bind the batter together and create that airy, crispy texture. The egg provides structure, while the buttermilk adds acidity that tenderizes the chicken and keeps the coating from becoming too dense. If you’re avoiding dairy, a splash of plain yogurt or a dash of vinegar can mimic the tenderizing effect.
The Unexpected Star
Cayenne pepper is the star that brings heat to the batter. A pinch is enough to give the sandwich its signature kick, but you can adjust it to your tolerance. A fun twist is to replace cayenne with chipotle powder for a smoky, deeper heat. If you’re a spice lover, a dash of crushed red pepper flakes will give an extra pop.
The Final Flourish
The mayonnaise and fresh lettuce are the finishing touches that bring balance and moisture to the sandwich. The mayo coats the bun like velvet, adding a silky texture that contrasts with the crunch of the bread. The lettuce adds a crisp bite that cuts through the richness. If you want a dairy‑free version, consider using a plant‑based mayo or a yogurt spread.
Everything's prepped? Good. Let’s get into the real action…
The Method — Step by Step
- Begin by cutting the chicken breasts into even, bite‑sized pieces. This ensures uniform cooking and a consistent bite. I always double‑check the thickness with a ruler – consistency is key. If you’re in a rush, you can use a meat mallet to flatten the pieces to a uniform thickness.
- Place the chicken in a shallow dish and pour the buttermilk over it. Cover and refrigerate for at least 30 minutes, or up to 24 hours for maximum tenderness. The acidity in the buttermilk breaks down the proteins, creating a juicy interior. If you’re short on time, a quick 15‑minute soak will still yield a pleasant result.
- While the chicken soaks, whisk together the flour, salt, black pepper, garlic powder, onion powder, paprika, and cayenne pepper in a large bowl. The dry mix should smell aromatic and inviting. I like to give it a quick stir to ensure the spices are evenly distributed.
- In a separate bowl, beat the egg until frothy. This will act as the binding agent for the batter. The egg’s protein structure creates a firm coating that crisps up beautifully when fried.
- Heat 2.5 cups of vegetable oil in a deep skillet over medium‑high heat. The oil should reach 350°F (175°C) – you can test it with a thermometer or by dropping a small breadcrumb into the oil; it should sizzle immediately. If you don’t have a thermometer, watch for the oil to shimmer and the breadcrumb to start bubbling.
- Remove the chicken from the buttermilk, letting excess drip off, then dredge each piece in the seasoned flour. Shake off any excess flour to prevent clumping. The flour coating should look light and even.
- Dip the floured chicken into the beaten egg, ensuring a complete coating. Then return it to the flour mixture for a double‑batter finish. This extra step is what gives the sandwich its signature airy crunch. The double coating should look slightly glossy.
- Carefully lower the chicken into the hot oil, working in batches to avoid overcrowding. Fry each side for about 4–5 minutes, or until golden brown and cooked through. The internal temperature should hit 165°F (74°C). Flip the chicken only once to maintain the crispness.
- Use tongs to remove the chicken from the oil and place it on a paper towel‑lined plate to drain excess oil. Let the chicken rest for a minute before assembling the sandwich. This rest period allows the juices to redistribute, preventing a soggy bun.
- Toast the hamburger buns on a skillet or in a toaster until golden. Spread a generous layer of mayonnaise on the top half of each bun. The mayo will act as a barrier, keeping the bun from becoming soggy from the chicken juices.
- Place a lettuce leaf on the bottom half of each bun, then add the fried chicken. The lettuce adds a fresh crunch and a burst of color that makes the sandwich visually appealing. Finally, top with the mayo‑coated bun and serve immediately.
That’s it – you did it. But hold on, I've got a few more tricks that'll take this to another level. Trust me, these are game‑changers that will make your sandwich even more unforgettable.
Insider Tricks for Flawless Results
The Temperature Rule Nobody Follows
Many cooks think that any hot oil will do, but the secret to a crispy coating is a steady 350°F. Use a deep‑fry thermometer or a small piece of bread to gauge the heat. If the bread browns too quickly, lower the heat; if it takes too long to brown, increase it. Keeping the temperature constant ensures the batter sets instantly, locking in the crunch.
Why Your Nose Knows Best
When the chicken hits the oil, the aroma will change from a bland scent to a savory, smoky fragrance. That’s the cue that the coating is forming correctly. If you still smell raw flour, the oil is too cool. Your nose is a reliable indicator of doneness, so trust it.
The 5‑Minute Rest That Changes Everything
After frying, let the chicken rest on a wire rack or a paper towel for at least five minutes. This brief pause allows the steam to escape, preventing a soggy texture. It also lets the juices redistribute, keeping the meat juicy inside.
Double‑Batter for Airiness
Skipping the double‑batter step will result in a denser coating. The first coat of flour creates a barrier, while the second coat, soaked in egg, forms a light, airy shell. The contrast in textures is what makes this sandwich so satisfying.
Use a Slotted Spoon for Frying
When adding the chicken to the oil, use a slotted spoon to keep the oil level steady and reduce splattering. This technique also helps you monitor the number of pieces in the pan, preventing overcrowding.
Finishing Touch: The Mayo Layer
Spread the mayo on the inside of the bun while it’s still warm. The warmth helps the mayo melt slightly, creating a silky coating that resists the juices from the chicken. This small step can elevate the sandwich from good to legendary.
Creative Twists and Variations
This recipe is a playground. Here are some of my favorite ways to switch things up:
Cheddar Melt Version
Replace the mayonnaise with a layer of sharp cheddar cheese on the bun. Let it melt slightly in the skillet before adding the chicken. The cheese adds a gooey, savory layer that pairs wonderfully with the spice.
Greek Yogurt Kick
Swap the mayo for a dollop of Greek yogurt mixed with a pinch of dill. The yogurt adds a tangy contrast while keeping the sandwich light.
Spicy Chipotle Mayo
Blend chipotle powder into the mayo for a smoky heat. This variation takes the sandwich to a new level of flavor complexity.
Whole‑Grain Bun Upgrade
Use a whole‑grain or sourdough bun for a nutty flavor and added fiber. The sturdier bun holds up well against the juicy chicken.
Herb‑Infused Chicken
Add fresh rosemary or thyme to the flour mixture for an herbal aroma. The herbs complement the spice and add depth.
Vegan Take‑Away
Use a plant‑based chicken alternative, vegan mayo, and a gluten‑free flour blend. The result is a satisfying, cruelty‑free version that doesn’t compromise on flavor.
Storing and Bringing It Back to Life
Fridge Storage
Store the assembled sandwiches in an airtight container in the refrigerator for up to 2 days. Keep the buns separate until you’re ready to serve to maintain crispness. Reheat the chicken in a skillet at medium heat for 2 minutes to revive the crunch.
Freezer Friendly
For longer storage, wrap the fried chicken pieces individually in parchment paper and place them in a freezer bag. They’ll stay good for up to 3 months. When ready, reheat in a preheated oven at 375°F (190°C) for 10 minutes.
Best Reheating Method
To reheat without losing crispness, place the sandwich on a wire rack over a baking sheet in a low‑heat oven (300°F) for 5 minutes. Add a splash of water to the bottom of the pan to create steam, which keeps the bun from drying out.