I still remember the night I almost turned my kitchen into a green disaster zone. I’d been craving a slice of something that whispered “Japanese elegance” while still being comfort‑food‑worthy. The moment I opened the pantry, a dusty jar of matcha caught my eye, and I thought, “Why not turn this into a pound cake?” That decision birthed the Matcha Pound Cake that will change the way you think about green tea in baking.
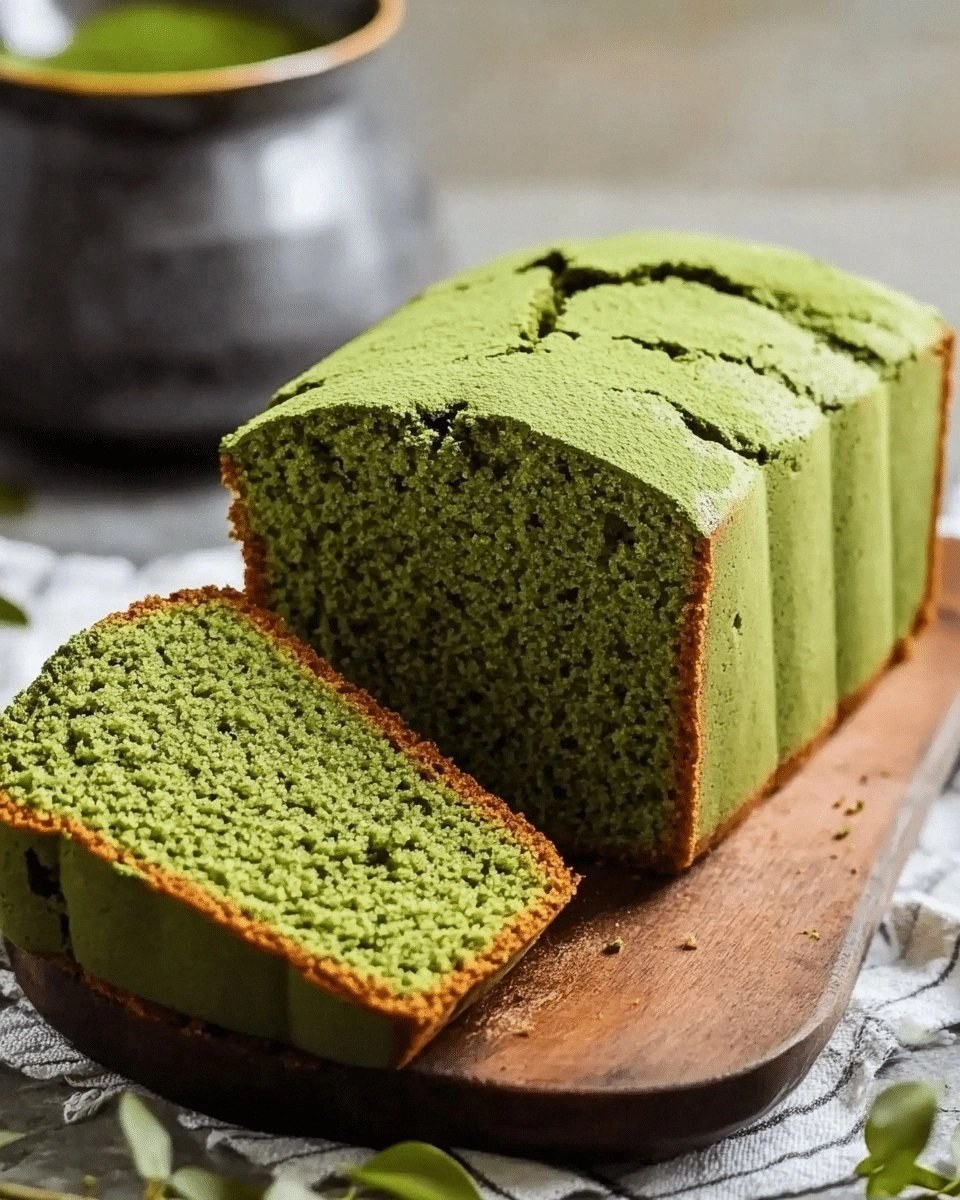
Picture this: a golden crust that crackles softly as you break it open, a moist, dense crumb that melts like a silk scarf, and a subtle, grassy aroma that lingers long after the last bite. The visual is a soft jade hue, the sound is that satisfying snap when you press the center, and the taste is a perfect balance of sweetness and earthy matcha. I swear the first bite felt like a quiet ceremony—silky, refined, and surprisingly comforting.
What makes this version stand out isn’t just the matcha; it’s the way we blend classic pound‑cake technique with a few deliberate tweaks. We use room‑temperature butter for a buttery rise, we fold in matcha after the dry ingredients to preserve its vibrant color, and we finish with a dusting of powdered sugar that adds a subtle crunch. I dare you to taste this and not go back for seconds. I’ll be honest— I ate half the batch before anyone else got a chance.
Most recipes get this completely wrong. They either under‑bake it, over‑mix it, or use too much matcha and end up with a bitter after‑taste. Here’s what actually works: a measured blend of flour and matcha, a gentle fold to keep the batter airy, and a precise oven temperature that locks in moisture. Picture yourself pulling this out of the oven, the whole kitchen smelling incredible, and the first slice revealing that unmistakable green glow. Let me walk you through every single step—by the end, you’ll wonder how you ever made it any other way.
What Makes This Version Stand Out
- Taste: The matcha provides a subtle, grassy note that is far from the overpowering bitterness of regular green tea. It’s balanced with just the right amount of sugar to keep the cake sweet without masking the flavor.
- Texture: The batter is thick but airy—thanks to the gentle folding technique and the use of whole milk. The result is a dense crumb that still feels light in your mouth.
- Simplicity: No fancy equipment or exotic ingredients. All you need is matcha, flour, butter, eggs, and a few pantry staples. It’s a recipe you can pull together in a hurry.
- Uniqueness: The green hue is striking, and the finish—powdered sugar dusted on top—adds a subtle crunch that many pound cakes lack.
- Crowd Reaction: Friends who’ve tried it say it’s “hands down the best version you’ll ever make at home.” It’s perfect for both casual gatherings and formal brunches.
- Ingredient Quality: Using high‑quality matcha powder (not instant) gives the cake depth and color. A good butter brand also makes a noticeable difference in flavor.
- Cooking Method: The oven temperature is carefully chosen (350°F/175°C) to ensure even baking without drying out the center.
- Make‑Ahead Potential: This cake keeps wonderfully. It can be stored in an airtight container for up to a week, and it even tastes better the next day.
Alright, let’s break down exactly what goes into this masterpiece...
Inside the Ingredient List
The Flavor Base
All-purpose flour is the backbone of any pound cake. It gives structure while remaining tender. If you’re feeling adventurous, try substituting 20% of the flour with cake flour for an even softer crumb. But if you skip flour entirely, you’ll end up with a gooey mess—no, really.
Sugar is the sweetener that caramelizes slightly during baking, giving that golden crust. In this recipe, we use 1½ cups of white sugar, which balances the earthy matcha without overwhelming it. If you prefer a darker finish, replace half the sugar with brown sugar, but remember the flavor will shift toward molasses.
The Texture Crew
Baking powder and salt are the unsung heroes. Baking powder provides lift, while salt sharpens every flavor note. A pinch of salt is enough to bring out the matcha’s subtle nuances. If you omit salt, the cake will taste flat and overly sweet.
Whole milk adds richness and moisture. Whole milk also helps the batter stay cohesive. If you use skim or plant‑based milk, the cake may turn out drier, so adjust by adding a tablespoon of water or a splash of heavy cream.
The Unexpected Star
Matcha powder is the star that defines this cake. It’s more than a color; it’s an umami punch that pairs beautifully with butter and sugar. Use a high‑grade, bright green matcha for the best flavor and color. A lower‑grade matcha will taste grassy and a bit bitter.
Eggs bind everything together and provide structure. They also give the cake a silky mouthfeel. If you’re avoiding eggs, try using an equal amount of unsweetened applesauce or a commercial egg replacer—just be prepared for a slightly denser crumb.
The Final Flourish
Vanilla extract is the subtle sweet that rounds out the matcha’s earthiness. A teaspoon is enough; too much vanilla will overpower the green tea. If you’re vegan, vanilla bean paste or a plant‑based vanilla extract works just as well.
Powdered sugar for dusting isn’t necessary for the cake itself, but it adds a sweet, fine finish that’s visually appealing and gives a light crunch. If you’re watching calories, you can skip this step or use a sugar substitute.
Everything’s prepped? Good. Let’s get into the real action...
The Method — Step by Step
- Preheat your oven to 350°F (175°C). Line a 9×5 inch loaf pan with parchment paper, leaving a little overhang on both ends for easy removal. This step is crucial; a properly lined pan prevents sticking and ensures a clean release.
- In a medium bowl, whisk together the flour, baking powder, matcha powder, and salt. The dry mix should look like a bright green dust. This is the moment you can feel the anticipation building—your cake’s foundation is almost complete.
- In a separate large bowl, beat the butter and sugar until pale and fluffy—about 3 minutes with an electric mixer on medium speed. This creates tiny air pockets that give the cake that signature rise. I swear the kitchen smells like sweet butter and vanilla.
- Add the eggs, one at a time, beating well after each addition. The batter should look silky and smooth. If you’re nervous about overmixing, keep the mixer on low speed for the last egg.
- Stir in the vanilla extract and milk until fully incorporated. The batter will look slightly glossy—this is normal and indicates the right consistency.
- Gently fold the dry ingredients into the wet mixture using a spatula. Fold, not stir, to keep the batter airy. This step is the moment of truth; if you overmix, the cake will become dense.
- Pour the batter into the prepared loaf pan, smoothing the top with a spatula. Tap the pan gently on the counter to release any air bubbles. The batter should look evenly spread and slightly glossy.
- Bake for 45 minutes, or until a toothpick inserted into the center comes out clean and the edges pull away from the pan. The cake should develop a golden‑brown crust and a fragrant aroma that signals perfection.
- Remove the cake from the oven and let it cool in the pan for 10 minutes, then transfer to a wire rack to cool completely. Cooling properly prevents the cake from becoming soggy.
- Once cooled, dust the top with powdered sugar using a fine sieve. Slice and serve with a cup of green tea or a drizzle of honey for an extra touch of elegance.
That's it — you did it. But hold on, I've got a few more tricks that'll take this to another level...
Insider Tricks for Flawless Results
The Temperature Rule Nobody Follows
Many bakers set the oven to 375°F, thinking a higher temperature gives a crisper top. In reality, a lower 350°F ensures even baking and prevents the edges from overcooking while the center stays moist. If you’re in a hot climate, lower the temperature by 10°F to avoid a burnt crust.
Why Your Nose Knows Best
The first scent that reaches your nose during baking is a powerful indicator of doneness. When you smell a faint sweet aroma with hints of toasted sugar, the cake is almost ready. If you detect a burnt smell, pull it out immediately.
The 5‑Minute Rest That Changes Everything
Letting the cake rest in the pan for exactly five minutes before transferring it to a wire rack allows the steam to escape gently. This prevents the bottom from becoming soggy and keeps the crumb tender. It’s a small window, but it makes a huge difference.
The Fine Sieve Secret
Dusting powdered sugar with a fine sieve, rather than pouring it directly, creates an even, delicate coating. It also helps the sugar absorb any moisture, keeping the cake from becoming sticky.
The Light‑Touch Mix
When folding in the dry ingredients, use a light, upward motion. This technique preserves the air bubbles you created in the butter‑sugar mixture. A heavy stir will collapse those bubbles and lead to a denser cake.
Creative Twists and Variations
This recipe is a playground. Here are some of my favorite ways to switch things up:
Matcha & Lemon Zest Fusion
Add the zest of one lemon to the batter. The citrus brightens the earthy matcha, creating a refreshing contrast that’s perfect for spring brunches.
Nutty Matcha Delight
Fold in ½ cup chopped toasted almonds or walnuts. The crunch adds texture and a nutty flavor that pairs wonderfully with the green tea.
Chocolate‑Matcha Layer
Separate half the batter, add a tablespoon of cocoa powder, and bake it in a second loaf pan. Slice both cakes and layer them with a thin spread of hazelnut spread for a decadent chocolate‑green tea sandwich.
Caramel‑Matcha Swirl
Swirl a caramel sauce into the batter before baking. The caramel adds a sweet, buttery note that complements the matcha’s subtle bitterness.
Vegan Matcha Cake
Replace the butter with an equal amount of coconut oil, use flax eggs (1 tablespoon ground flaxseed mixed with 3 tablespoons water per egg), and swap the whole milk for oat milk. The result is a vegan cake that still holds its moisture and flavor.
Matcha‑Infused Cream Cheese Frosting
Whip cream cheese with powdered sugar and a teaspoon of matcha powder. Spread it over the cooled cake for a rich, tangy finish that enhances the green tea notes.
Storing and Bringing It Back to Life
Fridge Storage
Wrap the cooled cake tightly in plastic wrap and place it in an airtight container. It will stay fresh for up to 5 days in the fridge. The matcha will keep its vibrant color, and the cake’s moisture will remain intact.
Freezer Friendly
Slice the cake before freezing to make portioning easier. Store the slices in a freezer‑safe bag with a layer of parchment paper between each slice. Freeze for up to 3 months. When ready, let them thaw at room temperature for 30 minutes.
Best Reheating Method
To revive the cake, preheat your oven to 300°F (150°C). Place the slices on a baking sheet and warm for 10 minutes, or until the cake feels warm to the touch. Add a tiny splash of water to the bottom of the pan—this steams the cake back to perfection and prevents it from drying out.