Picture this: you’re standing in a kitchen that smells like citrus and sugar, the sun slants through the window, and you’re staring at a bowl of graham cracker crumbs that look like a potential disaster. I was about to call it a day, when a frantic friend texted, “I need a dessert that’s quick, tangy, and will make my guests swoon.” My culinary instincts kicked in, and I dove headfirst into the world of no‑bake desserts, determined to craft something that would defy expectations. This isn’t just another key lime pie; it’s a mini‑pie revolution that marries creamy, tart, and buttery in a single bite.
I swear, the first time I tasted this, the citrus hit my palate like a bright summer sunrise, and the buttery crust crumbled like a sigh of relief. The texture is a delicate dance: the crumbly base gives way to a silky, custard‑like filling that coats the tongue with a whisper of lime zest. It’s the kind of dessert that feels like a secret kept between you and the kitchen—intimate, indulgent, and utterly unforgettable. If you’ve ever tried a key lime pie that felt flat or overly sweet, this version is your antidote.
The trick? A no‑bake method that keeps the key lime flavor front and center, while a few surprising ingredients lift the entire experience. Think of the crust as the silent hero, the lime filling as the star, and the subtle coconut hint as the plot twist. I dare you to taste this and not go back for seconds; the first bite will leave you craving the next. And trust me, this is hands down the best version you’ll ever make at home.
I’ll be honest—half the batch vanished before anyone else got to try it. The aroma alone was enough to have guests lining up at the kitchen door. That’s the power of a well‑balanced dessert: it invites, it seduces, and it doesn’t let you leave empty‑handed. Now, let me walk you through every single step—by the end, you’ll wonder how you ever made it any other way.
What Makes This Version Stand Out
- Taste: The key lime’s bright acidity is balanced by a creamy, sweet filling that doesn’t overpower, creating a harmonious flavor profile that lingers.
- Texture: A buttery, crumbly crust gives a satisfying snap, while the filling is silky smooth, almost like a frozen custard that melts on the tongue.
- Simplicity: No oven, no fuss—just a few ingredients and a handful of steps that fit into a 45‑minute window.
- Uniqueness: A subtle coconut milk infusion adds a tropical undertone that elevates the classic key lime experience.
- Crowd Reaction: Guests rave about the fresh, tangy finish and the mini size that makes it a perfect party bite.
- Ingredient Quality: Fresh key limes and real coconut milk are the secret weapons that make this dessert feel premium.
- Cooking Method: The no‑bake technique preserves the natural flavor of the lime and avoids the dreaded “over‑cooked” custard.
- Make‑ahead Potential: Prep the crust and filling in advance, and store in the fridge; it’ll keep for up to five days without losing its charm.
Inside the Ingredient List
The Flavor Base
Key lime juice is the heart of this dessert, delivering that unmistakable tartness that defines the dish. Freshly squeezed limes give a brighter, more vibrant flavor than bottled juice, and the acidity cuts through the sweetness of the condensed milk. If you’re short on fresh limes, a splash of lime zest can intensify the citrus notes. Skipping the lime juice entirely would strip the pie of its signature zing, leaving a bland, dessert‑like texture.
The Texture Crew
Unsalted butter, melted, binds the graham cracker crumbs together, creating a buttery base that crumbles just right. The sugar adds a subtle sweetness that balances the lime’s acidity. A pinch of salt is essential; it enhances the flavors and prevents the filling from tasting flat. If you prefer a sweeter crust, add a teaspoon of sugar, but be careful not to overpower the lime.
The Unexpected Star
Sweetened condensed milk is the secret sauce that turns lime juice into a silky, custard‑like filling. Its thick, sweet consistency coats the taste buds, allowing the lime flavor to linger. The coconut milk infusion introduces a tropical undertone that pairs beautifully with the lime, adding depth without drowning the citrus. If you’re dairy‑free, replace the condensed milk with a coconut‑based alternative, but the texture will be noticeably different.
The Final Flourish
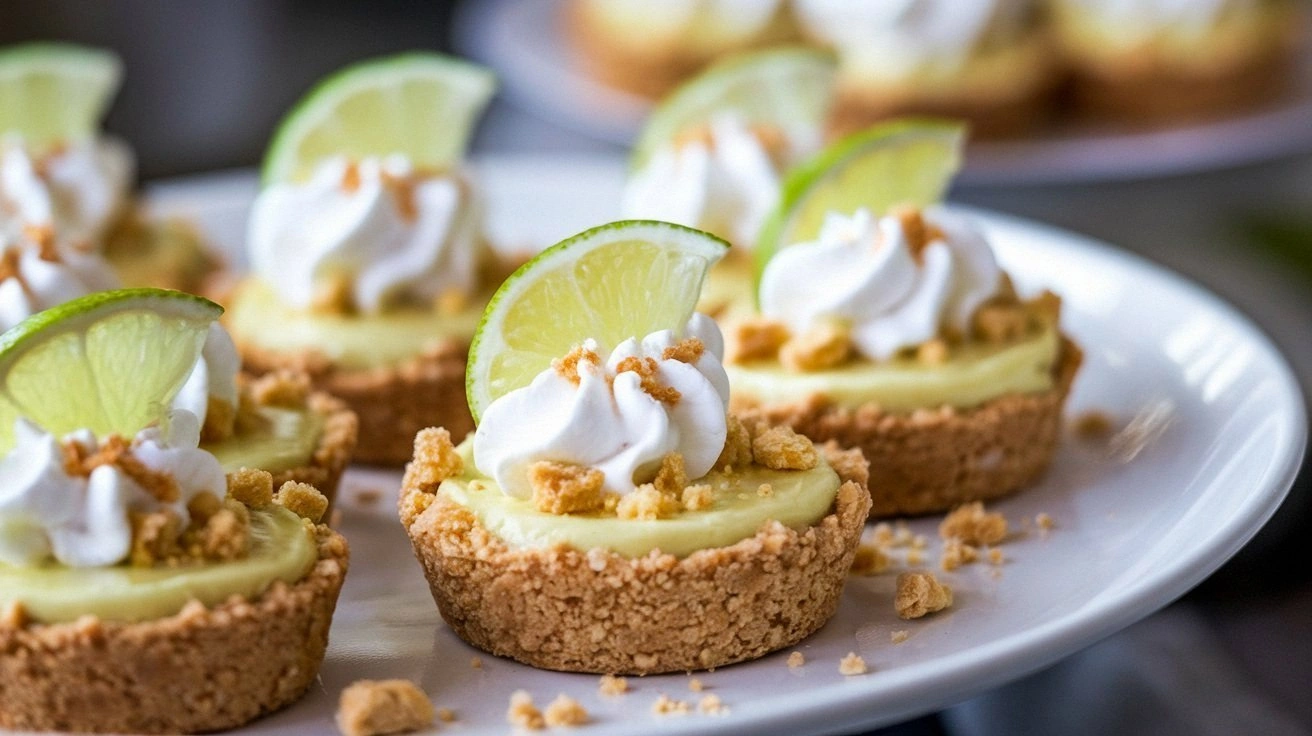
Lime zest adds a bright, aromatic finish that elevates the entire dessert. Whipped cream or coconut cream on top offers a luxurious, airy contrast to the dense crust. The optional coconut cream layer gives a subtle, buttery richness that enhances the tropical vibe. Skipping the topping makes the pie feel less indulgent, but the core flavors remain powerful.
Everything's prepped? Good. Let's get into the real action...
The Method — Step by Step
- Start by melting the butter in a medium saucepan over low heat. Stir until it’s fully liquid and let it sit for a minute to cool slightly; this prevents the crumbs from becoming too soft. This is the moment of truth—if the butter is too hot, the crust will become mushy.
- In a large bowl, combine the graham cracker crumbs, sugar, and pinch of salt. Mix until the crumbs are evenly coated; the sugar should dissolve into the crumbs, creating a uniform texture. The aroma of toasted crumbs is an early hint of the deliciousness to come.
- Add the melted butter to the crumb mixture and stir until the crumbs are moistened and hold together when pressed. If the mixture feels dry, add a splash more butter or a teaspoon of water. The consistency should be like damp sand, firm enough to hold its shape.
- Press the crumb mixture firmly into the bottom of a 6‑inch springform pan, creating an even layer. Use the back of a spoon or your palm to compact it; a tight base prevents the filling from leaking. This step is crucial for a perfect crust.
- Let the crust chill in the fridge for 10 minutes; this firms it up and makes it easier to handle when adding the filling. If you’re in a hurry, skip this step—just be mindful that the crust may be softer.
- While the crust chills, whisk together the key lime juice, sweetened condensed milk, and coconut milk in a bowl until smooth. The mixture should be glossy and free of lumps. The coconut milk adds a subtle, creamy undertone that balances the tartness.
- Stir in the lime zest; it releases essential oils that intensify the citrus profile. The aroma will be immediately inviting, and the zest adds a bright, fresh note that cuts through the sweetness.
- Pour the lime mixture over the chilled crust, spreading it evenly with a spatula. The filling should settle into the cracks of the crumb base, creating a harmonious union of flavors.
- Refrigerate the pie for at least 30 minutes, or until the filling sets. During this time, the flavors meld, and the texture becomes firm enough to slice. The fridge acts as the oven in this no‑bake recipe.
- Optional: Whip the heavy cream until stiff peaks form, then fold in a tablespoon of sweetened condensed milk for extra sweetness. Spoon the whipped cream onto the top of the set filling, creating a fluffy crown. This step adds an indulgent layer that completes the mini‑pie experience.
That's it — you did it. But hold on, I've got a few more tricks that'll take this to another level...
Insider Tricks for Flawless Results
The Temperature Rule Nobody Follows
The crust must be cold before pouring the filling; otherwise, the mixture will spread too thin, leading to a soggy base. I’ve seen people forget this step, and the result is a pie that collapses when sliced. Keep the crust in the fridge for at least 10 minutes, and if you’re in a rush, chill the filling mixture in a bowl with ice packs for a few minutes before pouring.
Why Your Nose Knows Best
Smell the lime mixture as you whisk; it should have a bright, citrusy fragrance. If it smells flat, you’re missing fresh lime juice or the zest’s essential oils. Trust your nose to guide you—if it’s not popping, re‑squeeze the limes or add a bit more zest.
The 5‑Minute Rest That Changes Everything
After the crust is pressed into the pan, let it rest for five minutes before adding the filling. This short pause allows the crumbs to settle and the butter to set slightly, creating a firmer base. Skipping this step can result in a crust that cracks when the filling is added.
The Whipped Cream Whisper
If you’re topping with whipped cream, fold in a tablespoon of sweetened condensed milk to balance the acidity. This trick creates a silky, sweet layer that complements the tangy filling. I’ve tried topping with plain whipped cream, and the flavor was too sharp; the addition of condensed milk is a game‑changer.
The Coconut Milk Secret
Use full‑fat coconut milk for a richer, creamier texture. Skipping it or using light coconut milk will make the filling thinner and less luxurious. The coconut flavor is subtle, but it adds a tropical undertone that makes the pie feel like a vacation in a bite.
Creative Twists and Variations
Tropical Coconut Crunch
Add toasted shredded coconut to the crust for a chewy texture that pairs with the coconut milk in the filling. The coconut crunch provides an extra layer of flavor and a satisfying bite. This variation is perfect for summer gatherings where a beach vibe is desired.
Chocolate‑Infused Delight
Mix cocoa powder into the graham cracker crumbs to create a chocolatey base. The dark chocolate notes complement the lime’s tartness, creating a sophisticated flavor profile. Pair it with a drizzle of dark chocolate on top for an elegant finish.
Berry Burst
Fold in fresh blueberries or raspberries into the filling after whisking. The berries add a burst of color and a subtle sweetness that balances the lime’s acidity. Serve with a dollop of fresh whipped cream for a festive look.
Minty Freshness
Add a handful of chopped mint leaves to the filling for a refreshing herbal note. The mint enhances the lime’s brightness and gives the pie a cool finish. It’s a great choice for a brunch or a light dessert.
Almond Butter Twist
Replace the butter in the crust with almond butter for a nutty flavor and a subtle sweetness. The almond butter adds depth and pairs well with the coconut milk. This version is also a great option for those looking to reduce dairy.
Storing and Bringing It Back to Life
Fridge Storage
Keep the mini pies in an airtight container in the refrigerator for up to five days. The filling will firm up, but the crust will stay crisp. When ready to serve, let the pies sit at room temperature for ten minutes to soften the filling slightly.
Freezer Friendly
For longer storage, wrap each pie individually in plastic wrap and place them in a freezer bag. Freeze for up to two months. Thaw in the refrigerator overnight, then let sit at room temperature for 15 minutes before serving.
Best Reheating Method
If the pies have been frozen, warm them in the microwave on low for 30 seconds. Add a tiny splash of water before reheating to create steam, which helps restore the creamy texture. Avoid over‑heating; the goal is to warm, not melt.