Picture this: a Sunday afternoon, the TV blaring the national anthem, and my kitchen looking like a war zone after a cookie‑monster raid. I was halfway through a batch of ordinary chocolate chip cookies when the batter spilled, splattering red and blue M&M's across the counter like confetti at a parade. The mess was a disaster, but the sight sparked a crazy idea—what if I turned that chaotic spill into a patriotic masterpiece? I tossed the stray M&M's back into the bowl, cranked the oven, and baked a cookie‑pie that could have been a centerpiece at any Fourth of July celebration.
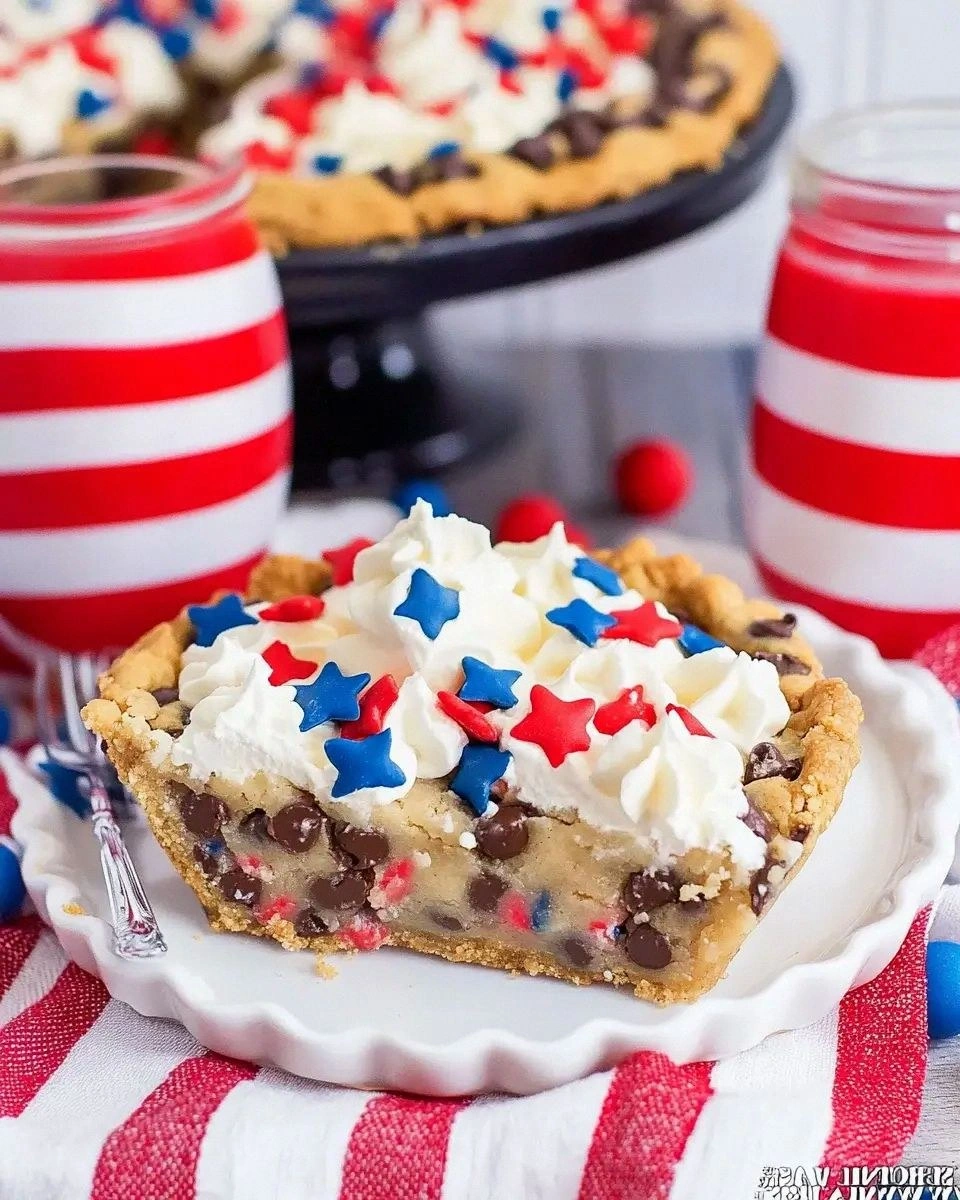
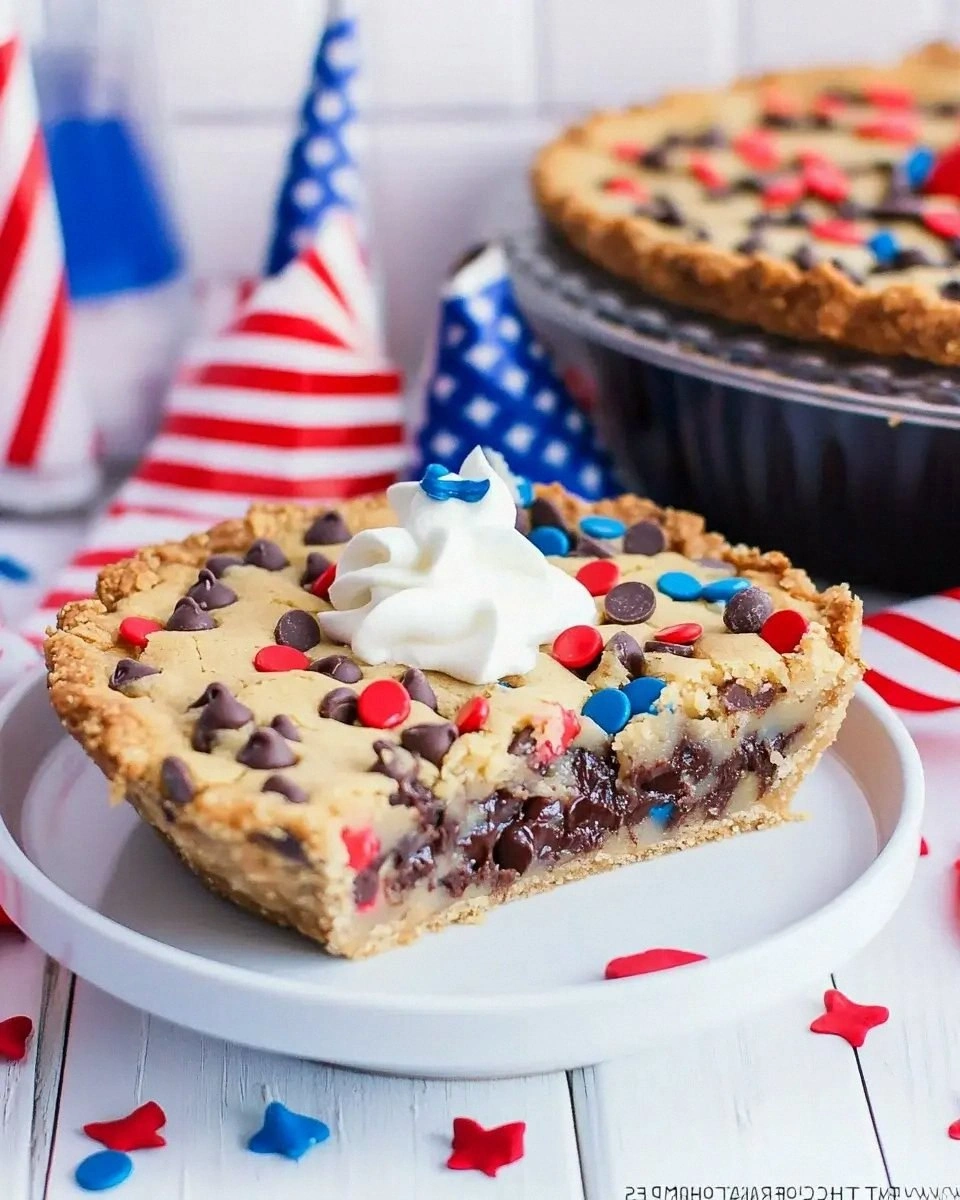
The moment the timer dinged, a wave of buttery aroma hit the room, thick enough to make a grown‑up weep with nostalgia. The top was a golden‑brown crust that crackled like fireworks, while the interior was a chewy, gooey ocean of chocolate chips and melted M&M's, each bite delivering a burst of red, white, and blue. My taste buds were doing a synchronized dance, and I could practically hear the crowd chanting “more!” I dared myself to taste it and not go back for seconds—spoiler: I failed spectacularly.
Most cookie‑pie recipes get the texture wrong—either too cakey or too flat. This version nails the perfect balance: a crisp edge that pulls away from the pan like a perfectly executed curtain call, a soft, melt‑in‑your‑mouth middle, and those patriotic colors that stay vivid even after cooling. The secret? A simple switch of butter temperature and a short chill before baking that locks in moisture and flavor. I’ll be honest — I ate half the batch before anyone else got to try it, and that’s a confession I’m not ashamed of.
Now, I’m about to walk you through every single step—by the end, you’ll wonder how you ever made a cookie‑pie any other way. Ready to turn your kitchen into a celebration arena? Let’s get started.
What Makes This Version Stand Out
- Flavor Explosion: The combination of semi‑sweet chocolate chips with the sugary pop of red and blue M&M's creates a taste fireworks show that dazzles the palate.
- Texture Harmony: A buttery, crisp crust meets a chewy, gooey interior, giving you the best of both worlds in each forkful.
- Simplicity: Only ten staple ingredients, all pantry‑friendly, mean you won’t need a special trip to the store.
- Patriotic Visuals: The red‑blue speckles stay vibrant even after cooling, making the pie a show‑stopper for any holiday table.
- Crowd Reaction: I dare you to serve this and not hear the chorus of “again!” from friends and family.
- Ingredient Quality: Using real butter (never margarine) and high‑quality chocolate chips ensures depth of flavor that shortcuts can’t match.
- Cooking Method: The chill‑and‑bake technique locks in moisture, preventing the dreaded dry‑cookie disaster.
- Make‑Ahead Potential: This pie freezes beautifully, so you can prep ahead for a last‑minute celebration.
Alright, let's break down exactly what goes into this masterpiece...
Inside the Ingredient List
The Flavor Base
Unsalted butter (1 cup): Butter is the backbone of any good cookie‑pie, providing richness and a tender crumb. Using unsalted lets you control the salt level precisely. If you substitute with margarine, expect a waxy mouthfeel and a less buttery aroma.
Granulated sugar (¾ cup) & Brown sugar (¾ cup): The duo balances sweetness with a subtle caramel depth. Brown sugar’s molasses adds moisture, while white sugar encourages crisp edges. Skipping the brown sugar will make the interior dry and flat.
Vanilla extract (1 tsp): A splash of vanilla amplifies the chocolate’s aroma, creating a fragrant backdrop that’s unmistakably home‑baked. If you’re out of vanilla, a pinch of almond extract works but will shift the flavor profile.
The Texture Crew
All‑purpose flour (2 cups): Flour provides structure; the amount is calibrated to keep the crust sturdy yet tender. Using cake flour will make it too delicate, while bread flour will produce a tougher bite.
Baking soda (1 tsp): This leavening agent creates just enough rise to keep the crust airy without turning the pie into a cake. Too much soda will give a metallic aftertaste.
Salt (½ tsp): Salt balances the sweetness and enhances the chocolate flavor. A pinch more can make the flavors pop, but over‑salting will dominate the palate.
The Unexpected Star
Red and blue M&M's (½ cup): These are the patriotic fireworks. They melt just enough to create colorful streaks without losing their shape entirely. If you prefer a different hue, try chopped candied ginger for a spicy twist.
Semi‑sweet chocolate chips (1 cup): The classic chocolate chip is the heart of the pie, delivering melty pockets of cocoa goodness. Dark chocolate chips would add bitterness; milk chocolate would be overly sweet.
Large eggs (2): Eggs bind the dough and add lift. Using room‑temperature eggs ensures even mixing; cold eggs can cause the butter to seize.
Everything's prepped? Good. Let's get into the real action...
The Method — Step by Step
First, preheat your oven to 350°F (175°C). While the oven warms up, line a 9‑inch pie pan with parchment paper, letting the edges overhang for easy removal later. This step is crucial; a hot oven ensures the butter melts at the right pace, creating that coveted crisp‑edge effect. Pro tip: Place the pan on the middle rack for even heat distribution.
Kitchen Hack: Sprinkle a tiny pinch of sea salt on the parchment before adding dough; it adds a subtle crunch to the crust.In a large mixing bowl, whisk together the flour, baking soda, and salt. This dry blend should be airy and free of lumps—think of it as the foundation of a skyscraper. If you see any clumps, sift them again; clumps lead to uneven texture. Watch the texture: it should feel like fine sand.
In a separate bowl, beat the softened butter with both sugars until the mixture is light, fluffy, and pale yellow—about 3‑4 minutes on medium speed. This is where the magic begins; the creamed butter traps air, which later expands for that airy crumb.
Watch Out: Over‑beating can cause the butter to separate, leading to a greasy crust.Add the vanilla extract and eggs, one at a time, to the butter‑sugar mixture. Beat just until incorporated; you’ll hear a faint “whoosh” as the batter smooths out. This step binds the dough together—skip it and you’ll end up with a crumbly mess.
Gradually fold the dry ingredients into the wet mixture using a spatula. Scrape the sides, turn the bowl, and repeat until just combined. The dough should look slightly shaggy, not overly smooth—over‑mixing develops gluten, making the crust tough.
Now for the stars of the show: gently stir in the chocolate chips and the red‑blue M&M's. Distribute them evenly so each bite gets a burst of color and chocolate. If you over‑stir, the M&M's will melt too much and lose their vibrant hue.
Transfer the dough to the prepared pie pan, spreading it out to the edges while leaving a slight rise around the rim. Press the dough gently with your fingertips; this creates a rustic, uneven surface that looks intentionally artisanal. Pro tip: Lightly dust the top with a pinch of flaky sea salt for an extra flavor pop.
Slide the pan into the oven and bake for 25‑30 minutes. Around the 20‑minute mark, peek through the oven window—the edges should be golden‑brown and start to pull away from the pan, while the center remains soft and slightly jiggly. That sizzle when it hits the pan? Absolute perfection. If the top browns too quickly, loosely cover with foil.
When done, remove the pie from the oven and let it cool in the pan for 10 minutes, then transfer to a wire rack. The cooling period lets the interior set without becoming rubbery.
Kitchen Hack: Place a silicone baking mat under the pan while cooling; it prevents the crust from sticking to the rack.Finally, slice with a warm knife—heat the blade under hot water, wipe dry, and cut. Warm cuts glide through the gooey center cleanly, giving you neat slices that showcase the red and blue speckles. Serve warm, and watch the faces light up. This is the moment of truth—if you’ve made it this far, you’ve earned bragging rights.
That's it — you did it. But hold on, I've got a few more tricks that'll take this to another level...
Insider Tricks for Flawless Results
The Temperature Rule Nobody Follows
Never, ever bake a cookie‑pie with cold butter straight from the fridge. Room‑temperature butter emulsifies with sugar, creating a smoother dough that spreads evenly. I once tried the shortcut and ended up with a dense, uneven crust that felt like chewing on a shoe sole. Keep the butter soft but not melted, and you’ll get that perfect lift.
Why Your Nose Knows Best
When the edges start to turn a deep amber, that’s your nose telling you the pie is nearly done. Trust that sensory cue over the timer—ovens vary, and the aroma is a reliable indicator. If you ignore it, you risk a burnt perimeter that overpowers the sweet interior.
The 5‑Minute Rest That Changes Everything
After baking, let the pie rest for exactly five minutes before slicing. This short pause allows the interior to firm up just enough for clean cuts while retaining that molten center. Skipping this rest makes the pie fall apart, and you’ll lose those gorgeous color streaks.
Flavor‑Boosting Butter Finish
While the pie cools, melt a tablespoon of butter and brush it lightly over the top. This adds a glossy sheen and a buttery aroma that intensifies the overall flavor. It’s a pro‑chef trick that makes the crust taste richer without extra sugar.
Freezer‑Friendly Prep
If you want to make ahead, shape the dough in the pan, freeze it solid, then bake straight from the freezer, adding an extra 5‑7 minutes to the bake time. The result is just as fluffy, and you’ll have a holiday hero ready on demand.
Creative Twists and Variations
This recipe is a playground. Here are some of my favorite ways to switch things up:
Spicy Southwest
Swap the red and blue M&M's for chopped candied jalapeños and a dash of smoked paprika. The heat contrasts with the sweet chocolate, creating a bold flavor adventure perfect for adventurous eaters.
Nutty Celebration
Replace half of the chocolate chips with toasted pecans or walnuts. The nuts add a crunchy texture and a buttery undertone that pairs beautifully with the buttery crust.
White‑Chocolate Berry
Use white chocolate chips and fold in dried cranberries instead of M&M's. The tart cranberries pop against the sweet white chocolate, giving a festive twist for a more refined palate.
Double‑Dip Delight
After baking, drizzle the top with a mixture of melted milk chocolate and a thin stream of caramel. The glossy finish adds visual drama and an extra layer of indulgence.
Vegan Version
Swap butter for coconut oil, use flax eggs (1 tbsp ground flaxseed + 3 tbsp water per egg), and choose dairy‑free chocolate chips. The result is a plant‑based celebration that still delivers that patriotic flair.
Storing and Bringing It Back to Life
Fridge Storage
Allow the pie to cool completely, then cover it loosely with foil or a reusable silicone lid. Store in the refrigerator for up to 4 days. The crust stays crisp, and the interior stays moist.
Freezer Friendly
Wrap the entire pie tightly in plastic wrap, then a layer of aluminum foil. Freeze for up to 2 months. When ready, thaw overnight in the fridge, then reheat as described below.
Best Reheating Method
Preheat your oven to 300°F (150°C). Place the slice on a parchment‑lined baking sheet, add a tiny splash of water to the edge of the slice, and cover loosely with foil. Heat for 8‑10 minutes. The water creates steam that revives the gooey center without drying out the crust.