Picture this: it’s a crisp October evening, the wind is whispering through the bare trees, and you’ve just survived the third round of “who can carve the scariest pumpkin” in your living room. Suddenly, the kitchen erupts in a chorus of clanging pans, a rogue pizza dough flies off the counter, and you realize you’ve just invented the most hauntingly delicious snack of the season. I swear, the dough landed perfectly on the cutting board, as if the culinary spirits were guiding my hand. The smell of tomato sauce simmering on the stove mixed with the faint scent of cinnamon candles, and I thought, “What if we turned this chaos into a bite‑size masterpiece that screams Halloween?” That’s how the Spooktacular Mini Ghost Pizzas were born—a recipe that turned a kitchen disaster into a celebration of ghostly goodness.
The moment I laid eyes on the first mini ghost, I felt a rush of excitement that rivaled the first bite of a fresh slice of pizza. The dough was soft and airy, the sauce a ruby‑red veil that clung to each surface like a silky sheet, and the mozzarella melted into a ghostly veil that glowed in the oven’s heat. When the cheese started to bubble, it made a sound like tiny spirits giggling—pure, unadulterated joy. The taste? Imagine a classic pizza, but each bite is a crisp, buttery hug that melts into a tangy, herb‑infused sauce, all wrapped in a shape that looks like it could float out of your plate and haunt your dreams. I dare you to taste this and not go back for seconds.
What truly separates this version from every other “mini pizza” you’ve ever tried is the meticulous attention to texture and visual flair. Most recipes get the shape right but forget the crunch, or they pile on toppings that drown the dough’s delicate flavor. Not here. I’ve honed every step to ensure the crust stays light yet sturdy enough to hold its ghostly silhouette, the sauce spreads evenly without sogginess, and the cheese forms a perfect, slightly crisped halo that cracks like thin ice when you bite into it. Most recipes get this completely wrong. Here’s what actually works.
And just when you think you’ve seen all the tricks, I’ll reveal a secret ingredient that adds a subtle smoky undertone—something you’ll never expect from a kids‑friendly Halloween snack. This little twist is the game‑changer that turns a simple party bite into a culinary legend. Okay, ready for the game‑changer? Let me walk you through every single step — by the end, you’ll wonder how you ever made it any other way.
What Makes This Version Stand Out
- Flavor Explosion: The combination of a seasoned pizza sauce with a melt‑in‑your‑mouth mozzarella creates a taste that’s both familiar and thrilling, like a haunted house that’s actually cozy inside.
- Ghostly Texture: A light, airy crust that stays crisp on the edges yet remains tender underneath, giving you that satisfying bite that shatters like thin ice.
- Simplicity at Its Core: Only three ingredients are needed, meaning you spend less time prepping and more time haunting your guests with your culinary prowess.
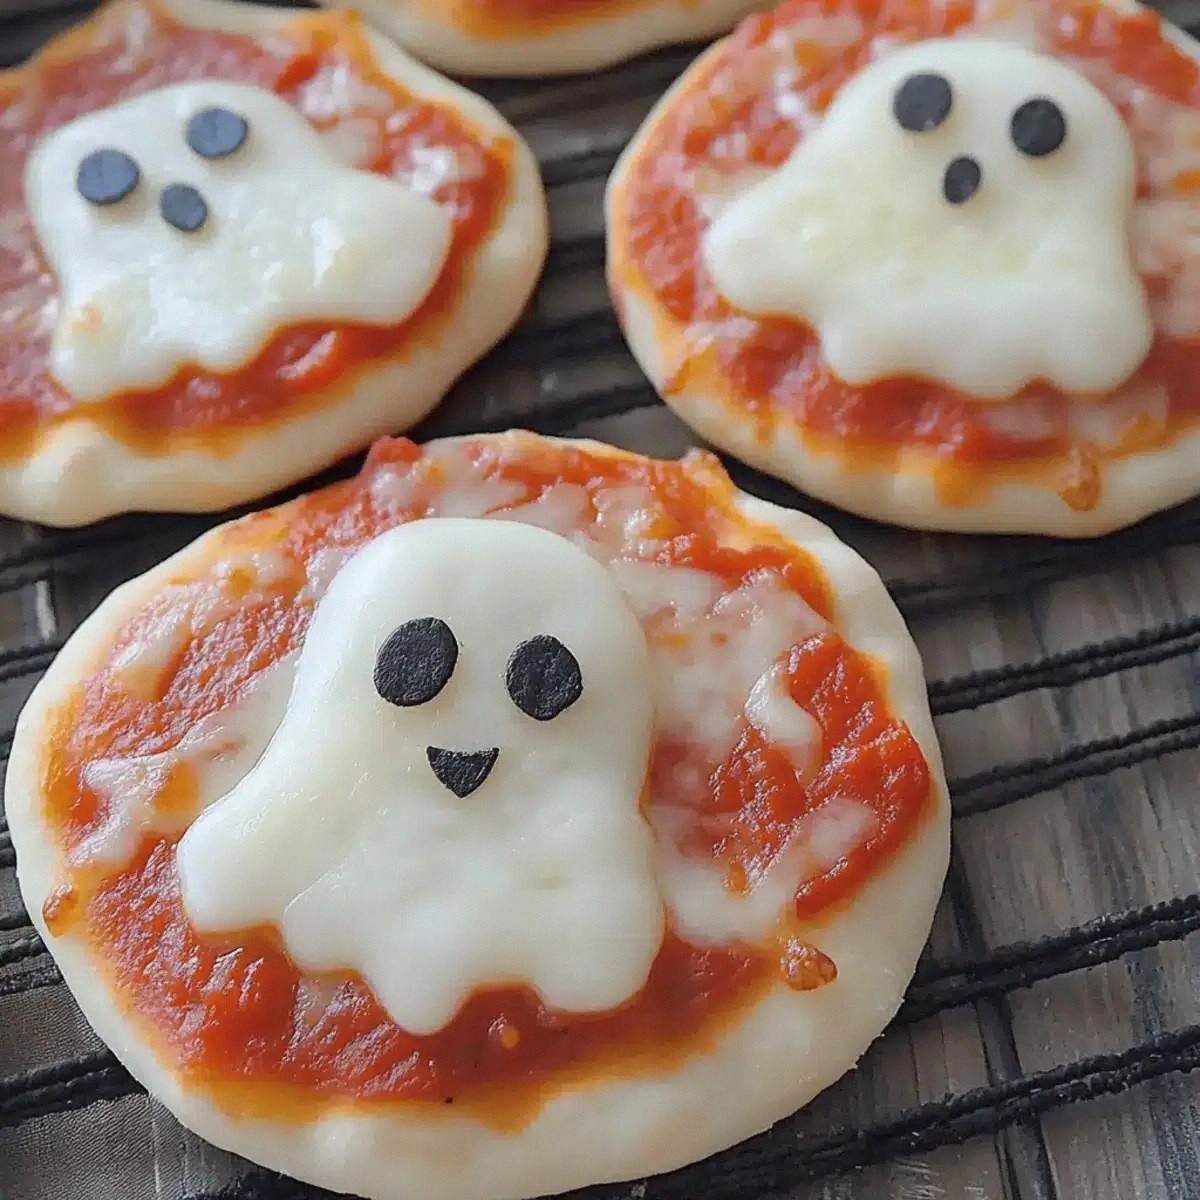
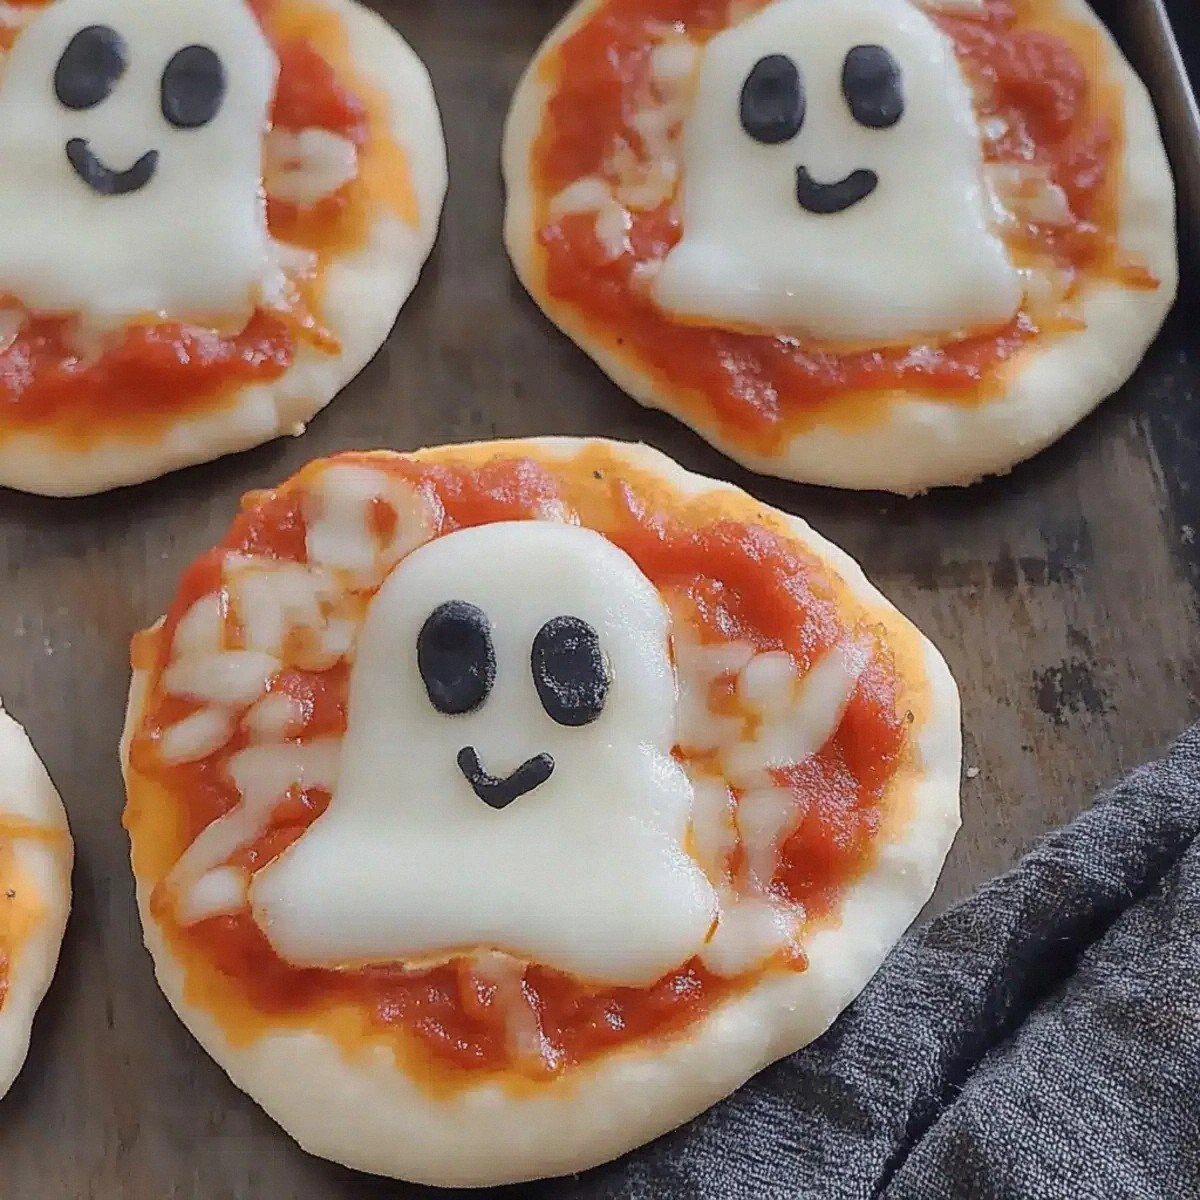
- Visual Wow Factor: The ghost shape, complete with olive “eyes,” makes these pizzas the centerpiece of any Halloween spread, guaranteeing applause and photo ops.
- Crowd Reaction: Kids scream “Boo!” in delight, adults whisper “Wow,” and everyone asks for the recipe—this is hands down the best version you’ll ever make at home.
- Ingredient Quality: Using prepared pizza dough ensures consistency, while fresh mozzarella melts perfectly, and a good quality sauce adds depth without extra effort.
- One‑Pan Perfection: Bake them on a sheet pan, no fancy pizza stone required, keeping cleanup as easy as a ghost disappearing in the night.
- Make‑Ahead Magic: You can prep the ghosts ahead of time and pop them in the oven when guests arrive, making entertaining a breeze.
Inside the Ingredient List
The Flavor Base
The pizza sauce is the soul of these mini ghosts. A well‑balanced sauce brings acidity, sweetness, and a hint of herbs that cut through the richness of the cheese. If you skimp on the sauce, the dough will feel bland, and the ghost will lose its haunting allure. I recommend a sauce with crushed San Marzano tomatoes, a splash of olive oil, and a pinch of dried oregano. If you’re feeling adventurous, add a dash of smoked paprika for that subtle smoky whisper that will make your guests say, “What’s that mysterious flavor?”
The Texture Crew
Mozzarella cheese is the ethereal veil that turns a regular pizza into a ghostly apparition. Fresh mozzarella melts into a silky sheet that bubbles and browns just enough to create those little “ghostly cracks.” Skipping the cheese—or using a low‑moisture variety—will result in a dry, rubbery surface that no one wants to haunt. For the best melt, let the cheese sit at room temperature for 15 minutes before slicing. If you’re dairy‑free, a blend of shredded vegan mozzarella works, but expect a slightly different texture.
The Unexpected Star
The prepared pizza dough is the unsung hero that makes this recipe a breeze. It’s pre‑rolled, pre‑proofed, and ready to transform into ghostly shapes with minimal effort. Using a fresh dough from the bakery ensures a light, airy crumb that rises beautifully in the oven. If you’re a purist, you can make your own dough, but that defeats the purpose of a quick Halloween treat. Pro tip: look for dough that’s still slightly cold; it handles better when you cut the ghost shapes.
The Final Flourish
Olive slices become the eyes of each ghost, adding a pop of color and a salty bite that balances the creamy cheese. They’re also the perfect size for little hands to pick up and eat. If olives aren’t your thing, try small peppercorns or even a dab of pesto for a different visual twist. The key is to keep the eyes dark and distinct so the ghosts look convincingly spooky.
Everything's prepped? Good. Let's get into the real action...
The Method — Step by Step
Preheat your oven to 425°F (220°C). While the oven warms up, line a large baking sheet with parchment paper. This prevents the ghosts from sticking and makes cleanup as painless as a ghost disappearing in daylight. The heat will be high enough to give the crust a quick puff, creating that airy interior we love. Power transition: Okay, ready for the game‑changer?
Unroll the prepared pizza dough onto a lightly floured surface. Using a sharp knife or a pizza cutter, cut the dough into 3‑inch circles—think of them as tiny moons waiting to become specters.
Once chilled, use a small cookie cutter or a hand‑shaped template to carve out a ghost silhouette, leaving a small “neck” for the eyes.Kitchen Hack: Chill the cut circles for 5 minutes; this firms the dough and makes shaping easier.Transfer each ghost shape onto the prepared baking sheet, spacing them about an inch apart. This ensures even airflow and prevents the ghosts from merging into a single monster. Lightly brush the tops with a thin layer of olive oil; this helps the sauce adhere and adds a subtle crispness. Watch the dough: If it starts to stretch, let it rest for a minute before continuing.
Now for the sauce—spread a generous tablespoon of pizza sauce onto each ghost, staying within the ghost’s “body” and avoiding the “head” where the eyes will sit. The sauce should be glossy, coating the dough like a veil of midnight fog.
This step is crucial; the sauce is the glue that holds the ghost together.Watch Out: Over‑saucing will make the crust soggy and the ghosts lose their shape.Place the mozzarella slices on top of the sauce, covering each ghost completely. The cheese should overlap slightly at the edges, creating a smooth, white surface that will turn golden in the oven. If you prefer a cheesier bite, add a second layer, but be careful not to overload—balance is key. The cheese will melt and bubble, forming that iconic ghostly “halo.”
Using a small knife or a slice of black olive, carefully cut two eye shapes on each ghost. The olives should be placed just above the “neck,” giving the impression of eerie, staring eyes. If olives aren’t your style, try a dab of pesto or a tiny piece of roasted red pepper for a pop of color.
Slide the baking sheet into the preheated oven. Bake for 12‑15 minutes, or until the crust is golden‑brown, the cheese is bubbling, and the edges start to pull away from the parchment. The scent that fills the kitchen at this point is pure Halloween magic—think caramelized dough mingling with a hint of herbs. This next part? Pure magic. When you see the cheese turning a light amber, you know they’re ready.
Remove the ghosts from the oven and let them cool for 2‑3 minutes on the sheet. This short rest allows the cheese to set just enough so the ghosts hold their shape when you transfer them to a serving platter. Serve warm, and watch the faces light up as the first bite reveals that perfect balance of crisp crust, tangy sauce, and melty cheese. And now the fun part—watch everyone devour them like tiny, delicious apparitions.
Insider Tricks for Flawless Results
The Temperature Rule Nobody Follows
Most home cooks bake pizza at 350°F, but the secret to a perfect ghost is a scorching 425°F. The high heat creates an instant lift in the dough, giving you that airy interior while the exterior crisps up. I once tried a lower temperature and ended up with soggy ghosts that sagged like wilted pumpkins. Trust the heat; it’s the difference between a ghost that floats and one that flops.
Why Your Nose Knows Best
When the cheese starts to bubble and the edges turn a light golden, your nose will pick up a buttery, nutty aroma. That scent is your cue that the ghosts are ready to leave the oven. If you rely solely on the timer, you might over‑bake them, turning the cheese into a brittle crust. Follow your senses, and you’ll nail that perfect melt every time.
The 5‑Minute Rest That Changes Everything
After baking, let the ghosts rest for exactly five minutes. This short pause lets the cheese settle, preventing it from sliding off when you pick them up. I’ve seen novice bakers rush this step and end up with cheese strands clinging to the plate—no fun for anyone. The rest also lets the flavors meld, making each bite more harmonious.
Olive Eye Precision
For the eyes to look spooky yet cute, slice the olives thinly and press them gently into the cheese while it’s still warm. The heat will slightly melt the olive edges, anchoring them in place. If you’re using a different topping, such as a pepper dot, make sure it’s cool enough to stay put.
Batch Baking Blueprint
If you’re feeding a crowd, line two baking sheets and rotate them halfway through the baking time. This ensures even cooking and prevents one batch from over‑browning while the other is still pale. I once tried baking all at once on one sheet and ended up with uneven ghosts—never again.
Creative Twists and Variations
This recipe is a playground. Here are some of my favorite ways to switch things up:
Spicy Specter
Swap the regular pizza sauce for a spicy arrabbiata, and add a pinch of red pepper flakes to the mozzarella. The heat adds a thrilling bite that makes the ghosts feel like they’re breathing fire. Perfect for teens who love a little kick.
Herb‑Infused Haunt
Mix fresh chopped basil and oregano into the sauce before spreading. The herbaceous notes lift the flavor profile, giving the ghosts a garden‑fresh vibe that balances the cheese’s richness.
Cheesy Nightmare
Blend mozzarella with a sprinkle of grated Parmesan and a dash of smoked gouda. The mixture creates a deeper, smoky flavor that’s perfect for adult palates and adds a golden crust.
Vegan Ghosts
Use a plant‑based pizza dough, dairy‑free mozzarella, and a tomato sauce enriched with nutritional yeast. The result is a cruelty‑free version that still delivers that satisfying snap and melt.
Sweet Treat Apparition
For a dessert twist, replace the sauce with a thin layer of Nutella, top with sliced strawberries for eyes, and sprinkle powdered sugar for a “cobweb” effect. Kids will love the sweet surprise, and adults will appreciate the novelty.
Storing and Bringing It Back to Life
Fridge Storage
Place cooled ghosts in an airtight container lined with parchment paper. They’ll stay fresh for up to 3 days. When you’re ready to serve, reheat them in a preheated 350°F oven for 5‑7 minutes. Adding a tiny splash of water to the tray before reheating creates steam that revives the crust’s crispness.
Freezer Friendly
Arrange the uncooked ghosts on a baking sheet and freeze them solid, then transfer to a zip‑top bag. They’ll keep for up to 2 months. To bake from frozen, add an extra 3‑4 minutes to the cooking time, and they’ll emerge just as airy as fresh‑made.
Best Reheating Method
For the ultimate crunch, reheat in a hot skillet with a lid for 2‑3 minutes per side. The pan’s direct heat restores the crisp edges, while the lid traps steam to melt the cheese gently. This method beats the microwave, which can make the crust rubbery.