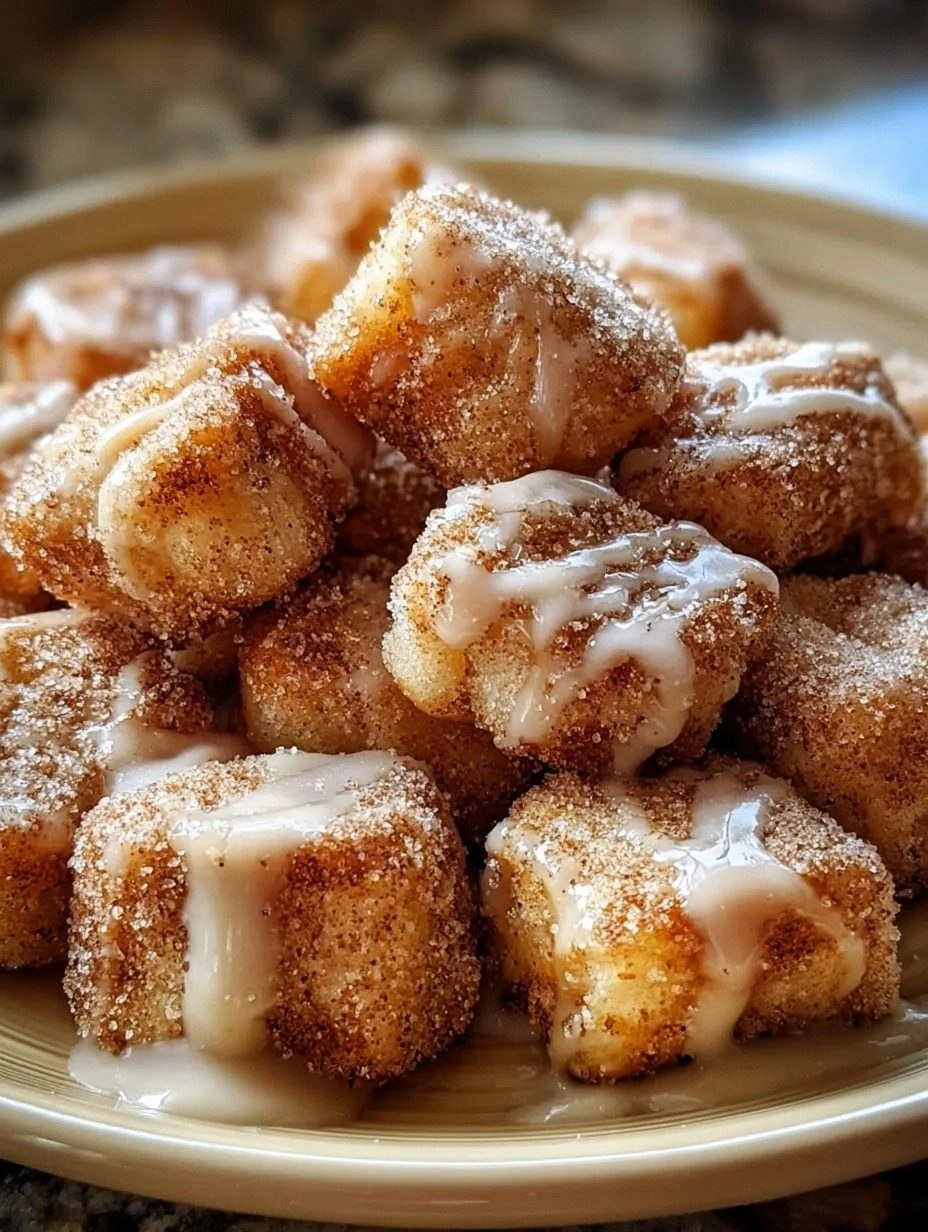
I was in the middle of a Sunday morning disaster when a rogue bag of cinnamon decided to stage a coup on my countertop. The spice flew everywhere, coating the floor, the cat, and my unsuspecting coffee mug. I stared at the chaos, half‑laughing, half‑panicking, and thought, “If I’m going to clean this up, I might as well make something that smells like a hug from a bakery.” That moment sparked the birth of what I now call the ultimate cinnamon sugar biscuit bites—an indulgent, bite‑size marvel that turned a mess into a masterpiece. I dare you to taste this and not go back for seconds.
Picture this: the oven door swings open, a warm wave of caramel‑cinnamon perfume rushes out, and the golden tops glisten with a delicate sugar crust that crackles like autumn leaves underfoot. The first bite delivers a buttery crunch that shatters like thin ice, followed by a soft, pillowy interior that melts on your tongue. Your nose picks up the faint hint of vanilla and a whisper of nutmeg, while the texture dances between crisp edges and a cloud‑like center. It’s the kind of comfort that makes you close your eyes, lean back, and say, “Okay, ready for the game‑changer?”
Most biscuit recipes get the balance wrong—either they’re dry as desert sand or soggy like a wet sock. I’ve tried the “quick fix” versions that promise fluffy results in ten minutes, only to end up with a bland, rubbery mess that would make a seasoned baker cringe. The secret to this version is a trio of techniques: a cold butter cut‑in method that creates steam pockets, a buttermilk soak that tenderizes the crumb, and a final cinnamon‑sugar glaze that caramelizes just enough to give that addictive crunch. Most recipes overlook one of these steps, but we’re not about shortcuts here.
And now the fun part: I’m going to spill the beans on a little ingredient that most people skip—cream of tartar. A pinch of it stabilizes the leavening, giving the biscuits a lift that feels like they’re floating on a cloud. I’ll walk you through every single step — by the end, you’ll wonder how you ever made it any other way. Stay with me here — this is worth it.
What Makes This Version Stand Out
- Flavor Explosion: The cinnamon‑sugar coating is not just a garnish; it’s a caramelized crust that bursts with spice the moment you bite.
- Texture Harmony: A crisp outer shell gives way to a feather‑light, buttery interior, creating a contrast that feels like a symphony in your mouth.
- Simplicity Meets Sophistication: Only ten pantry staples are needed, yet the technique feels like something you’d find in a five‑star bakery.
- Unique Ingredient Twist: A pinch of cream of tartar stabilizes the rise, something most home cooks never think to add.
- Crowd‑Pleaser Factor: Whether it’s a brunch gathering or an after‑dinner snack, these bites disappear faster than you can say “more, please.”
- Ingredient Quality Matters: Using real butter and buttermilk elevates the flavor profile from “good” to “legendary.”
- Cooking Method Mastery: The cold‑butter cut‑in creates steam pockets that puff the biscuit without heavy mixing.
- Make‑Ahead Magic: Freeze the unbaked dough and bake straight from the freezer for a quick treat any day.
Inside the Ingredient List
The Flavor Base
Flour is the backbone of any biscuit, providing structure and the canvas for all flavors. I use all‑purpose flour because it offers the perfect balance of protein and starch, giving you that tender crumb without becoming tough. If you swap it for cake flour, you’ll get an even softer bite, but you may lose a bit of the classic biscuit bite. When measuring, spoon the flour into your cup and level it off; compacting it leads to dense biscuits that feel more like a bread roll than a delicate bite.
The Sweet & Spice Crew
Granulated sugar and cinnamon are the dynamic duo that turn ordinary dough into a sweet‑spicy wonder. Cinnamon brings warmth and depth, while sugar caramelizes during baking, forming that signature crackle. If you’re feeling adventurous, try a pinch of ground nutmeg or cardamom for an exotic twist. Remember: fresh ground cinnamon yields a brighter, more aromatic flavor than pre‑ground, which can taste muted after a few months on the shelf.
The Texture Crew
Cold unsalted butter, cut into cubes, is the secret to flaky layers. As the butter melts in the oven, it creates steam pockets that puff the biscuit from the inside out. For the ultimate melt‑in‑your‑mouth feel, use European‑style butter with a higher fat content. Baking powder and a dash of cream of tartar work together to give the biscuits a gentle lift without a bitter aftertaste. Skipping the cream of tartar means you’ll lose that subtle rise that makes the interior so airy.
The Moisture Makers
Buttermilk is the liquid that brings everything together, adding acidity that reacts with the leavening agents for a higher rise. If you’re out of buttermilk, mix 3/4 cup milk with 1 tsp lemon juice and let it sit for five minutes—that’s a perfect substitute. The egg, though optional, adds richness and helps bind the dough, ensuring the bites hold together when you pull them apart. A splash of vanilla extract can also be added for a subtle aromatic undertone that complements the cinnamon.
Everything's prepped? Good. Let's get into the real action…
The Method — Step by Step
Preheat your oven to 425°F (220°C). While the oven warms up, line a baking sheet with parchment paper; this prevents sticking and gives the biscuits a uniform golden base. The heat at this temperature is crucial—it creates that rapid steam burst that lifts the biscuit instantly. Pro tip: If you hear a faint hiss as the dough hits the tray, you’re on the right track.
In a large mixing bowl, whisk together 2 cups flour, 2 tbsp sugar, 2 tsp baking powder, 1 tsp cream of tartar, 1 tsp salt, and 1 tsp ground cinnamon. Make sure the dry ingredients are evenly distributed; this prevents pockets of bitter baking powder. The aroma of cinnamon mingling with flour should already start to tease your senses. Watch Out: Over‑mixing the dry mix can cause the leavening to activate prematurely, leading to flat biscuits.
Add the ½ cup cold cubed butter to the dry mixture. Using a pastry cutter or your fingertips, cut the butter into the flour until the mixture resembles coarse crumbs with pea‑size butter bits. This step is the heart of the biscuit’s flaky texture—those little butter islands will melt into steam pockets.
Kitchen Hack: Freeze the butter cubes for an extra 5 minutes right before cutting; the colder they are, the less they’ll melt into the flour, preserving those steam pockets.Create a well in the center of the dry mixture and pour in ¾ cup buttermilk and 1 large egg. Gently stir with a wooden spoon until the dough just comes together; it should look slightly shaggy and a bit sticky. Over‑stirring develops gluten, which will make the biscuits tough—resist the urge to keep mixing. The batter should be thick enough to hold its shape when scooped but soft enough to spread slightly on the baking sheet.
Turn the dough onto a lightly floured surface and pat it into a ½‑inch thick rectangle. Use a 2‑inch biscuit cutter (or a floured glass) to cut out rounds. Press straight down without twisting; twisting seals the edges and prevents the biscuits from rising properly. Gather the scraps, pat them again, and cut more rounds until all dough is used. You should have about 12‑14 bites, depending on cutter size.
Place the biscuit rounds on the prepared sheet, leaving a tiny gap between each. Brush the tops with ¼ cup melted butter—this is the secret that gives the crust a glossy, buttery sheen before the sugar hits. Then, in a shallow bowl, combine ¼ cup sugar with 1 tsp cinnamon and sprinkle generously over each biscuit. The sugar will caramelize, forming that signature crackle.
Watch Out: If you apply too much butter, the sugar can melt into a soggy glaze; a light brush is all you need.Slide the sheet into the oven and bake for 12‑15 minutes, or until the tops are golden‑brown and the edges start pulling away from the parchment. You’ll hear a faint crackle as the sugar caramelizes—listen for that, it’s the sound of perfection. Around the 10‑minute mark, rotate the pan to ensure even browning. When you pull them out, the biscuits should have a glossy finish and a fragrant cinnamon scent that fills the kitchen.
Allow the biscuits to cool on a wire rack for 5 minutes. This short rest lets the interior set while the outer crust stays crisp. While they’re still warm, you can drizzle a tiny drizzle of extra melted butter for an added glossy finish, but this is optional. Finally, serve them warm, perhaps with a dollop of whipped cream or a drizzle of maple syrup if you’re feeling indulgent. I’ll be honest — I ate half the batch before anyone else got to try it.
Insider Tricks for Flawless Results
The Temperature Rule Nobody Follows
Never let your butter or buttermilk sit at room temperature for more than five minutes before mixing. The colder the butter, the more steam it creates, and the colder the buttermilk, the better it reacts with the baking powder. I once tried a “room‑temp” shortcut and ended up with biscuits that spread flat like pancakes. Keep your ingredients chilled, and you’ll get that dramatic rise that looks like a puffed cloud.
Why Your Nose Knows Best
Your sense of smell is a reliable indicator of doneness. When the biscuit tops start to emit a deep, caramel‑cinnamon aroma, you’re within two minutes of perfection. If you rely solely on color, you might pull them out too early and lose that magical crunch. Trust that sweet, buttery scent—it’s the kitchen’s built‑in timer.
The 5‑Minute Rest That Changes Everything
After cutting the dough, let the rounds rest for five minutes before baking. This brief pause lets the gluten relax and the leavening agents finish their work, resulting in a softer crumb. A friend once skipped this rest and complained the biscuits were “too dense.” Give them those five minutes, and you’ll notice a lift that feels like they’ve been puffed by a gentle wind.
Butter Brush Precision
When brushing melted butter on top, use a silicone pastry brush and apply a thin, even coat. Too much butter makes the sugar glaze soggy; too little leaves the crust dry. I recommend a quick swipe—just enough to make the sugar stick and the surface shine. This tiny adjustment is the difference between a glossy, caramelized finish and a dull, pale biscuit.
The “Steam‑Trap” Technique
Place a shallow pan of water on the lower rack of the oven while the biscuits bake. The steam keeps the interior moist, ensuring the center stays tender while the exterior crisps. I tried this once for a batch of scones and the result was a tender, melt‑in‑your‑mouth crumb that held its shape perfectly. If you’re baking in a dry climate, this trick is a lifesaver.
Creative Twists and Variations
This recipe is a playground. Here are some of my favorite ways to switch things up:
Maple‑Brown Sugar Bliss
Swap half the granulated sugar in the topping for brown sugar and add a tablespoon of pure maple syrup to the melted butter brush. The result is a deeper caramel flavor with a hint of maple that pairs beautifully with the cinnamon. Perfect for a cozy fall brunch.
Chocolate Chip Surprise
Fold in ½ cup mini chocolate chips after the butter is cut in. The chocolate pockets melt slightly during baking, creating gooey pockets that contrast with the crisp cinnamon crust. Kids love the surprise melty center, and adults appreciate the indulgent twist.
Nutty Crunch Variation
Add ¼ cup finely chopped toasted pecans to the dry mix and sprinkle a few extra on top before baking. The nuts add a buttery crunch and a subtle earthiness that balances the sweet glaze. It’s a great option for a holiday spread.
Savory Herb Version
Omit the cinnamon‑sugar topping, replace it with a blend of dried rosemary, thyme, and a pinch of garlic powder, and brush with herb‑infused butter. Serve alongside a bowl of soup for a comforting, savory bite that still retains the biscuit’s fluffy interior.
Gluten‑Free Adaptation
Swap the all‑purpose flour for a 1:1 gluten‑free flour blend, and add 1 tablespoon of xanthan gum to mimic the elasticity of gluten. The texture remains tender, and the flavor stays true to the original. Just be sure to keep the butter extra cold to maintain those flaky layers.
Storing and Bringing It Back to Life
Fridge Storage
Place cooled biscuits in an airtight container lined with a paper towel to absorb excess moisture. They’ll stay fresh for up to three days. When you’re ready to eat, reheat in a preheated 350°F oven for five minutes; the crust will regain its crispness.
Freezer Friendly
Arrange the unbaked biscuits on a parchment‑lined tray and freeze solid (about 2 hours). Transfer them to a zip‑lock bag; they’ll keep for up to two months. Bake straight from frozen, adding an extra 2‑3 minutes to the bake time. No thawing required—pure convenience.
Best Reheating Method
To revive day‑old biscuits, preheat a skillet over medium heat, add a splash (about a teaspoon) of water to the pan, and cover for 30 seconds. The steam revives the interior while the skillet re‑crispes the exterior. This trick works faster than the oven and keeps the biscuits from drying out.