I was standing in my tiny kitchen, the timer on my old oven ticking like a nervous metronome, when a sudden craving for something that could satisfy both my love of flaky pastry and my need for a halal protein hit me like a lightning bolt. I rummaged through the pantry, found a half‑eaten bag of frozen peas, a wilted carrot that was begging for redemption, and a rotisserie chicken that was definitely halal‑certified. The smell of the chicken, still warm, drifted up and wrapped around me like an old friend, while the cold butter in the fridge glistened like tiny snowflakes waiting to be transformed. I thought, “If I can’t find the perfect meat pie on the internet, I’ll just make the one that blows everyone’s mind.”
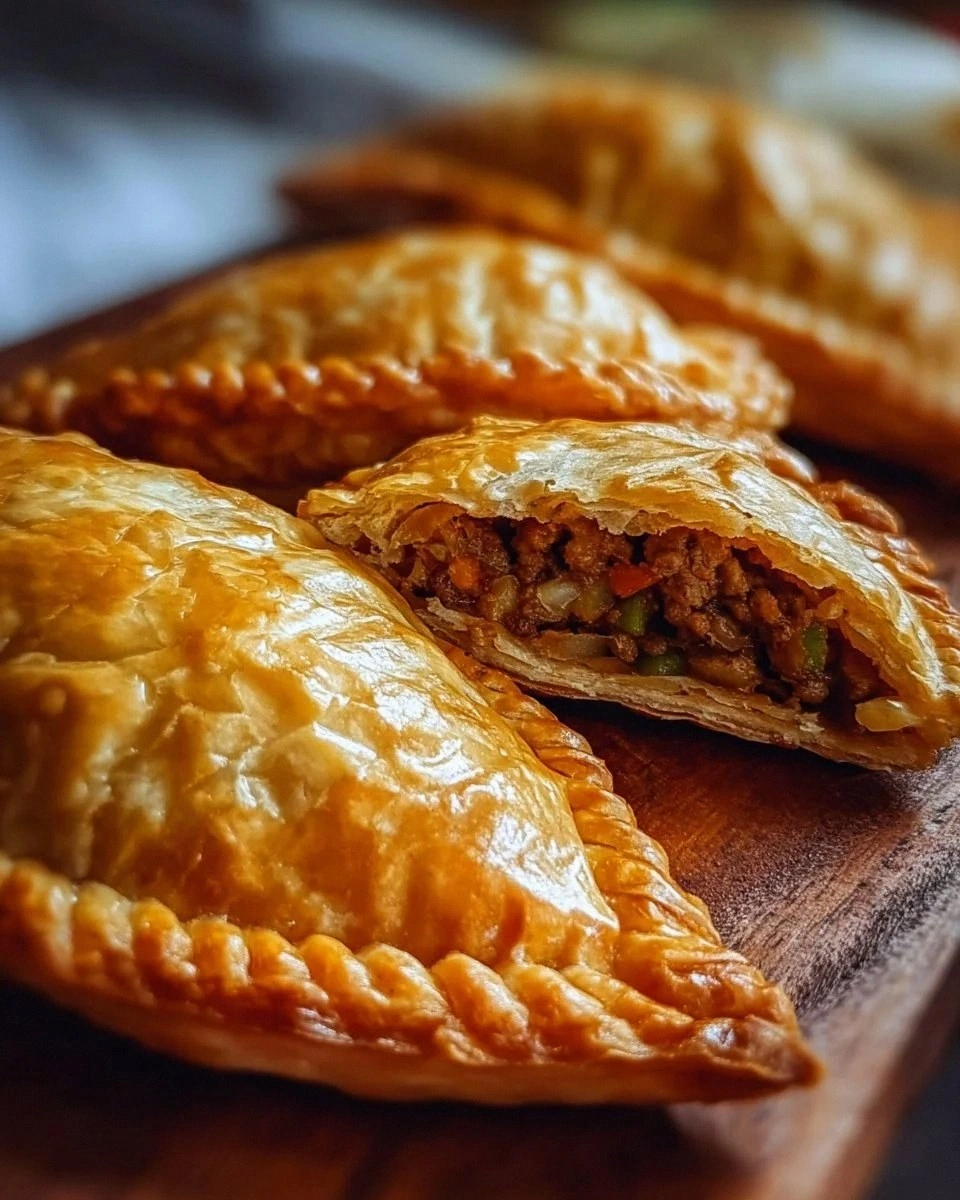
Picture this: a golden‑brown crust that cracks open with the slightest pressure, revealing a steaming, buttery filling that oozes out in ribbons of flavor. The first bite is a symphony—crisp, buttery pastry that shatters like thin ice, followed by a velvety, savory interior that whispers cumin and garlic powder, while peas pop like tiny green fireworks. The aroma alone is enough to make the whole house feel like a bakery on a bustling Saturday morning, and the texture? Imagine a perfect balance between the tender chicken that falls apart in your mouth and the subtle crunch of carrots that keep things interesting. This isn’t just a snack; it’s a full‑on sensory experience that makes you want to hug the oven.
Most recipes out there either overcomplicate the pastry, leaving it soggy, or they skimp on the seasoning, resulting in a bland filling that feels like a missed opportunity. I’ve tried the “quick” versions that use store‑bought dough and ended up with a rubbery disappointment. This version, however, is hands‑on enough to feel rewarding but simple enough that you won’t need a pastry chef’s degree. The secret? A cold‑butter technique that creates steam pockets, and a humble splash of chicken broth that keeps the filling moist without drowning the flavors. I dare you to taste this and not go back for seconds—because you will, and you’ll thank me later.
Okay, ready for the game‑changer? We’re going to use ice‑cold water and butter that’s been chilled in the freezer for a few minutes, which forces the fat to stay in solid chunks while the dough comes together. Those little butter islands melt in the oven, creating those coveted flaky layers. And there’s a twist you won’t see in any other recipe: a dash of cumin that adds an earthy depth, turning a simple chicken pie into something that feels exotic yet comforting. Let me walk you through every single step — by the end, you’ll wonder how you ever made it any other way.
What Makes This Version Stand Out
- Flavor Explosion: The combination of garlic powder, cumin, and a splash of chicken broth creates a depth that ordinary meat pies lack. Each bite delivers a balanced savory punch that lingers pleasantly on the palate.
- Flaky Perfection: By keeping the butter ice‑cold and handling the dough minimally, you get a crust that’s light, airy, and shatters like delicate parchment. No soggy bottoms here.
- Simplicity Meets Elegance: Only ten core ingredients, all pantry staples, yet the result feels like it came from a five‑star bakery. You won’t need a pantry full of exotic spices.
- Halal Certified: Every protein component is halal‑approved, and the broth is certified as well, making this dish inclusive without compromising on taste.
- Crowd‑Pleaser: Whether you serve them as appetizers at a party or as a main course for dinner, they disappear faster than you can say “more please.” I’ll be honest — I ate half the batch before anyone else got to try it.
- Make‑Ahead Magic: You can assemble the pies a day ahead, refrigerate, and bake them fresh when guests arrive. The crust stays crisp, and the filling stays juicy.
- Budget Friendly: Using leftover chicken and frozen peas keeps the cost low, while the buttery pastry feels luxurious.
- Versatile Base: The dough can be shaped into mini hand‑pies, large tartlets, or even a full‑size pie, adapting to any occasion.
Inside the Ingredient List
The Flavor Base
The heart of any great pie is its seasoning. Garlic powder and cumin are the dynamic duo that give this filling its signature aroma—think of a warm market stall where spices dance in the air. The garlic provides that familiar, comforting depth, while cumin adds an earthy, slightly smoky undertone that elevates the humble chicken. If you skip either, you’ll end up with a bland filling that feels like a missed opportunity. For a milder version, you can halve the cumin, but trust me, the flavor balance shifts dramatically.
The Texture Crew
Carrots and peas are not just decorative; they add a burst of color and a contrasting snap that keeps the palate engaged. The carrots, when diced small, soften just enough to melt into the sauce while still offering a faint chew. The peas, frozen and then tossed straight into the pan, retain their bright green pop, preventing the filling from becoming a homogenous mush. If you’re allergic to peas, swap them for corn kernels—the sweetness will still work beautifully.
The Unexpected Star
A quarter cup of chicken broth might seem trivial, but it’s the secret moisture keeper. It prevents the filling from drying out during the bake, ensuring every bite is juicy. The broth also carries the umami from the halal‑certified chicken, deepening the overall taste profile. If you’re out of broth, a splash of water with a pinch of chicken bouillon works fine, but the flavor won’t be as rich.
The Final Flourish
The pastry itself is a simple blend of flour, butter, salt, and ice water. The key is the temperature contrast: cold butter creates steam pockets, while ice water prevents gluten over‑development, resulting in a tender crumb. Too much mixing will develop gluten and make the crust tough, so handle the dough like you would a delicate piece of paper—gently and with purpose. If you can’t find unsalted butter, use salted but reduce the added salt by half to keep the balance.
The Binding Agent
One large egg, whisked and brushed on top, is the final touch that gives the pies a glossy, golden finish. The egg wash also acts as a subtle adhesive, helping the edges seal so no filling leaks out during baking. If you’re vegan or allergic to eggs, a mixture of plant‑based milk and a little maple syrup can mimic the shine, though the color won’t be as deep.
Everything's prepped? Good. Let's get into the real action...
The Method — Step by Step
Start by making the pastry. In a large bowl, whisk together 2 cups of all‑purpose flour and ½ teaspoon of salt. Add the diced, ice‑cold butter and, using a pastry cutter or your fingertips, work it into the flour until the mixture resembles coarse crumbs with some pea‑sized butter pieces. This is the moment where the dough decides whether it will be flaky or dense—keep the butter cold and the mixing gentle. That sizzle when it hits the pan? Absolute perfection.
Gradually drizzle in 7 tablespoons of ice water, stirring with a fork until the dough just comes together. You might not need all the water; stop adding as soon as the dough forms a cohesive ball. Wrap the dough in plastic wrap and chill in the freezer for exactly 15 minutes.
Kitchen Hack: If you’re in a rush, use a rolling pin to flatten the dough quickly, then chill for 5 minutes before rolling again.While the dough chills, move to the filling. Heat 1 tablespoon of olive oil in a large skillet over medium heat. Add the finely chopped onion and sauté until translucent, about 3‑4 minutes, stirring occasionally to avoid burning. The aroma of sweet onions will start to fill the kitchen, signalling that you’re on the right track.
Add the diced carrot to the skillet and continue to sauté for another 2 minutes. The carrots should soften slightly but retain a faint bite. Then toss in the frozen peas; they’ll release a burst of steam as they thaw, turning the mixture a vibrant green.
Watch Out: Keep the heat medium to prevent the veggies from scorching; a gentle sizzle is ideal.Stir in the shredded chicken, 1 teaspoon of garlic powder, 1 teaspoon of cumin, ½ teaspoon of black pepper, and the second ½ teaspoon of salt. Mix everything thoroughly so the spices coat every morsel of chicken. Then pour in the ¼ cup of chicken broth, allowing it to bubble and meld the flavors together. Let the mixture simmer for 4‑5 minutes, until the broth reduces slightly and the filling looks glossy and slightly thickened. This is the point where the filling becomes a cohesive, aromatic mixture that will stay moist inside the crust.
Remove the skillet from heat and let the filling cool for a few minutes. Meanwhile, take the chilled dough out of the freezer and place it on a lightly floured surface. Using a rolling pin, roll the dough to about ¼‑inch thickness. Cut out circles roughly 4‑5 inches in diameter—these will become the tops and bottoms of your pies. If you prefer a rustic look, you can also cut the dough into squares or use a large biscuit cutter for a different shape.
Place a dough circle onto a parchment‑lined baking sheet. Spoon about 2‑3 tablespoons of the filling onto the center, leaving a border of about ½ inch. Fold the dough over to create a half‑moon shape, pressing the edges with your fingers to seal. Then, using the back of a fork, crimp the edges for a decorative finish and to ensure a tight seal. This next part? Pure magic. Brush the top with a lightly beaten egg, which will give the pies a beautiful golden sheen when baked.
Preheat your oven to 400°F (200°C). Once heated, place the baking sheet in the oven and bake for 20‑25 minutes, or until the crust is deep golden and the edges start pulling away from the parchment. The aroma at this stage is intoxicating—think of a bakery on a crisp autumn morning. When the pies are done, remove them and let them rest for 3‑5 minutes before serving. This short rest lets the steam settle, keeping the crust crisp.
That's it — you did it. But hold on, I've got a few more tricks that'll take this to another level...
Insider Tricks for Flawless Results
The Temperature Rule Nobody Follows
Never underestimate the power of a cold oven rack. Placing the baking sheet on a pre‑chilled metal rack helps the bottom of the pastry stay crisp while the top browns evenly. I once baked these on a warm rack and ended up with a soggy base—lesson learned. If you’re in a hurry, at least chill the baking sheet for 10 minutes before loading the pies.
Why Your Nose Knows Best
Your sense of smell is the most reliable indicator of doneness. When the crust starts to emit a nutty, buttery scent, you’re just a minute or two away from perfection. Trust that nose over a timer; ovens can be quirky, and the scent will tell you if the pies are about to over‑brown or still need a touch more time.
The 5‑Minute Rest That Changes Everything
After pulling the pies from the oven, let them rest on a cooling rack for at least five minutes. This rest allows the steam inside to redistribute, preventing the crust from becoming soggy. I once served them straight out of the oven, and the filling was a bit runny—those five minutes made all the difference. Plus, it gives you a moment to admire your handiwork before the inevitable devouring.
Egg Wash Perfection
Freezing for Future Feasts
If you want to make these ahead, assemble the pies, brush with egg wash, and freeze them on a tray before transferring to a zip‑top bag. When you’re ready to serve, bake them straight from the freezer at 400°F for an extra 5‑7 minutes. The crust will still be flaky, and the filling will heat through without drying out. This method is perfect for busy weeknights or unexpected guests.
Creative Twists and Variations
This recipe is a playground. Here are some of my favorite ways to switch things up:
Spicy Harissa Heat
Swap the cumin for 1 teaspoon of harissa paste and add a pinch of cayenne. The result is a fiery kick that pairs wonderfully with the buttery crust. Perfect for those who love a little heat without overwhelming the palate.
Cheesy Delight
Stir in ½ cup of shredded mozzarella into the filling just before the final simmer. The cheese melts into creamy pockets, adding a gooey texture that kids adore. It’s like a pizza‑pie hybrid that’s both comforting and indulgent.
Herb‑Infused Freshness
Add a tablespoon of freshly chopped parsley or cilantro to the filling for a burst of green freshness. The herbs brighten the flavor profile and give the pies a pop of color that’s Instagram‑ready.
Sweet & Savory Apple
Dice a small apple and sauté it with the onions for a subtle sweetness that contrasts the savory chicken. This variation is especially lovely in autumn, when apples are at their peak.
Vegan Swap
Replace the chicken with seasoned jackfruit and use a plant‑based butter for the crust. The texture mimics shredded chicken, and the flavor remains rich thanks to the broth and spices. A fully vegan version that still delivers that flaky perfection.
Storing and Bringing It Back to Life
Fridge Storage
Place cooled pies in an airtight container and store them in the refrigerator for up to 3 days. Reheat in a preheated oven at 350°F for 10‑12 minutes, covering loosely with foil to prevent over‑browning. A tiny splash of water on the crust before reheating helps revive that original crispness.
Freezer Friendly
As mentioned earlier, freeze unbaked pies on a tray, then transfer to a zip‑top bag. They’ll keep for up to 2 months. When ready, bake from frozen at 400°F for 25‑30 minutes, or until the crust is golden and the filling is bubbling.
Best Reheating Method
For the crispiest results, use a convection oven or a toaster oven, which circulates hot air and revives the flaky layers. Microwave is a no‑go; it makes the crust rubbery. If you’re in a pinch, a hot skillet covered with a lid for a few minutes can also re‑crisp the bottom while warming the interior.