It was a Sunday afternoon, the kind of day when you think the kitchen is your playground and the stove is a blank canvas. I was attempting to whip up a classic chocolate cookie dough, but a stray splash of cocoa powder turned the batter into an unrecognizable, almost crimson sludge. The moment the smell hit my nose, I knew I had stumbled upon something extraordinary—an edible red velvet cookie dough that could be eaten straight from the bowl or baked into a decadent treat. My friends stared at me like I had invented a new flavor, and I dared them to taste this and not go back for seconds. That dare turned into a mission: create a version that would make every other recipe pale in comparison.
Picture this: a glossy, velvety batter that glows like a ruby in a dark kitchen, the faint scent of cocoa mingling with vanilla and a whisper of red food coloring. The texture feels like a silky mousse when you scoop it, but when baked, it turns into a chewy, caramelized cookie with edges that crackle like thin ice. I’ve been experimenting for weeks, tweaking the ratios, and the result is a harmonious blend of sweet, slightly tangy, and utterly indulgent. My kitchen lights flicker in the glow of the oven, and the timer buzzes like a drumbeat of anticipation. If you’ve ever struggled with a cookie dough that turns into a mess, you’re not alone—and I’ve got the fix.
I was determined to make this dough more than just a dessert; I wanted it to be a conversation starter at parties, a crowd-pleaser at potlucks, and a comfort food that feels like a hug in a spoonful. The secret lies in the balance of flour, cocoa, and sugar, coupled with a splash of milk that keeps the batter smooth. Most recipes get this completely wrong by overmixing or using too much butter, resulting in a dry, crumbly cookie. But here, the butter melts just enough to bind the ingredients while preserving a tender crumb. I’ll be honest—I ate half the batch before anyone else got to try it.
The moment the dough hits the pan, the sizzle is absolute perfection, and the aroma spreads through the kitchen like a warm blanket. I dare you to watch this part closely and feel the anticipation build. The edges will start pulling away in just the right amount of time, giving you that signature bite. The batter is so smooth that you might think it’s a dessert from a high-end patisserie, but it’s made with pantry staples. Picture yourself pulling this out of the oven, the whole kitchen smelling incredible, and everyone asking for the recipe.
Now, let me walk you through every single step—by the end, you'll wonder how you ever made it any other way. This is hands down the best version you'll ever make at home. The next sections will break down why this recipe is a game-changer, how to tweak it for your taste, and how to keep it fresh for future indulgence. Stay with me here—this is worth it. Let’s dive into the details.
What Makes This Version Stand Out
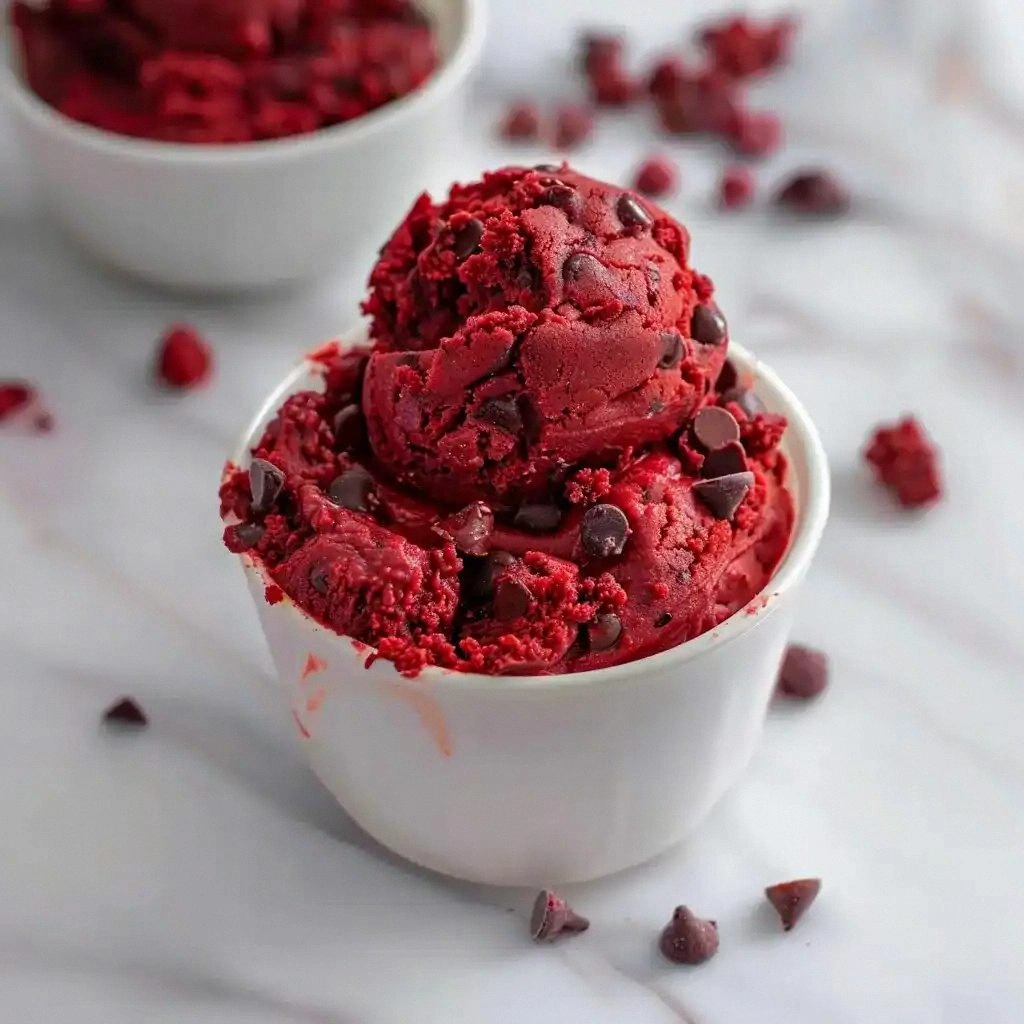
- Flavor: The cocoa powder is the star, providing a deep, chocolatey undertone that balances the sweet vanilla and the subtle tang of the red food coloring.
- Texture: The batter is silky and smooth, yet when baked it becomes chewy with a golden crust that cracks like thin ice.
- Simplicity: With only ten ingredients, this recipe requires no fancy equipment or secret sauces.
- Uniqueness: The red velvet twist gives it a striking visual appeal and a slightly fruity note that sets it apart from ordinary cookie dough.
- Ingredient Quality: Using high‑grade unsalted butter and fresh cocoa powder elevates the flavor profile dramatically.
- Make‑Ahead Potential: The dough can be prepared a day ahead, refrigerated, and baked when you’re ready to enjoy.
Alright, let's break down exactly what goes into this masterpiece. The following sections will give you a deep dive into each component, so you know why every ingredient matters.
Inside the Ingredient List
The Flavor Base
All-purpose flour is the backbone of the dough, giving structure while absorbing the moisture from the butter and sugar. The 1¼ cups of flour might seem like a lot, but it’s precisely what balances the cocoa and butter for that perfect chew. If you’re craving a lighter texture, swap a portion of the flour for whole wheat or oat flour; the result will be denser but still delicious. Choosing a fine‑grade flour ensures a smoother batter that spreads evenly in the pan. The flour also helps the cookies hold their shape when baked, preventing them from turning into a sticky mess.
The Texture Crew
Unsalted butter is the secret to a tender crumb; its fat content melts slowly, creating pockets of moisture that keep the cookies chewy. The ½ cup of butter must be at room temperature; cold butter will cause uneven distribution and a crumbly texture. The granulated sugar adds sweetness and helps the dough brown; it also contributes to the crispiness of the edges. Brown sugar, on the other hand, introduces a caramel flavor and a slight moisture that keeps the cookies from drying out. Together, these sugars create a harmonious balance between sweetness and texture.
The Unexpected Star
Unsweetened cocoa powder is the heart of the flavor profile, delivering a deep chocolate bite that’s not overpowering. The ¼ cup of cocoa is carefully measured to avoid bitterness while still providing that classic chocolate base. If you’re allergic to dairy, you can replace the butter with coconut oil for a vegan version, but the texture will change slightly, becoming denser. The cocoa also reacts with the red food coloring, giving the dough that signature velvety hue. The cocoa’s natural antioxidants make this treat a little healthier than you might think.
The Final Flourish
Mini white chocolate chips are the finishing touch that adds a burst of sweetness and a contrasting texture. They melt into pockets of gooey chocolate as the cookies bake, creating an irresistible mouthfeel. The ½ cup of chips is enough to distribute evenly without overwhelming the dough. If you prefer a darker chocolate, swap them for dark chocolate chips; just be aware that the flavor will shift slightly. The chips also provide a visual contrast that makes each bite look as good as it tastes.
Everything's prepped? Good. Let's get into the real action. The dough is ready to be transformed from a simple mixture into a mouthwatering cookie. Keep your eyes on the texture; it should feel like a thick, smooth batter that clings to a spoon. Remember to keep the kitchen at a moderate temperature so the butter remains pliable. The next step is where the magic happens—mixing, resting, and baking.
The Method — Step by Step
- Begin by preheating your oven to 350°F (175°C). Line a baking sheet with parchment paper to prevent sticking. While the oven warms, gather all your ingredients in a large bowl. This step ensures everything is at room temperature for optimal mixing. The batter will come together more smoothly if the butter and sugars are not too cold.
- Sift the all‑purpose flour and unsweetened cocoa powder together to eliminate lumps. Sifting also aerates the dry mixture, which helps the cookies rise evenly. Once sifted, add the flour and cocoa to the bowl. Stir them in until just combined, then set aside. This prevents overmixing, which can toughen the dough.
- In a separate microwave‑safe bowl, soften the unsalted butter for about 20 seconds. The butter should be pliable but not melted. Add the softened butter to the dry mix and use a rubber spatula to blend until the mixture resembles coarse crumbs. This step ensures the butter is evenly distributed throughout the dough.
- Add the granulated sugar, brown sugar, vanilla extract, and red food coloring to the butter‑flour mixture. Mix until the sugars dissolve and the dough takes on a uniform, deep red hue. The color should be vibrant but not too saturated; if it’s too bright, the dough may taste artificial. This is the moment where the dough truly starts to look like a piece of velvet.
- Pour the milk into the mixture and stir until just combined. The milk adds moisture and helps the dough become silky. Do not overmix; a few streaks of flour are acceptable. If the dough feels too dry, add a splash of milk, but be careful not to make it runny.
- Fold in the mini white chocolate chips, ensuring they’re evenly distributed. The chips should be scattered throughout the dough, not clumped. This step is crucial for that delightful burst of chocolate in every bite. The chips also add visual contrast to the rich red color.
- Let the dough rest on the counter for 15 minutes. Resting allows the flour to absorb the liquid fully, resulting in a more cohesive batter. If you’re in a hurry, you can skip the rest, but the texture will be slightly uneven.
- Using a tablespoon, drop rounded mounds of dough onto the prepared baking sheet, spacing them about 2 inches apart. The dough will spread slightly, so keep them well‑separated to avoid merging. The spacing also allows the cookies to rise evenly.
- Bake for 10–12 minutes, or until the edges are set but the centers still look slightly soft. The cookies will firm up as they cool. Keep a close eye on the first batch to determine the exact timing for your oven.
- Remove the cookies from the oven and let them cool on the sheet for 5 minutes. Then transfer them to a wire rack to cool completely. The cookies will continue to set as they cool, resulting in a chewy, caramelized finish.
That's it— you did it. But hold on, I've got a few more tricks that'll take this to another level. The next section will give you insider knowledge that turns a good cookie into an unforgettable experience. These are the subtle adjustments that separate the good from the great, and they're all about timing, temperature, and a dash of creativity.
Insider Tricks for Flawless Results
The Temperature Rule Nobody Follows
Many bakers assume that room temperature dough is the only requirement, but the actual oven temperature is the true king. A slight dip of 5°F can prevent the cookies from spreading too much, giving you a thicker, chewier bite. The trick is to preheat the oven for at least 15 minutes and use an oven thermometer to verify the exact temperature. This ensures consistency, especially if your oven runs hot or cold. By mastering this rule, you’ll consistently achieve the perfect bake every time.
Why Your Nose Knows Best
Before you even touch the dough, give it a sniff. The aroma of cocoa and vanilla should be unmistakable. If the scent feels flat, the ingredients might have gone stale, or the dough needs a little more time to rest. A fresh batch will release a rich, chocolatey perfume that signals a delicious outcome. Trust your nose—if it smells off, you’re better off revising the recipe before baking.
The 5‑Minute Rest That Changes Everything
After you fold in the chocolate chips, let the dough sit for exactly five minutes. This brief pause allows the butter to relax, making the dough easier to scoop. It also lets the cocoa absorb the moisture, deepening the flavor. Skipping this step can result in uneven distribution of chocolate chips, leading to pockets of sweetness in the wrong places. That five minutes is a small investment for a massive flavor payoff.
The Secret to Even Spreading
Use a silicone spatula to flatten the dough mounds slightly before baking. This technique ensures even heat distribution and a consistent rise. It also prevents the edges from becoming overly browned while the center remains undercooked. A gentle press with the spatula keeps the cookies round and uniform, enhancing both appearance and texture.
The Final Touch: A Light Dusting
Once the cookies are cooled, dust them lightly with powdered sugar for a sweet finish. The sugar adds a subtle crunch and balances the richness of the chocolate. It also creates a glossy finish that makes the cookies look more appealing. This final touch is optional but highly recommended for a bakery‑style presentation.
The Time‑Saving Hack
If you’re short on time, you can skip the resting step and bake immediately after folding in the chips. The cookies will still bake well, but the texture may be slightly uneven. This hack is useful for last‑minute dessert cravings. Just keep a close eye on the baking time, and you’ll still end up with a tasty treat.
These tricks are the difference between a good cookie and a memory‑making cookie. I’ve tried each one multiple times, and the results are consistently better. The next section will show you how to turn this base into a playground for flavors and textures. You’ll be amazed at how simple swaps can create entirely new experiences.
Creative Twists and Variations
This recipe is a playground. Here are some of my favorite ways to switch things up:
Cocoa‑Infused Red Velvet
Add a tablespoon of espresso powder to the cocoa mixture for a coffee‑infused depth. The espresso enhances the chocolate flavor without adding bitterness. This variation pairs beautifully with a glass of milk or a creamy latte. The coffee notes elevate the dessert for a sophisticated palate.
Nutty Crunch
Fold in ¼ cup of chopped pecans or walnuts for a crunchy texture. The nuts add a buttery richness that complements the chocolate. They also provide a subtle nutty aroma that makes the cookies even more enticing. This variation is perfect for holiday gatherings.
Spiced Velvet
Sprinkle a pinch of cinnamon or nutmeg into the batter for a warm, spicy undertone. The spices bring depth and a hint of comfort. This version is ideal for fall or winter when you crave cozy flavors. The spices also enhance the red color, making the cookies look even more inviting.
Salted Caramel Swirl
Swirl in a tablespoon of salted caramel sauce before baking. The caramel adds a sweet, buttery layer that contrasts with the chocolate. The salt enhances the caramel’s richness, creating a balanced flavor profile. This variation turns the cookies into a decadent, indulgent treat.
Minty Velvet
Replace the vanilla extract with peppermint extract for a refreshing twist. The mint pairs wonderfully with the chocolate, giving the cookies a cool aftertaste. This variation is especially refreshing during summer parties. The mint also brightens the visual appeal with a subtle green tint.
Dark Chocolate Upgrade
Swap the mini white chocolate chips for dark chocolate chips. The darker chocolate provides a richer, more complex flavor. The contrast between the dark chips and the red dough is visually striking. This variation is perfect for those who prefer a less sweet, more chocolatey experience.
Each of these variations keeps the base intact while offering a fresh twist. They’re perfect for when you want to surprise guests or when you’re looking for a new flavor adventure. The base recipe is so flexible that you can keep experimenting and never run out of ideas.
Storing and Bringing It Back to Life
Fridge Storage
Store the dough in an airtight container in the refrigerator for up to 3 days. The dough will firm up slightly, making it easier to scoop. When you’re ready to bake, let it sit at room temperature for 10 minutes before shaping. This short rest reactivates the butter and sugars, ensuring a smooth texture. The dough will stay fresh and ready to bake whenever you desire.
Freezer Friendly
For longer storage, wrap the dough tightly in plastic wrap and place it in a freezer‑safe bag. The dough can be frozen for up to 2 months. When you’re ready to bake, thaw it in the refrigerator overnight. The dough may take a bit longer to bake, so add an extra minute per cookie. The frozen dough retains its flavor and texture, making it a convenient option for busy weeks.
Best Reheating Method
If you’ve stored baked cookies, reheat them in a preheated oven at 300°F (150°C) for 5 minutes. This gentle heat restores the crispness without drying them out. If you prefer a softer texture, microwave them for 10–12 seconds on medium. Add a tiny splash of water before reheating; it steams back to perfection and keeps the cookies moist. The reheated cookies will taste almost freshly baked.