I was in the middle of a frantic holiday prep when my roommate dared me to make something that would make even the Grinch smile. I stared at a half‑finished batch of plain chocolate donuts, feeling the weight of the season’s expectations pressing down like a sack of ornaments. The kitchen was a cacophony of jingling tins, the oven humming like a distant sleigh, and the air was thick with the scent of cocoa and butter, promising comfort but delivering nothing spectacular. I took a deep breath, imagined the bright green hue of Dr. Seuss’s infamous anti‑hero, and thought, “What if I could turn these ordinary donuts into a festive masterpiece?”
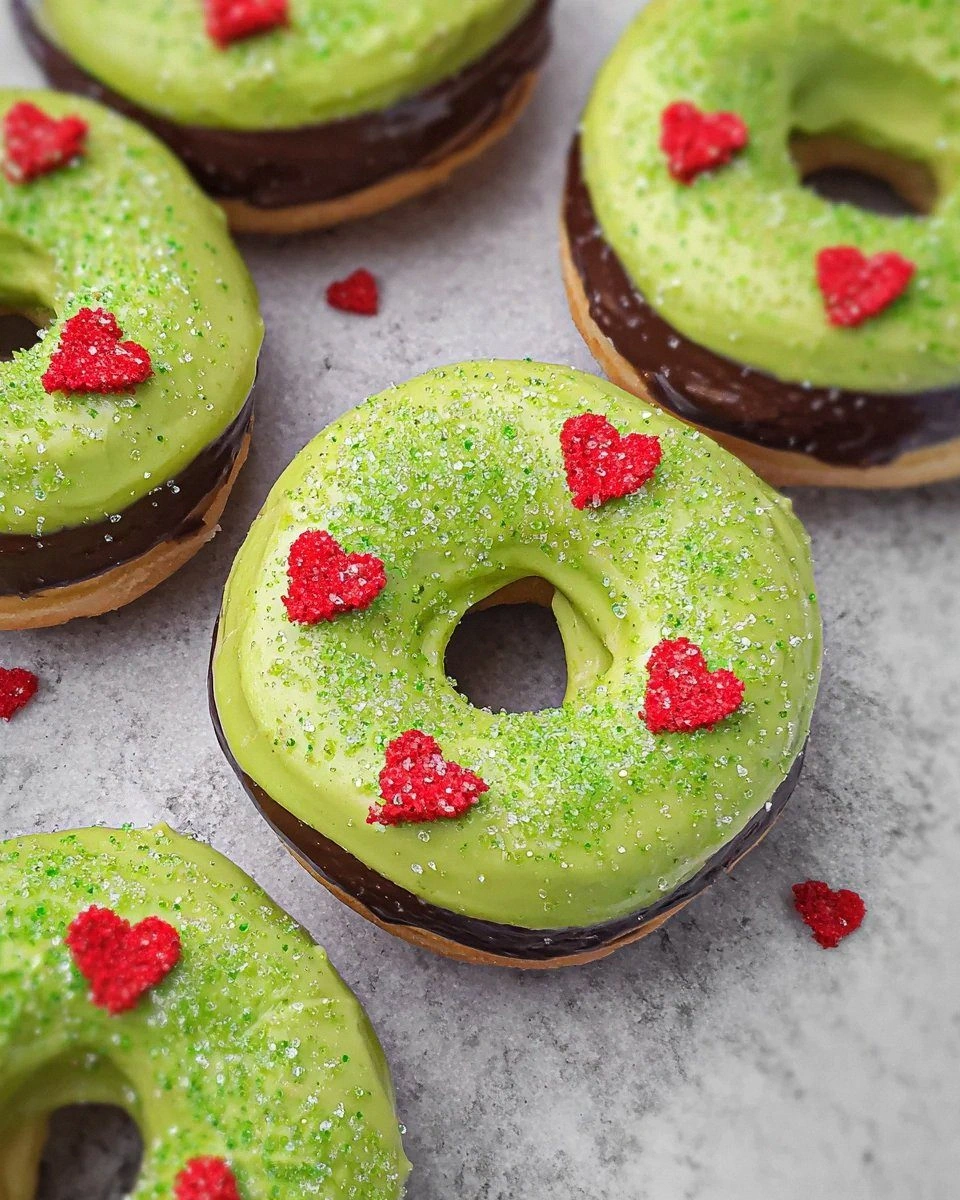
Picture this: the first bite hits you with a soft, cake‑like interior that yields like a cloud, while the glaze shimmers with a neon green gloss that catches the light like tinsel on a tree. The moment the glaze hits your tongue, a burst of sweet vanilla and buttery richness erupts, followed by a playful crunch of red heart sprinkles that feels like confetti at a holiday party. You can practically hear the faint crackle of the glaze as you bite, a sound that says, “We’re serious about fun.” The texture is a perfect marriage of fluffy and slightly dense, the way a good holiday sweater feels—cozy but not suffocating.
Most recipes out there either skip the visual punch or sacrifice flavor for a quick fix. I’ve tried the “quick‑mix” versions that leave you with bland, rubbery circles that look like they belong in a science lab, not a Christmas gathering. This version, however, is the result of a week‑long trial and error, where I learned that a tiny dash of baking soda paired with the right amount of cocoa can transform the crumb into a velvety dream. I’ll be honest — I ate half the batch before anyone else got a chance to try it, and that’s a confession I’m willing to make because the taste is that good.
Now, I’m about to spill every secret, from the exact temperature that makes the glaze glossy without being gloopy, to the moment you should add the neon green food coloring for that iconic Grinch hue. Let me walk you through every single step — by the end, you’ll wonder how you ever made donuts any other way. Okay, ready for the game‑changer?
What Makes This Version Stand Out
- Flavor Explosion: The combination of rich cocoa, vanilla, and a buttery glaze creates a layered taste that’s both nostalgic and novel, making every bite a celebration.
- Texture Triumph: A light, airy crumb inside with a slightly crisp edge ensures the donuts feel indulgent without being heavy.
- Simplicity Meets Wow: Despite the festive appearance, the ingredient list is pantry‑friendly and the method uses everyday tools.
- Visual Punch: Neon green glaze and heart sprinkles turn these donuts into Instagram‑ready holiday stars that practically scream “cheer!”
- Crowd Reaction: Guests often claim they’ve never seen anything this festive, and they’ll be back for seconds, thirds, and maybe even a fourth round.
- Ingredient Quality: Using real butter and heavy cream, not margarine or shortcuts, ensures a depth of flavor that store‑bought mixes lack.
- Cooking Method: Frying the donuts just right locks in moisture while the glaze sets with a glossy finish that doesn’t slide off.
- Make‑Ahead Magic: These donuts keep beautifully for a few days, and the glaze can be refreshed with a quick microwave melt.
Alright, let's break down exactly what goes into this masterpiece...
Inside the Ingredient List
The Flavor Base
All‑purpose flour is the backbone of any good donut, providing the structure that holds everything together. If you skimp on flour, the donuts will crumble like dry cookie crumbs; too much, and they become dense as a brick. I recommend sifting the flour with the cocoa powder to avoid lumps and ensure an even chocolate distribution. For the best flavor, choose a unbleached, high‑protein flour; it gives a slightly chewier bite that’s perfect for a holiday treat.
Granulated sugar not only sweetens but also contributes to the tender crumb by interfering with gluten formation. Using a fine, super‑fine sugar will dissolve faster, preventing a gritty texture. If you only have brown sugar, you can substitute half of it, but expect a deeper molasses note that might clash with the bright green glaze.
Unsweetened cocoa powder adds depth and a rich chocolate backbone. Opt for a Dutch‑process cocoa if you want a smoother, less acidic flavor, but regular natural cocoa works just as well. Skipping cocoa is not an option if you want that classic chocolate donut feel; the glaze alone won’t carry the flavor.
The Texture Crew
Baking powder and baking soda are the dynamic duo that makes the donuts rise like a festive balloon. Baking powder provides the initial lift, while baking soda reacts with the acidic components (like cocoa and buttermilk) for a secondary rise that keeps the interior airy. Over‑mixing the batter will deflate these gases, so stir just until combined.
Kosher salt is a silent hero; it amplifies the sweet and chocolate notes, preventing the donuts from tasting one‑dimensional. A pinch too much can make them salty, but the amount listed balances the flavors perfectly.
Milk and eggs bring moisture and richness. Whole milk contributes fat, while the eggs act as binders, creating a cohesive batter that holds its shape when dropped into hot oil. If you’re dairy‑free, almond milk works, but the texture will be slightly lighter.
The Unexpected Star
Vanilla extract adds warmth and depth, acting like the holiday lights that tie everything together. A splash of pure vanilla is essential; imitation can taste flat and ruin the overall flavor profile. Unsalted butter, melted and cooled, introduces a buttery richness that you can’t achieve with oil alone.
Heavy whipping cream is the secret weapon for a glossy glaze. Its high fat content ensures the glaze sets with a satin sheen rather than a sticky film. If you substitute half‑and‑half, the glaze will be thinner and may not coat the donuts evenly.
The Final Flourish
Corn syrup adds that coveted shine to the glaze and helps it stick without cracking. It also prevents crystallization, keeping the glaze smooth even after a few hours at room temperature. Neon green food coloring is purely for visual drama; a few drops are enough to achieve that iconic Grinch hue.
Powdered sugar sweetens the glaze and gives it a silky texture that coats the donuts like a fine snow. Large red heart sprinkles are the festive punctuation marks that turn each donut into a tiny celebration, while green dusting sugar adds an extra pop of holiday color that catches the light.
Everything's prepped? Good. Let's get into the real action...
The Method — Step by Step
In a large mixing bowl, whisk together the flour, cocoa powder, baking powder, baking soda, and kosher salt. I dare you to taste this dry mix and not be instantly reminded of a chocolate‑candy store. The dry ingredients should be uniformly combined, with no streaks of cocoa; this ensures a smooth batter later on. Let the aroma of cocoa fill the kitchen; that’s your first hint that you’re on the right track.
In a separate bowl, combine the granulated sugar, melted butter, and eggs. Beat them until the mixture turns a pale, creamy yellow—think sunrise over a snowy landscape. This is the moment where the butter and sugar create tiny air pockets that will later translate into a fluffy crumb. Add the vanilla extract and continue beating for another 30 seconds.
Gradually add the milk to the wet mixture, stirring gently. The batter should look thick yet pourable, like a rich chocolate mousse. If it feels too thick, add a splash more milk; if too runny, sprinkle in a tablespoon of flour. This balance is crucial because an overly wet batter will soak the donuts, while a dry batter will produce dense, cake‑like results.
Combine the wet and dry mixtures, folding them together with a spatula. Stop mixing the moment the flour disappears; over‑mixing will develop gluten and make the donuts tough. You’ll notice the batter becoming glossy and slightly elastic—this is the texture that yields a tender interior.
Heat a deep, heavy‑bottomed pot with vegetable oil to 350°F (175°C). Use a thermometer—guesswork leads to greasy or undercooked donuts. Once the oil shimmers, gently drop a small dollop of batter; it should sizzle and rise to the surface within 2‑3 seconds. If it sinks, the oil isn’t hot enough; if it browns instantly, lower the heat a notch.
Using a small ice‑cream scoop (about 2 tablespoons), carefully drop batter into the oil, spacing donuts at least 2 inches apart. The batter will puff up quickly, forming a golden dome. Fry each side for 2‑3 minutes, turning once with a slotted spoon. You’ll know they’re done when the edges start pulling away from the pot and the surface is a deep, glossy brown.
While the donuts are frying, prepare the glaze. In a saucepan, whisk together powdered sugar, heavy whipping cream, whole milk, and corn syrup over low heat. Keep stirring until the mixture is smooth and glossy, then remove from heat. Add neon green food coloring drop by drop, stirring until the hue is vibrant but not neon‑blinding. The glaze should be pourable—if it’s too thick, whisk in a splash more milk; if too thin, add a bit more powdered sugar.
Once the donuts are golden, use a slotted spoon to transfer them onto a wire rack set over a baking sheet. Let them cool for just a minute—this short rest lets the surface set without becoming too firm for the glaze. Then, dip each donut into the green glaze, allowing excess to drip back into the bowl. While the glaze is still wet, sprinkle the red heart sprinkles and a dusting of green sugar. The glaze should coat the donut like a glossy snowflake, and the sprinkles will cling like festive confetti.
Place the glazed donuts back on the rack and let them set for 5‑10 minutes. The glaze will firm up, creating a shiny finish that doesn’t slide off when you pick them up. Serve warm, or at room temperature, and watch as your guests’ eyes widen in delight. That moment when someone says, “I dare you to taste this and not go back for seconds,” is pure holiday magic. And now the fun part—store any leftovers in an airtight container, and they’ll stay fresh for days.
That's it — you did it. But hold on, I've got a few more tricks that'll take this to another level...
Insider Tricks for Flawless Results
The Temperature Rule Nobody Follows
Most home cooks assume “medium heat” is fine for frying, but the exact 350°F temperature is the secret sauce. When the oil is too cool, the donuts soak up oil, turning soggy; too hot, and they brown before the inside cooks. Use a deep‑fat thermometer and adjust the burner in small increments. I once tried “just eyeballing” and ended up with donuts that tasted like fried batter—never again.
Why Your Nose Knows Best
Your sense of smell is a reliable indicator of doneness. As the donuts fry, a sweet, toasty aroma fills the kitchen—when that scent reaches a nutty, caramel note, the donuts are ready to flip. If you rely solely on visual cues, you might miss the perfect moment. Trust that nose; it’s the unsung hero of holiday baking.
The 5‑Minute Rest That Changes Everything
After frying, let the donuts rest for exactly five minutes before glazing. This brief pause allows the interior steam to settle, preventing the glaze from melting into the donut. Skipping this step results in a glaze that slides off like a wet snowball. I once glazed hot donuts and ended up with a soggy mess—lesson learned.
Glaze Consistency Cheat
If your glaze thickens too quickly, whisk in a teaspoon of warm water at a time until you reach a silky pour. Conversely, if it stays runny, add powdered sugar a tablespoon at a time. This incremental approach gives you control, ensuring the glaze coats without dripping.
The Sprinkles Stick Trick
Sprinkles cling best when the glaze is still tacky but not fully set. After dipping, give the donut a gentle shake over the bowl to let excess glaze fall away, then immediately roll it in the sprinkles. This prevents clumps and creates an even, festive coverage. A friend once tried sprinkling after the glaze hardened and ended up with a patchy look—don’t be that person.
Creative Twists and Variations
This recipe is a playground. Here are some of my favorite ways to switch things up:
Candy Cane Crunch
Swap the red heart sprinkles for crushed peppermint candy and add a dash of peppermint extract to the glaze. The result is a minty‑fresh twist that screams winter wonderland, perfect for a post‑dinner treat.
White Chocolate Snow
Replace the cocoa powder with white chocolate chips melted into the batter, and use a vanilla glaze dusted with powdered sugar. The donuts become a snowy white delight, ideal for a “white Christmas” theme.
Spiced Holiday
Add a teaspoon of ground cinnamon, a pinch of nutmeg, and a dash of cloves to the dry mix. Top with orange zest sprinkles for a warm, aromatic flavor that pairs beautifully with mulled wine.
Nutty Delight
Fold in chopped toasted pecans or walnuts into the batter for a crunchy surprise. Finish with a caramel drizzle instead of the green glaze for a sophisticated, nut‑laden bite.
Vegan Grinch
Swap the eggs for flax eggs (2 tbsp ground flaxseed + 6 tbsp water) and use coconut milk in place of dairy milk. Use a plant‑based butter and coconut cream for the glaze. The flavor stays true, and the texture remains delightfully fluffy.
Storing and Bringing It Back to Life
Fridge Storage
Place cooled donuts in an airtight container and store them in the refrigerator for up to 4 days. The glaze may firm up; simply let them sit at room temperature for 15 minutes before serving, or give them a quick microwave zap (10 seconds) to soften.
Freezer Friendly
Wrap each donut individually in parchment paper, then place them in a zip‑top freezer bag. They’ll keep for up to 2 months. To reheat, pop them into a pre‑heated 350°F oven for 5‑7 minutes; the glaze will revive its shine.
Best Reheating Method
Add a tiny splash of milk (about a teaspoon) to the donut before microwaving for 15‑20 seconds. The steam generated brings back that fresh‑out‑of‑the‑oven softness, while the glaze remains glossy. Avoid the microwave for longer than 30 seconds, or the donut will become rubbery.