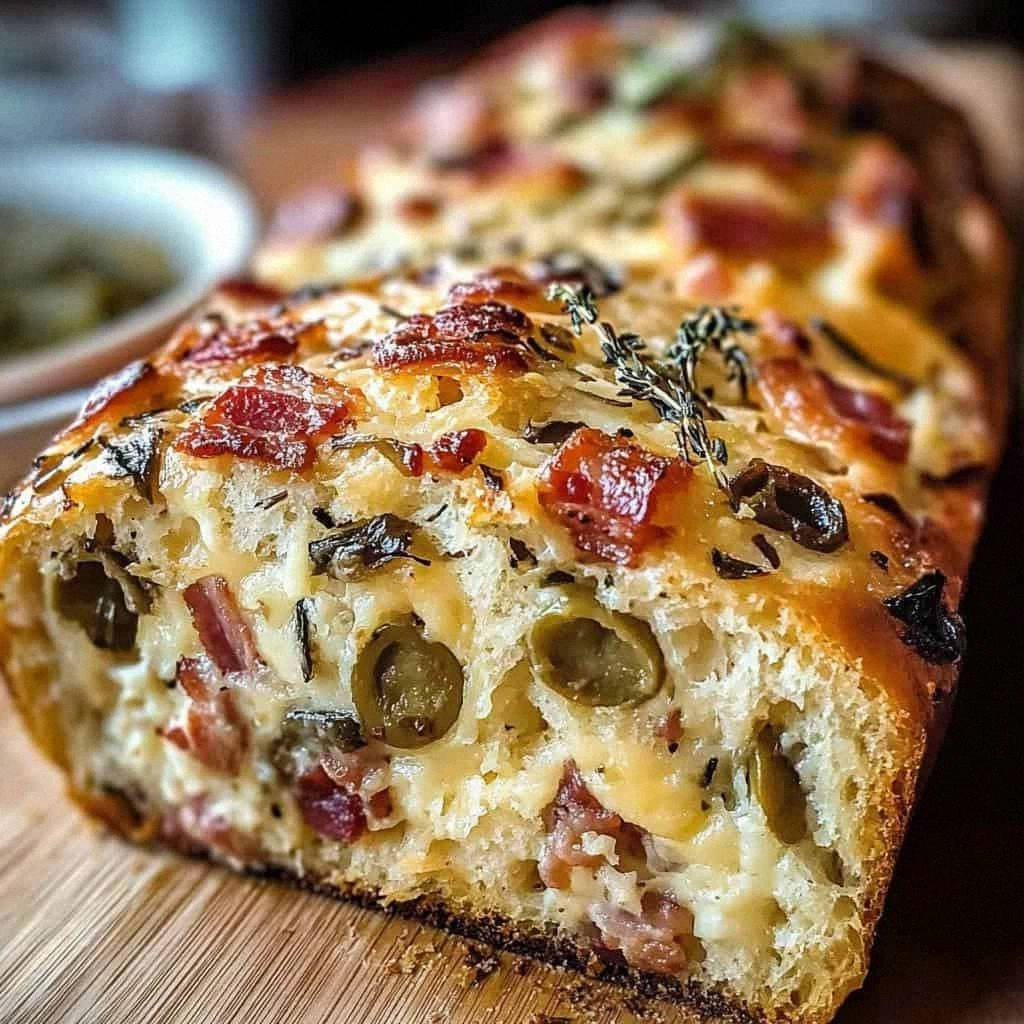
I still remember the day I ruined dinner. Not just any dinner — the kind of dinner where you're trying to impress your partner's parents, the kitchen smells like a dream, and then suddenly the smoke alarm is shrieking like it's auditioning for a horror movie. I had attempted some fancy olive tapenade focaccia that turned into a brick so dense it could have been used as a paperweight. But from that culinary disaster came this magnificent beast: Olive Bacon Cheese Bread that actually works. Picture this: you're standing in your kitchen, flour dusting your countertops like fresh snow, the smell of sizzling bacon weaving through the air like a siren song, and you know you're about to create something that will make grown adults weep with joy.
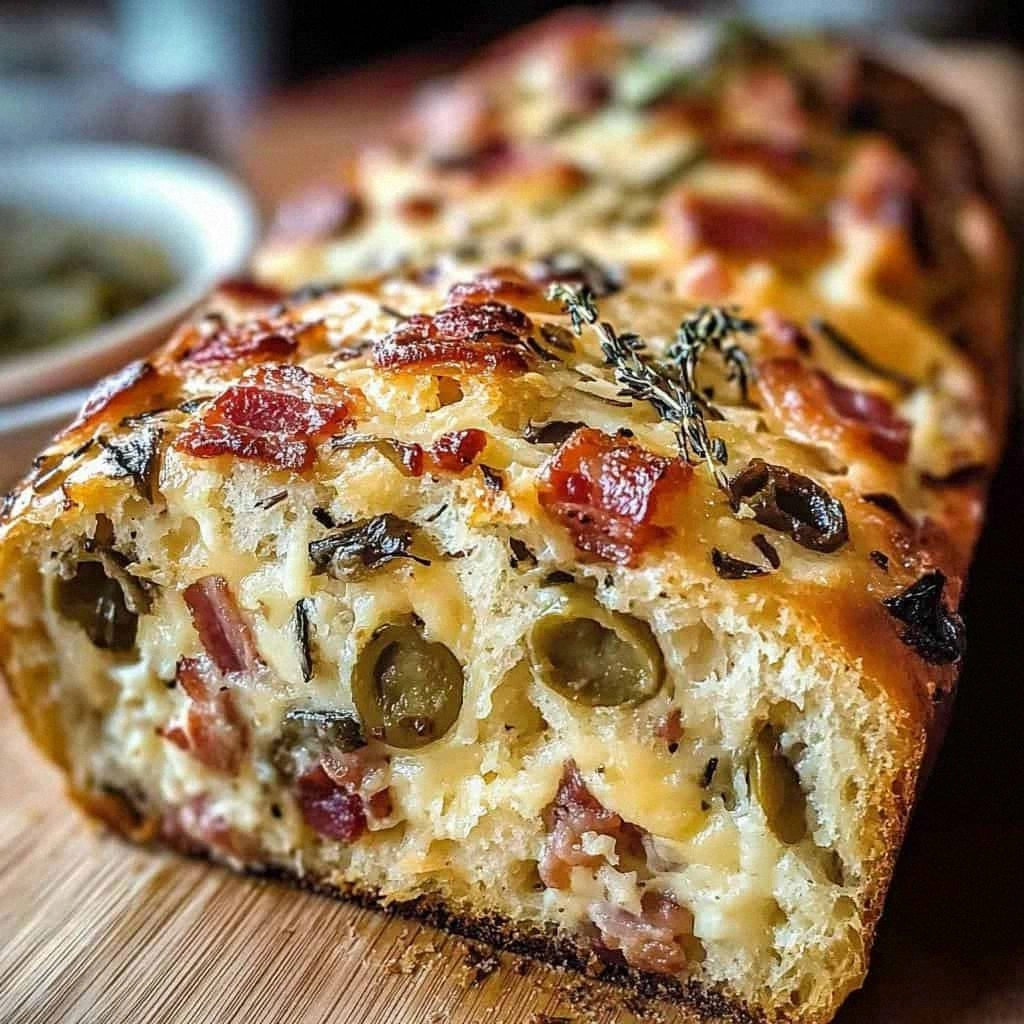
Fast forward three months of obsessive testing, five pounds of flour, and what my neighbors now call "the great cheese incident of 2023," and I've cracked the code. This isn't just another bread recipe — this is the bread recipe that will ruin all other breads for you. The crust shatters like caramelized sugar under your teeth, revealing a soft, stretchy interior studded with briny olives that pop like flavor fireworks, smoky bacon that practically melts on your tongue, and three cheeses that create the most obscene cheese pull you'll ever witness. I dare you to taste this and not go back for seconds. Actually, I dare you to make it through the first slice without immediately starting on the second.
What makes this version different? Most recipes get this completely wrong. They treat the olives like an afterthought, they don't understand the sacred relationship between bacon fat and bread dough, and they absolutely butcher the cheese situation by using one sad, pre-shredded bag of mozzarella that tastes like disappointment. This version? This is hands down the best version you'll ever make at home, and I'm prepared to fight anyone who says otherwise. Stay with me here — this is worth it.
The secret weapon isn't some exotic ingredient you need to special order from a monastery in the Alps. It's actually a technique I learned from my Italian grandmother's neighbor's cousin (don't ask), combined with understanding how to coax maximum flavor from every single component. Picture yourself pulling this out of the oven, the whole kitchen smelling like a Mediterranean bistro had a beautiful accident with a smokehouse, your family gathering around like you're presenting the holy grail. Let me walk you through every single step — by the end, you'll wonder how you ever made it any other way.
What Makes This Version Stand Out
- Flavor Bomb: We're not playing it safe here. This bread hits you with a one-two punch of umami from the bacon, followed by the bright, briny notes of both green and Kalamata olives. It's like a flavor party where everyone's invited and nobody wants to leave.
- Texture Paradise: The crust develops these incredible blistery pockets that crackle when you bite into them, while the interior stays so soft and stretchy it practically breathes. Most recipes give you either tough crust or gummy interior — we nail both.
- Cheese Strategy: Three cheeses isn't showing off, it's basic math. Gruyère melts like a dream and brings nutty sophistication, sharp cheddar provides that tangy backbone, and Parmesan creates those crispy, lacy edges that taste like cheese candy.
- Make-Ahead Magic: I'll be honest — I ate half the batch before anyone else got to try it. But the other half? It actually gets better overnight, making this the perfect party bread that you can prep ahead without anyone knowing you're not a culinary wizard.
- No-Fail Technique: If you've ever struggled with bread that comes out like a doorstop or tastes like the inside of a cardboard box, you're not alone — and I've got the fix. This method is practically bulletproof.
- Crowd Reaction: I've seen people who claim they "don't really like olives" demolish an entire loaf. I've seen vegetarians break their diets for "just one bite" of the bacon-studded version. This bread has powers.
Alright, let's break down exactly what goes into this masterpiece...
Inside the Ingredient List
The Flavor Base
The foundation of any great bread starts with flour, but not all flour is created equal. For this recipe, we're using all-purpose flour because it strikes the perfect balance between structure and tenderness — bread flour would make this too chewy, while cake flour would turn it into a sad, floppy mess. The instant dry yeast is your best friend here because it doesn't need proofing and plays nicely with the olive oil and salt. Speaking of salt, we're using exactly one and a half teaspoons — enough to enhance all the other flavors without making your bread taste like a salt lick. The lukewarm water needs to be just right: too hot and you'll murder your yeast, too cold and your dough will take forever to rise. Think baby bottle temperature, and you'll nail it every time.
Olive oil does double duty here, adding richness to the dough while helping create that gorgeous golden crust. Don't cheap out and use vegetable oil — this is olive bread, people, commit to the theme. The water quality actually matters too; if your tap water tastes like a swimming pool, use filtered water. Your yeast is alive, and like any living thing, it deserves clean water and a comfortable temperature. Trust me, happy yeast makes happy bread, and happy bread makes very happy humans.
The Texture Crew
Here's where most recipes go wrong — they treat the mix-ins like they're just along for the ride. Not us. We're strategically using six ounces of bacon, cooked until it's just crispy enough to crumble but not so crisp it turns into bacon dust when you bite into the bread. The fat that renders out? We're saving that liquid gold and using it to grease the pan, because every drop of bacon flavor counts. The olives need to be roughly chopped, not minced into oblivion. You want those satisfying pops of briny goodness, not olive confetti that disappears into the bread matrix.
When it comes to the cheese situation, we're building layers like a flavor lasagna. Gruyère melts into these gorgeous stretchy pockets that taste like what would happen if Swiss cheese went to finishing school. Sharp cheddar provides that tangy backbone that cuts through the richness of the bacon. And Parmesan? Parmesan is the overachiever that creates these lacy, crispy edges where the cheese touches the pan — they're like cheese crackers that form naturally, and they're absolutely addictive. The key is shredding your own cheese; pre-shredded stuff is coated with cellulose that prevents it from melting properly.
The Unexpected Star
Fresh rosemary might seem like an afterthought, but it's actually the ingredient that ties this whole operation together. The piney, resinous notes of rosemary play beautifully with the smoky bacon and briny olives, creating this Mediterranean-meets-breakfast flavor profile that shouldn't work but absolutely does. Mince it finely so it distributes evenly — nobody wants to bite into a rosemary tree. Black pepper adds just enough warmth to make the flavors sing without announcing its presence. It's like the bass player in a band: you don't always notice it's there, but you'd miss it if it disappeared.
Garlic in bread can be tricky — too much and you're breathing fire for days, too little and why bother? We're using just two cloves, minced so fine it practically melts into the dough. It adds this subtle depth that makes people ask "what's that amazing flavor?" without being able to put their finger on it. That's the mark of a well-balanced bread: everyone tastes something different, but nobody can quite figure out the magic trick.
The Final Flourish
The egg wash is what separates amateur bread from professional-level gorgeousness. One large egg beaten with a tablespoon of milk creates this shiny, golden-brown crust that looks like it came from a French bakery. Don't skip this step — it's the difference between bread that looks homemade and bread that looks like you could sell it for ten bucks a loaf at a farmer's market. The second olive oil addition gets brushed on right after baking, soaking into the hot crust and adding this incredible sheen and flavor that makes the bread practically glow.
Everything's prepped? Good. Let's get into the real action...
The Method — Step by Step
- In a large bowl, whisk together the flour, instant yeast, and salt like you're conducting a tiny flour orchestra. Make a well in the center and pour in the lukewarm water and olive oil. Mix with a wooden spoon until a shaggy dough forms — it should look like a hot mess at this stage, and that's exactly right. Cover the bowl with plastic wrap and let it sit for 20 minutes; this autolyse period lets the flour fully hydrate and starts developing gluten without any effort on your part. This next part? Pure magic.
- Turn the dough out onto a lightly floured surface and knead for 8-10 minutes. Here's the thing about kneading: most people under-knead because their arms get tired. Push through the burn, because properly kneaded dough should be smooth and elastic, passing the windowpane test (stretch a piece thin enough to see light through without tearing). If you're sweating, you're doing it right. The dough will transform from a lumpy disaster to something that feels like a baby's cheek — smooth, soft, and slightly bouncy.
- Place the dough in an oiled bowl, turning once to coat the top. Cover with plastic wrap and let rise in a warm spot until doubled in size, about 1 to 1.5 hours. Don't rush this step — good things come to those who wait, and rushing the rise is like trying to speed-date your way to true love. The dough is ready when you poke it with your finger and the indentation stays but doesn't collapse. That sizzle when the dough hits the oiled bowl? Absolute perfection.
- While the dough rises, cook your bacon in a skillet over medium heat until crispy but not burnt. Remove to paper towels and crumble when cool enough to handle. Reserve 2 tablespoons of the bacon fat — this liquid gold is going to make your kitchen smell like heaven and your bread taste like it was blessed by the bacon gods themselves. Rough-chop your olives if you haven't already, making sure to remove any sneaky pits that might have escaped the pitting process.
- Turn the risen dough out onto your counter and gently deflate it — think of it as burping your dough baby. Pat it into a rough rectangle and sprinkle evenly with the bacon, olives, cheeses, garlic, rosemary, and black pepper. This is the moment of truth where you transform plain bread dough into something that will make people propose marriage. Roll the dough up jelly-roll style, tucking in the ends as you go, then fold it over itself a few times to distribute the mix-ins evenly.
- Knead the dough gently for just 30 seconds to incorporate all the goodies. Don't overdo it here — you're not trying to develop more gluten, just evenly distribute the mix-ins. The dough will look like it's been partying in Vegas with all those colorful additions, and that's exactly what you want. Form it into a round or oval loaf, whatever fits your aesthetic. Place it on a parchment-lined baking sheet that's been greased with the reserved bacon fat.
- Cover the shaped loaf loosely with plastic wrap and let rise again for 45 minutes to 1 hour, until puffy but not quite doubled. This is where most people mess up — they either under-proof (bread stays dense) or over-proof (bread collapses). The dough should spring back slowly when you poke it, like a memory foam pillow. Don't walk away from the kitchen here; keep an eye on it because over-proofed dough is sad dough.
- Preheat your oven to 425°F (220°C) about 30 minutes before baking. Place a metal pan on the bottom rack — we're going to create steam for that professional crust. Beat together the egg and milk for the egg wash, and brush it generously over the risen loaf. Get into all the nooks and crannies; this is what creates that gorgeous mahogany color that makes people think you went to culinary school.
- Bake for 30-35 minutes, until the loaf sounds hollow when tapped on the bottom. The cheese might bubble out and create these crispy, lacy edges — fight anyone who tries to remove these before you're ready to serve. Halfway through baking, quickly pour a cup of hot water into the pan on the bottom rack and close the oven door immediately. This steam creates the most incredible crust that shatters like thin ice when you bite into it.
- Remove from oven and immediately brush with the remaining olive oil. Let cool on a wire rack for at least 30 minutes — I know, I know, warm bread is irresistible, but cutting into hot bread ruins the texture. The bread continues cooking from residual heat, and cutting too early results in gummy, dense slices. Use this time to clean up your kitchen and prepare yourself for the standing ovation you're about to receive.
That's it — you did it. But hold on, I've got a few more tricks that'll take this to another level...
Insider Tricks for Flawless Results
The Temperature Rule Nobody Follows
Here's the thing about bread temperature that will change your baking life forever: your ingredients should all be at room temperature except the water, which needs to be precisely lukewarm. Cold eggs from the fridge will shock your yeast into sluggish behavior, while hot water will murder it completely. Let your eggs sit on the counter for 30 minutes before starting, and if you forget (we've all been there), submerge them in warm water for 5 minutes. The difference in rise time and final texture is dramatic — we're talking about bread that rises like it's on steroids versus bread that takes forever and still looks depressed.
Your kitchen temperature matters more than you think. If it's winter and your house is freezing, your dough will rise at a glacial pace. Create a proofing box by turning your oven to 200°F for exactly 2 minutes, then turning it off. Place your covered dough inside with a small bowl of hot water — you've just created a warm, humid environment that mimics a professional proofing cabinet. In summer, find the coolest spot in your house. Dough rises faster in heat, which can lead to over-proofing and collapse. A friend tried skipping this adjustment once — let's just say it didn't end well for her dinner party timeline.
Why Your Nose Knows Best
Professional bakers don't just eyeball doneness — they smell it. When your bread is perfectly baked, your kitchen will fill with this incredible nutty, toasty aroma that's different from the raw dough smell. It's like the difference between smelling coffee beans versus brewing coffee. This happens because the Maillard reaction (that magical browning process) creates hundreds of new aromatic compounds. When you catch that first whiff of perfection, start checking for doneness. Your nose is more reliable than any timer.
The sound test is equally important. When you tap the bottom of a properly baked loaf, it should sound hollow, like knocking on a wooden door versus a pillow. This indicates that the interior is properly cooked and the crust has developed correctly. If it sounds dense or thuddy, give it another 5 minutes. The loaf should also feel significantly lighter than when it went in — moisture has evaporated, creating that perfect airy structure. These sensory checkpoints are what separate good bakers from great ones.
The 5-Minute Rest That Changes Everything
After your bread comes out of the oven, resist the urge to immediately slice into it. I know, I know — warm bread with melting butter is one of life's greatest pleasures. But here's what happens if you wait just 5 minutes: the steam redistributes throughout the loaf, the proteins finish setting, and the starches complete their final gelatinization. The result? Bread that stays fresher longer, slices cleaner without tearing, and has a more developed flavor. It's like the difference between eating a steak right off the grill versus letting it rest — patience pays massive dividends.
During this rest, brush the loaf with olive oil one more time. The hot bread will absorb this final layer of flavor, creating an almost glossy finish that looks professionally done. This also helps soften the crust slightly, making it easier to slice while still maintaining that satisfying crunch. Pro tip: use your best extra virgin olive oil here, because this is where its flavor really shines through. The heat has subsided enough that the delicate aromatics won't be destroyed, but the bread is still warm enough to absorb all that liquid gold.
Creative Twists and Variations
This recipe is a playground. Here are some of my favorite ways to switch things up:
Mediterranean Sunrise
Swap the bacon for sun-dried tomatoes packed in oil, keeping the oil for greasing the pan. Add crumbled feta instead of cheddar, and throw in some chopped artichoke hearts and fresh oregano. The result is a bread that tastes like summer in Santorini, with bright, tangy flavors that make you want to book a flight to Greece. The sun-dried tomatoes create these little pockets of intense umami that balance perfectly with the salty feta and briny olives. This version is vegetarian-friendly but still packed with enough flavor to make carnivores convert.
Spicy Southwest
Replace the bacon with chorizo, cooked and crumbled, and swap the Gruyère for pepper jack. Add a diced jalapeño and substitute cilantro for the rosemary. The chorizo releases this gorgeous red-orange oil that stains the dough sunset colors, while the pepper jack creates these spicy, melty pockets that surprise you with heat. This version pairs incredibly with chili or as the base for epic grilled cheese sandwiches. The olives provide a cooling contrast to the spice, creating this perfect balance that keeps you coming back for more.
French Onion Dream
Caramelize three large onions until they're deep golden and jammy, then fold them into the dough with the olives. Use Gruyère and a touch of Swiss for that classic French onion soup flavor profile. The caramelized onions melt into the bread, creating these sweet, savory ribbons that taste like someone captured the essence of French onion soup and turned it into carb form. Add fresh thyme instead of rosemary, and you've got a bread that tastes like it costs fifteen dollars a slice at a fancy bistro.
Everything Bagel Remix
Everything bagel seasoning isn't just for bagels anymore. Mix it into the dough along with cream cheese cubes instead of cheddar. The cream cheese creates these surprise pockets of tangy richness that melt into creamy goodness. Top the loaf with more everything seasoning before baking for that signature crunchy, seedy crust. The olives play beautifully with the garlic and onion in the seasoning, creating this breakfast-inspired bread that makes incredible French toast or the base for smoked salmon sandwiches.
Autumn Harvest
Add roasted butternut squash cubes and crispy sage leaves to the mix, using smoked gouda for the cheese component. The sweetness of the squash creates this incredible contrast with the salty olives and smoky cheese. This version screams fall comfort food and pairs beautifully with hearty soups or stews. The sage adds an earthy, aromatic note that makes your kitchen smell like you've been transported to a New England autumn festival.
Greek Goddess
Use all Kalamata olives and add chopped fresh dill and mint along with the rosemary. Replace the Gruyère with kasseri cheese and the cheddar with a mild manchego. The herbs create this incredibly fresh, almost floral note that makes the bread taste like it was blessed by Aphrodite herself. This version is incredible served warm with a drizzle of honey — the sweet-savory combination will make you understand why Greeks have been perfecting flavor combinations for thousands of years.
Storing and Bringing It Back to Life
Fridge Storage
Contrary to popular belief, bread should never go in the fridge — the cold temperature actually accelerates staling by causing the starch molecules to recrystallize faster. Instead, wrap your completely cooled bread tightly in plastic wrap, then in aluminum foil, and store at room temperature for up to 3 days. The plastic wrap prevents air from drying out the bread, while the foil protects against light and additional air exposure. If you live in a particularly humid climate, add a paper towel around the bread before wrapping to absorb excess moisture and prevent molding.
For cut bread, press plastic wrap directly against the cut surface before wrapping the whole loaf. This prevents the exposed crumb from drying out and going stale. Store the wrapped bread in a bread box or cool, dry place away from direct sunlight. If you notice the crust starting to soften (which happens as moisture redistributes), you can refresh it by placing the unwrapped bread in a 350°F oven for 5-7 minutes. This drives off excess moisture and restores that crispy crust texture.
Freezer Friendly
This bread freezes beautifully for up to 3 months, making it perfect for meal prep or unexpected guests. For best results, slice the completely cooled bread before freezing — this way you can grab exactly what you need without thawing the entire loaf. Wrap individual slices or the whole loaf in plastic wrap, then in aluminum foil, and finally place in a freezer bag. The triple wrapping prevents freezer burn and preserves that fresh-baked flavor. Label with the date and type of bread, because three months from now you won't remember if this was the regular version or the spicy Southwest variation.
To thaw, remove however many slices you need and let them sit at room temperature for 30-45 minutes, or microwave individual slices for 15-20 seconds. For a whole loaf, thaw overnight in the refrigerator still wrapped, then bring to room temperature before refreshing in a 350°F oven for 8-10 minutes. Never thaw bread on the counter unwrapped — condensation will make the crust soggy and the interior gummy. Pro tip: you can toast frozen slices directly in the toaster, adding an extra minute to the normal toasting time.
Best Reheating Method
The key to bringing day-old or frozen bread back to life is understanding that you're not just warming it — you're recreating the fresh-baked experience. For room temperature bread, sprinkle the crust lightly with water (seriously, just flick some water on it), wrap in foil, and warm in a 350°F oven for 10-12 minutes. The water creates steam that rehydrates the crumb without making it soggy, while the foil traps moisture and prevents over-browning. Remove the foil for the last 2 minutes if you want to crisp up the crust.
For individual slices, the toaster is your best friend, but add a twist: wrap the slice in a damp paper towel and microwave for 10 seconds before toasting. This creates a steam treatment that rehydrates the crumb, then the toaster crisps up the crust. The result is bread that tastes almost as good as fresh-baked. For the ultimate revival, after toasting, brush with a tiny bit of olive oil and sprinkle with kosher salt. It's like giving your bread a spa day followed by a makeover — it comes out looking and tasting better than ever.