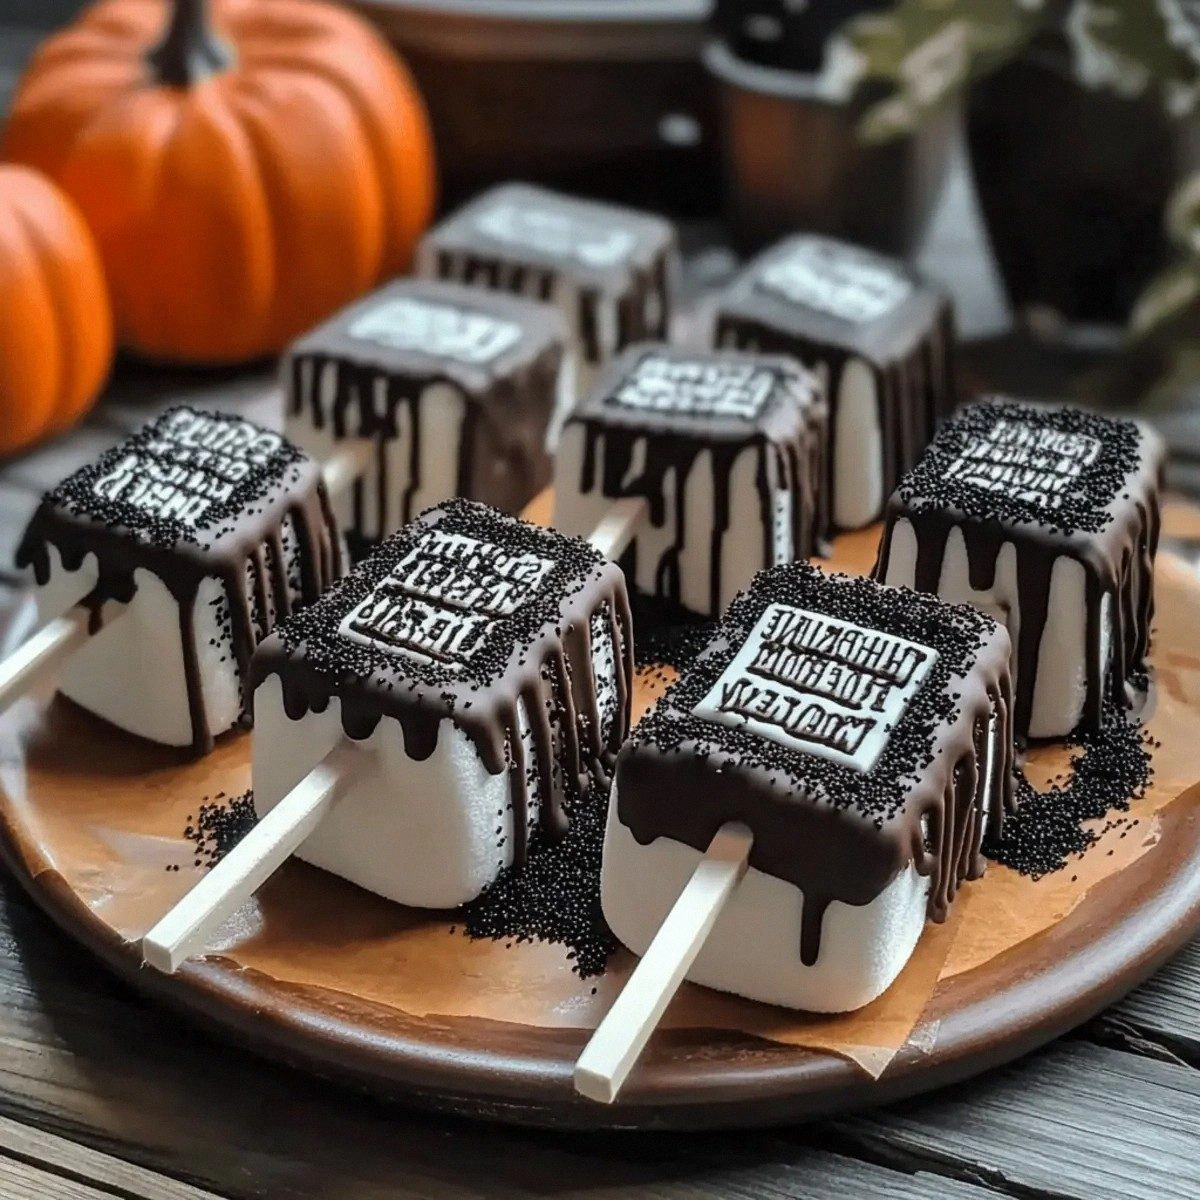
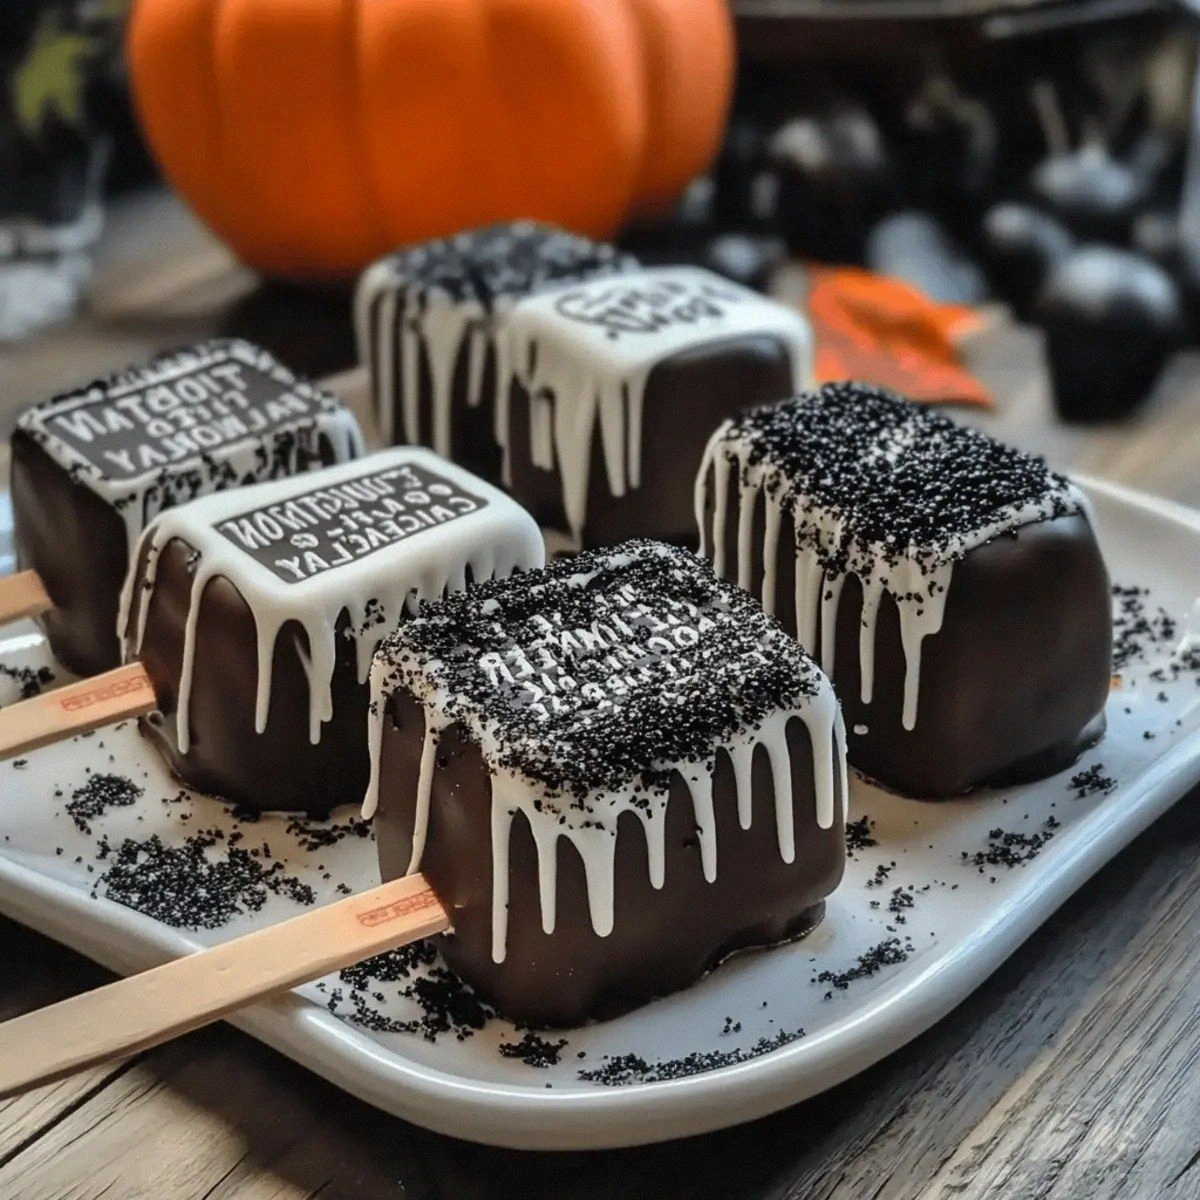
I was in the middle of a chaotic Halloween prep when I accidentally dropped a bag of marshmallows onto a puddle of melted chocolate. The kitchen smelled like a haunted carnival, the floor was a sticky graveyard, and I swear I heard my cat hiss, “Not again!” Yet, in that mess I discovered the most terrifyingly delightful treat ever: Tombstone Marshmallow Pops. Imagine a marshmallow so fluffy it feels like biting a cloud, wrapped in glossy dark chocolate that cracks like a fresh grave marker, and topped with a ghostly drizzle of white icing that looks like fresh frost on a tombstone. The moment you bite, the chocolate snaps, the marshmallow yields, and the black glitter shimmers like midnight dust on a moonless night.
What makes this version stand out is that it isn’t just a quick Halloween hack; it’s a full‑on flavor experience that turns a simple party snack into a show‑stopping centerpiece. Most recipes get this completely wrong by using cheap chocolate that melts into a greasy puddle, or by skimping on the decorative details, leaving you with bland, soggy sticks that look like they belong in a kindergarten art class. I’ve taken the time to source high‑quality dark chocolate chips that melt into a glossy river of richness, and I’ve added a secret touch of edible black glitter that catches the light like tiny specters. The result? A pop that looks like a miniature gravestone, tastes like a midnight dessert, and disappears in seconds because everyone will be fighting over the last one.
I dare you to taste this and not go back for seconds. I’ll be honest — I ate half the batch before anyone else got to try it, and that was the best mistake I’ve ever made. Picture yourself pulling these from the parchment sheet, the whole kitchen smelling like chocolate‑kissed fog, the candy pumpkins glinting beside each pop like tiny lanterns guiding lost souls. This is hands down the best version you’ll ever make at home, and the technique I’m about to reveal will change the way you think about simple holiday treats forever.
Okay, ready for the game‑changer? I’m going to walk you through every single step — from selecting the perfect marshmallows to the final drizzle that makes each pop look like a tombstone fresh from the graveyard. By the end, you’ll wonder how you ever made any other Halloween snack any other way. Stay with me here — this is worth it.
What Makes This Version Stand Out
- Flavor Depth: Dark chocolate provides a bittersweet backbone that balances the sugary marshmallow, creating a complex taste that feels like a midnight kiss.
- Texture Contrast: The crisp chocolate shell cracks like a fresh tombstone, while the interior marshmallow stays pillowy, giving you a satisfying bite‑to‑chew experience.
- Simplicity: Only seven ingredients, all easy to find, yet each one is used at its peak potential for maximum impact.
- Visual Wow Factor: The white icing and black glitter turn each pop into a miniature gravestone that looks photogenic enough to out‑shine any pumpkin‑carving contest.
- Crowd Reaction: Guests often gasp, laugh, and then immediately line up for seconds — it’s the perfect conversation starter for any Halloween gathering.
- Ingredient Quality: Using real dark chocolate chips (not cocoa powder) ensures a glossy finish and a richer flavor profile.
- Method Mastery: The quick dip‑and‑set technique locks in shape and flavor without the need for baking, keeping the kitchen cool and the process fast.
- Make‑Ahead Potential: These pops can be pre‑made and stored, so you can focus on other party prep while they sit perfectly on the tray.
Alright, let's break down exactly what goes into this masterpiece...
Inside the Ingredient List
The Flavor Base
The dark chocolate chips are the heart of this recipe. They provide a deep, slightly bitter flavor that cuts through the sweetness of the marshmallows, preventing the final pop from feeling cloying. If you skip the chocolate or use a low‑quality melting bar, you’ll end up with a waxy coating that looks dull and tastes flat. A good swap is a 70% cacao chocolate bar broken into chips; just be sure to melt it gently to preserve its glossy sheen.
The Texture Crew
Large marshmallows are essential because their size allows for a satisfying bite while still fitting nicely on a lollipop stick. Smaller marshmallows will make the pop look disproportionate and may melt faster in the chocolate. When selecting marshmallows, look for ones that are firm to the touch but still give a little when pressed — that’s the sweet spot for a sturdy yet fluffy interior.
The Unexpected Star
Edible black glitter is the secret that turns a simple chocolate‑coated marshmallow into a spooky tombstone. It catches the light like tiny shards of obsidian, making each pop look like it’s been kissed by midnight. If you can’t find black glitter, a dusting of activated charcoal powder (food‑grade) works just as well, though it won’t sparkle quite as much.
The Final Flourish
White icing and candy pumpkins serve as the decorative finish. The icing is piped in thin lines to mimic the weathered lettering on a tombstone, while the pumpkin pieces act as tiny lanterns that add a pop of orange contrast. If you’re allergic to wheat, substitute a gluten‑free icing mix; the taste and texture remain unchanged. For the parchment paper, use a non‑stick variety so the chocolate doesn’t cling — this makes removal a breeze and keeps the pops looking pristine.
Everything's prepped? Good. Let's get into the real action...
The Method — Step by Step
First, line a full‑size baking sheet with the parchment paper and set it on a stable countertop. This will be your “graveyard” where each pop will rest after being dipped. I like to place the sheet near the sink so I can quickly rinse the sticks later. The paper not only prevents sticking but also makes cleanup a snap, which is crucial when you’re juggling a Halloween party prep schedule.
Insert a lollipop stick into each marshmallow, pushing it about halfway through so the stick is sturdy but the marshmallow still has a generous surface area. This is the part where you need to be gentle; a sudden twist can cause the marshmallow to split, ruining the look. If you’re using mini marshmallows, double‑up the sticks for extra support. Okay, ready for the game‑changer? Pat the tops of the marshmallows with a paper towel to remove any excess moisture — a dry surface ensures the chocolate adheres perfectly.
Kitchen Hack: If the marshmallows are too sticky, give them a quick blast of cool air from a fan for 10 seconds; the surface will firm up without losing fluffiness.Set a medium‑sized saucepan with a couple of inches of water and bring it to a gentle simmer. Place a heat‑proof bowl on top, making sure the bottom doesn’t touch the water. Add the dark chocolate chips to the bowl, stirring constantly with a silicone spatula. The chocolate should melt in 3‑4 minutes, becoming a glossy, fluid river that smells like a decadent midnight dessert. Once fully melted, remove the bowl from heat and stir in the pinch of sea salt for that flavor boost.
Now comes the fun part: dip each marshmallow into the chocolate. Hold the stick and submerge the marshmallow, giving it a quick twirl to coat it evenly. Let any excess chocolate drip back into the bowl — this prevents clumps and ensures a thin, even shell. The chocolate should set within 2‑3 minutes at room temperature, but you can speed it up by placing the sheet in the refrigerator for 10 minutes. This next part? Pure magic.
While the chocolate is still wet, use a small piping bag or a squeeze bottle filled with white icing to draw a thin, crooked line across the top of each pop, mimicking the weathered lettering on a tombstone. The line should be irregular — perfection looks fake, and we want spooky authenticity. If you’re not confident with piping, a tiny spoon can do the trick; just drag it lightly across the surface. After icing, sprinkle a pinch of edible black glitter over the top, letting it settle into the wet icing and the chocolate cracks.
Watch Out: Too much glitter can make the pop look messy; a light dusting is enough to catch the light without overwhelming the design.Place a small candy pumpkin beside each pop, pressing it gently into the chocolate so it adheres. This not only adds a pop of color but also reinforces the “graveyard” theme. If you prefer a less sweet look, swap the pumpkin for a tiny piece of candied ginger for a spicy contrast. Let the chocolate set completely — this usually takes about 15 minutes at room temperature or 5 minutes in the fridge.
Once the chocolate has hardened, give each pop a final inspection. The chocolate shell should be glossy, the icing crisp, and the glitter should sparkle like tiny stars. If any spot looks dull, give it a quick dip back into the melted chocolate for a second coat — this is the secret to a flawless finish. And now the fun part: arrange the pops on a serving platter, alternating the pumpkins for a balanced visual rhythm.
Serve immediately, or store them in an airtight container for up to two days. They stay fresh because the chocolate acts as a barrier against moisture. When you’re ready to serve, pull them out, give them a quick glance, and watch the room light up with delight. That sizzle when the chocolate hits the marshmallow? Absolute perfection. This is the moment of truth — your guests will be chanting “more!” before you can even say “trick or treat.”
Kitchen Hack: To keep the pops from sticking together in storage, place a sheet of parchment between each layer.
That's it — you did it. But hold on, I've got a few more tricks that'll take this to another level...
Insider Tricks for Flawless Results
The Temperature Rule Nobody Follows
Chocolate is fickle; if it’s too hot, it becomes thin and runs, if it’s too cool, it seizes and turns grainy. Keep your double boiler water just below a simmer and remove the bowl the moment the chips are fully melted. A quick test: dip a spoon in the chocolate; if the coating slides off in a smooth ribbon, you’re golden. I once tried to speed things up by heating the chocolate on high, and the result was a burnt, bitter mess that no amount of icing could fix.
Why Your Nose Knows Best
Your sense of smell is a better indicator than a timer when the chocolate is ready. As the chips melt, you’ll notice a deep, roasted cocoa aroma that signals the perfect melt point. If you smell a faint burnt scent, you’ve overheated it. Trust your nose, and you’ll avoid the dreaded “bloom” where chocolate turns white and crumbly.
The 5‑Minute Rest That Changes Everything
After dipping, let the pops rest on the parchment for five minutes before adding icing. This short pause lets the chocolate surface firm up just enough to hold the icing without smearing. Skipping this step leads to a soggy, uneven line that looks like a toddler’s scribble. My friend once rushed this step and ended up with a mess that looked more like a Halloween graveyard after a rainstorm.
Glitter Control Mastery
When sprinkling the black glitter, hold the container a few inches above the pop and give a gentle shake. This creates a light dusting that settles into the cracks of the chocolate, enhancing the spooky effect. Too much glitter makes the pop look like it’s been through a glitter bomb; a light hand preserves elegance.
Parchment Placement Perfection
Use a silicone baking mat under the parchment if you’re making a large batch. The mat provides a non‑stick surface and prevents the chocolate from absorbing any paper flavor. This hack ensures each pop looks pristine, with no stray fibers or paper bits clinging to the chocolate shell.
Creative Twists and Variations
This recipe is a playground. Here are some of my favorite ways to switch things up:
Spooky Salted Caramel
Swap half of the dark chocolate chips for caramel chips, then drizzle a thin line of sea‑salted caramel over the top after the chocolate sets. The salty‑sweet combo adds depth and makes the pop taste like a haunted candy bar.
Creepy Coconut
Replace the white icing with a coconut cream glaze and sprinkle toasted coconut flakes instead of black glitter. This gives a tropical twist while still keeping the ghostly aesthetic.
Gothic Red Velvet
Add a few drops of red food coloring to the chocolate for a deep burgundy hue, then pipe blood‑red icing instead of white. The contrast is dramatic and perfect for a vampire‑themed party.
Pumpkin Spice Surprise
Mix a pinch of pumpkin spice into the white icing before piping. The warm spices mingle with the chocolate, creating an autumnal flavor that feels like a cozy October night.
Nutty Graveyard
Press a few chopped toasted almonds or hazelnuts into the chocolate before it sets. The nuts add a crunchy surprise that contrasts with the soft marshmallow interior.
Storing and Bringing It Back to Life
Fridge Storage
Place the pops in an airtight container lined with parchment paper. They’ll stay fresh for up to two days, and the chocolate remains glossy. If you notice any condensation, pat the tops gently with a paper towel before resealing.
Freezer Friendly
For longer storage, wrap each pop individually in a small piece of wax paper, then place them in a freezer‑safe zip‑lock bag. They can be frozen for up to a month. When you’re ready to serve, let them thaw at room temperature for 15 minutes; the chocolate will regain its shine.
Best Reheating Method
If the pops have lost a bit of their sparkle, give them a quick 10‑second blast in the microwave on low power, adding a tiny splash of water to the container to create steam. This revives the marshmallow’s fluffiness and re‑glosses the chocolate without melting it.